Although these steps aren't exhaustive or intended to cover any specific issue, they are fundamental, basic, and effective in getting MainStage 2 into good working order.
MainStage 2.2 or later
Confirm requirements and versions
- Check system requirements
Make sure that you haven't overlooked any hardware aspect that's required to use MainStage 2. You can view system requirements on the Mac App Store.
- Update to the latest software version
Check the Updates button on the Mac App Store for updates and make sure that you have the most recent version of MainStage. Installing the latest update ensures that your software has the latest improvements and enhancements.
- Check compatibility and driver versions for devices not manufactured by Apple
If you're using a product not manufactured by Apple ("third-party"), check the support area on the manufacturer's website to be sure that you're using the latest version of the relevant driver or other software for your product. This might apply to an audio interface, MIDI interface, storage system, control surface, or plug-ins. For information on troubleshooting possible issues with Audio Unit plug-ins, click here.
Test using the computer's built-in audio hardware
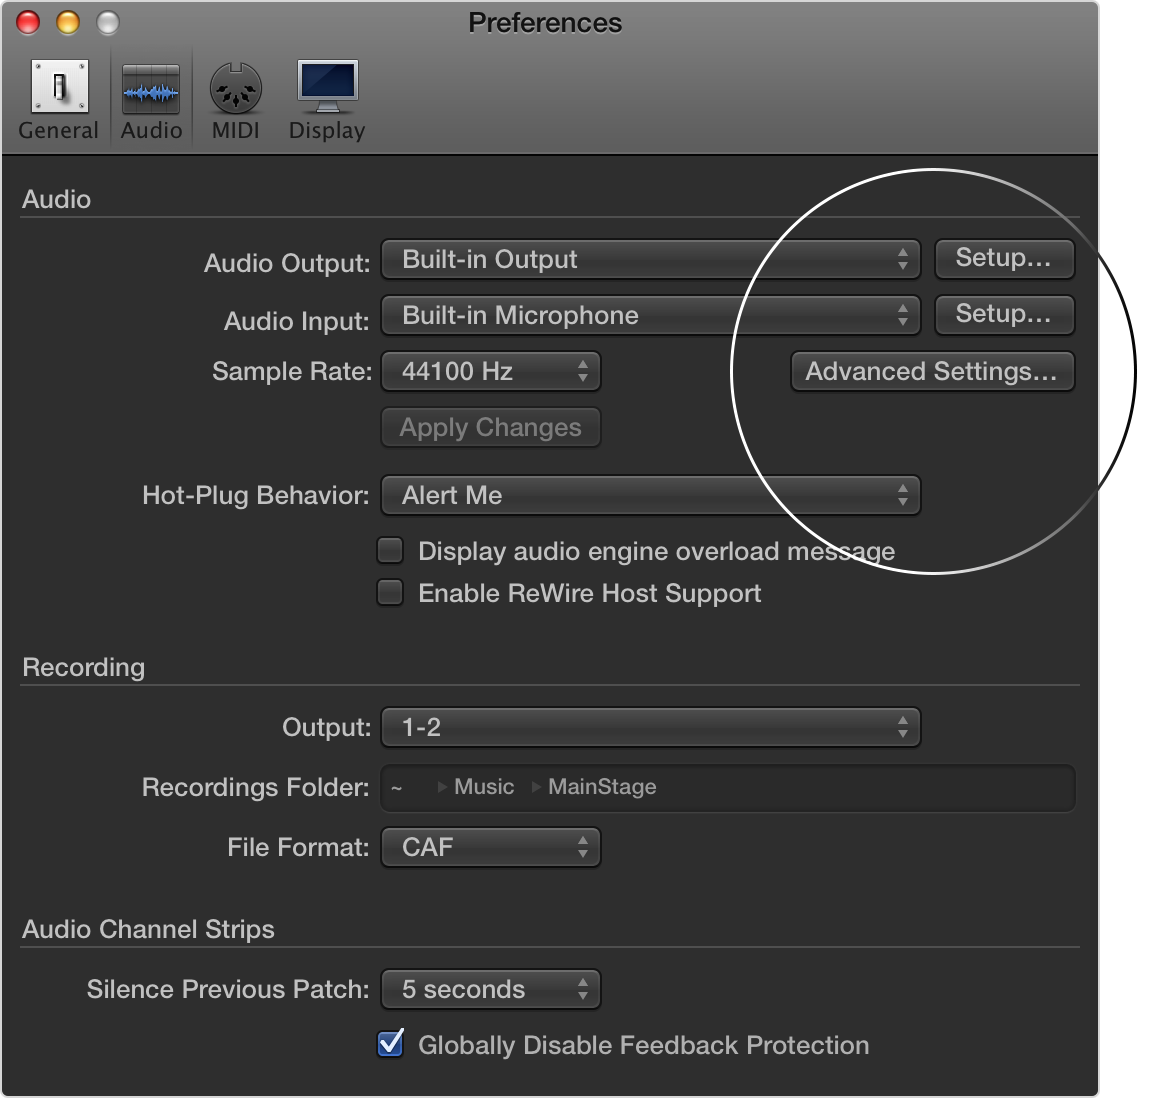
If you use external audio hardware, try setting MainStage to use the built-in audio hardware on your computer. Choose MainStage > Preferences > Audio from the menu bar and click the Audio pane. Choose Built-in Input and Built-in Output from the Audio Input and Output pop-up menus. If the issue is resolved using built-in audio, refer to the manufacturer of your audio interface.
Test a new Concert
Sometimes Concert files can become unusable causing unexpected behavior in MainStage. To create a completely fresh Concert, choose File > New and select a template in the template selector window. Test to see if the issue is resolved in the new Concert.
Delete the User Preferences
You can resolve many issues by restoring MainStage back to its original settings. This will not impact your Concert files. To reset your MainStage user preference settings to their original state, do the following:
- In the Finder, choose Go > Go to Folder from the menu.
- Type: ~/Library/Preferences
- Press the Go button.
- Remove the com.apple.mainstage.plist file from the Preferences folder.
Reinstall MainStage
Another approach you might consider is reinstalling MainStage. Follow the steps below to completely reinstall a fresh copy of MainStage.
- Delete the MainStage application from /Applications on your hard drive.
- Open the App Store application and redownload MainStage from the Purchases section on the Mac App Store.
For further information on settings or installation refer to the MainStage documentation available from the Help menu.
MainStage 2.1 or earlier
Confirm requirements and versions
- Check system requirements
Make sure that you haven't overlooked any hardware aspect that's required to use MainStage 2. You can view system requirements on the Logic Studio Technical Specifications page.
- Update to the latest software version
Choose Apple () menu > Software Update and make sure that you have the most recent updates for MainStage and other important system files. Installing the latest updates ensures that your software has the latest improvements and enhancements.
Note: Be sure MainStage is in the /Applications folder and is named MainStage before running Software Update. Check by choosing Applications from the Go menu in the Finder.
- Check compatibility and driver versions for third-party devices
If you're using a third-party audio interface, MIDI interface, storage system, control surface, or plug-in, check the support area on the manufacturer's website to be sure that you're using the latest version of the relevant driver or other software for your product. For information on troubleshooting possible issues with Audio Unit plug-ins, click here.
Test using the computer's built-in audio hardware
If you use external audio hardware, try setting MainStage to use the built-in audio hardware on your computer. Choose MainStage > Preferences > Audio from the menu bar and click the Audio pane. Choose Built-in Input and Built-in Output from the Audio Input and Output pop-up menus. If the issue is resolved using built-in audio, refer to the manufacturer of your audio interface.
Test a new Concert
Sometimes Concert files can become unusable causing unexpected behavior in MainStage. To create a completely fresh Concert choose File > New and select a template in the Template Selector window. Test to see if the issue is resolved in the new Concert.
Delete the User Preferences
You can resolve many issues by restoring MainStage back to its original settings. This will not impact your Concert files. To reset your MainStage user preference settings to their original state, do the following:
- In the Finder, choose Go > Go to Folder from the menu.
- Type: ~/Library/Preferences
- Press the Go button.
- Remove the com.apple.mainstage.plist file from the Preferences folder.
Reinstall MainStage
Another approach you might consider is reinstalling MainStage. Follow the steps below to completely reinstall a fresh copy of MainStage. Note: Make sure that you have your installation discs handy before starting this.
On Mac OS X v10.5 Leopard:
- In the Finder, choose Go > Applications. Drag the MainStage application to the Trash.
- Go to /Library/Receipts.
- In the Receipts folder, select the MainStage.pkg file.
- Choose View > As List to view the contents in a list.
- Click the Date Modified column header so you can easily see all of the receipts that were installed at the same time as Mainstage.
- Drag the MainStage.pkg receipt to the Trash, as well as any other items that have the same modification date within three minutes of the MainStage.pkg file's modification date.
- Click the Name column header to sort the list alphabetically.
- Drag any other receipts with names that begin with MainStage to the Trash.
- Insert your Logic Studio installation disc and install MainStage.
- When finished, choose Apple () > Software Update to update your software to the latest version.
On Mac OS X v10.6 Snow Leopard or OS X Lion:
- In the Finder, choose Go > Applications. Drag the MainStage application to the Trash.
- Insert your Logic Studio installation disc and install MainStage.
- When finished, choose Software Update from the Apple () menu to update your software to the latest version.
For further information on settings or installation, please refer to the MainStage documentation available on your installation discs or from the Help menu.