Randy Goodrum - There are times when upgrading is a necessary, and sometimes scary process. Jason quickly determined the perfect solutions for my particular needs. Click "here" to read more.
AP took the "overwhelming" out of the equation and in 2 days handed me what would've taken me months to figure out on my own. ~ Kerry Muzzey - Composer
Jonathan Parks - President at Alibi, "I’m so happy to work with AP. They are responsible for mastering the entire Alibi catalog and it sounds absolutely amazing." Read entire testimonial.
AP's David Knauer was asked to write an article by Tom Kenny, Editor for Mix magazine, for the Dec 2012 "Mastering" issue. It's all about mastering for TV and Film library music. more...
Need a great price on audio hardware, software or even a computer, let AP put together an equipment package or Turn-key system for you. Contact us now for a free consultation.
Danny Pelfrey - "They continue to be there for me and always provide the support I need. I recommend them every chance I get. What more could you ask for?" Read entire testimonial.
Transcenders - "There is very little margin for error when you work in the world of TV and film. We used to stress out about these things, now we just call AP." Read the entire testimonial.
Did you know Audio Perception offers custom solutions for solving your problems or addressing your special needs using FileMaker, AppleScript, web services and more?
We service many TV and film composers like Mike Post, Jeff Russo, Sonic Fuel, Transcenders, Rick Marvin, Anton Sanko, Kim Planert, Joel Goodman, and Christopher Tyng. See them all here.
Click the red help button at the bottom of this page to get support now. Describe your problem, submit a help ticket, and a technician will be notified immediately.
AP has started a new equipment consignment program to help clients turn their quality used gear into cash. We will have a searchable list available in our Store soon.
Audio Perception's Photo section has over 400 pictures of our work including studio installs, wiring, before and afters, people and more. Click here to see it.
Did you know Audio Perception Post offers full service audio postproduction for film & TV? We offer Dlg editing, ADR, sound design, Foley, custom music and 5.1 mixing. Click here to see more.
Audio Perception has solutions for all of your audio and video wiring needs. We offer complete system design, install, custom cabling fabrication, patchbays, and panels too.
Check out the AP Store for great products by Radial, Primacoustic, Sound Anchors, Bittree, BAE, Digital Audio Labs, Focusrite, Rednet, Guilford of Maine, and lots more! Click here for the store.
Search for help with your tech issues, update information, user's questions and much more in our Forum section, or use our other free tech options under the Support menu.
AP has composed over 300 songs for music libraries. Songs cover a wide variety of genres and can be heard recently in commercials from Chex Mix, Purina, and Hilton Hotels. Click to listen.
AP offers many choices for sound treatments including custom wall panels, bass traps and clouds, as well as many stock options to fit any budget and design.
Click the "Site Signup" button at the bottom of the home page to stay informed about special events, get tech updates, receive lists of used items for sale and more.
The OS X Mavericks v10.9.1 Update is recommended for all OS X Mavericks users.
Updating your system
You should back up your system before installation. To do this you can use Time Machine.
Do not interrupt the installation process once you have started to update your system.
You may experience unexpected results if you have third-party system software modifications installed, or if you've modified the operating system through other means.
Choose Apple menu () > Software Update to check for the latest Apple software using the Mac App Store, including this update.
Other software updates available for your computer may appear, which you should install. Note that an update's size may vary from computer to computer when installed using Software Update. Also, some updates must be installed prior to others.
You can also download the manual update installer. This is a useful option when you need to update multiple computers, but only want to download the update once. Standalone installers are available from Apple Support Downloads.
About the update
The OS X Mavericks v10.9.1 Update is recommended for all OS X Mavericks users. It improves the stability, compatibility, and security of your Mac. This update includes:
Improved support for Gmail in OS X Mail, and fixes for users with custom Gmail settings
Improves the reliability of Smart Mailboxes and search in Mail
Fixes an issue that prevented contact groups from working properly in Mail
Resolves an issue that prevented VoiceOver from speaking sentences that contain emoji
Fixes an issue that prevented iLife and iWork apps from updating on non-English systems
Addresses an issue that may cause multiple prompts to unlock “Local items” keychain
Addresses an issue that may cause Japanese keyboards to retain a previously used language
Includes Safari 7.0.1
Fixes an issue that could cause Safari to become unresponsive when filling out forms on fedex.com, stubhub.com, and other websites
Improves Credit Card Autofill compatibility with websites
Improves VoiceOver compatibility with facebook.com
Updates Shared Links periodically when open in the Safari Sidebar
Additional Information
For detailed information about the security content of this update, see Apple security updates.
Important: Information about products not manufactured by Apple is provided for information purposes only and does not constitute Apple’s recommendation or endorsement. Please contact the vendor for additional information.
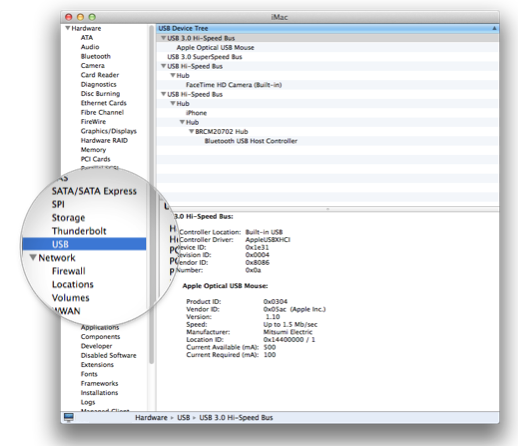
Macs that support OS X include built-in USB ports. You can use System Information or System Profiler to see how fast these ports are, and to see what's currently connected to them.
Use System Information or System Profiler to see if USB devices connected to your Mac are seen by OS X.
Press and hold the Option key on your keyboard, and click the Apple menu ().
Choose System Information or System Profiler.
In the window that appears, select USB from the left column.
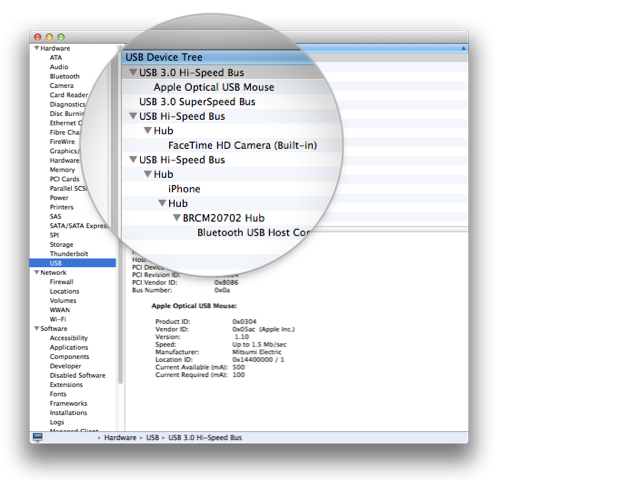
The USB Device Tree lists which devices are connected to which ports. Each device is listed underneath the port it's connected to. Some of these ports and devices may be internal. For example, the internal FaceTime HD camera on an iMac or MacBook Pro is connected internally to USB on your computer.
USB speeds
To see which kinds of built-in USB ports your Mac includes, check the specifications page for your computer on the Apple Support website.
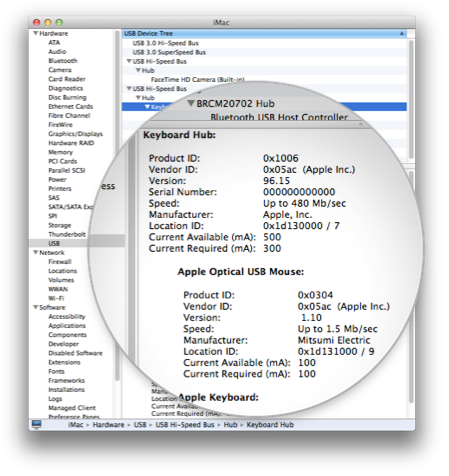
USB 3 is capable of communicating faster than USB 2, and both of these are faster than USB 1. To check the potential speed of a connected device, select it in the device tree, then look at the speed designation in the lower part of the window.
In the example above, an Apple Optical USB Mouse is capable of USB 1 speeds. It is connected to a USB hub built into a keyboard. The keyboard hub is capable of USB 2 speeds.
speed
meaning
5 Gbp/sec
The port / device is capable of USB 3 speeds
480 Mbp/sec
The port / device is capable of USB 2 speeds.
1.5 Mbp/sec
The port / device is capable of USB 1 speeds.
If a device isn't operating at the speed you expect, try connecting it directly to a USB port on your computer.
For best results, connect your fastest devices to your fastest ports. For example, connect a USB 3 drive to a USB 3 port. Connecting a fast device to a slower port can slow the device's communication with the computer. If you're using an iOS device, make sure that your iOS device is connected to a port or hub listed as 480 Mb/sec or faster. If it isn't, connect it to another USB port on the computer.
Connecting a slower USB device to a faster USB port does not make the slower device operate faster. For example, a USB 2 Keyboard still operates at USB 2 speeds when it's connected to a USB 3 port.
USB hubs
The device tree also lists any USB hubs connected to each USB bus, including keyboards and displays with built-in USB hubs. Be sure to check the speed of these hubs before connecting a device. Not all USB hubs use USB 2 or later, especially on older hardware.
Some displays and computers may show groups of their built-in ports as "hubs" in the device tree. For example, a Mac Pro may show the front collection of USB ports as one hub, and the rear collection of ports as another hub. Internally connected USB devices may also be connected to an internal USB hub on the computer's logic board, or inside a device such as an iPhone.
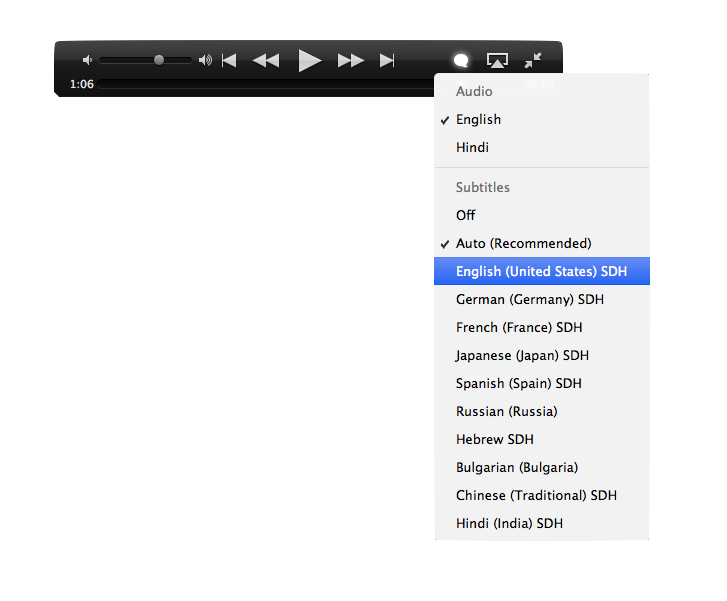
OS X Mavericks includes a number of applications and features that support subtitles and closed captioning, including iTunes 11, DVD Player, QuickTime Player, and HTML5 video viewed in Safari.
Selecting a caption
Captions and subtitles are available from the Subtitles menu if they are included in the video you are watching. To check to see which options are available for your video, click the Subtitles button . If captions or subtitles are available, this button appears in the navigation controls you see when you move your pointer over the video.
Setting captioning preferences
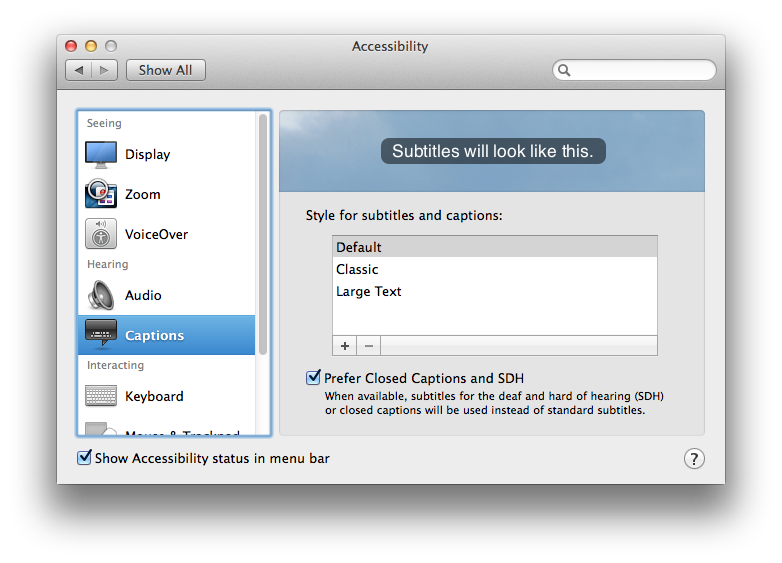
If you prefer to use captions or subtitles for the deaf and hard of hearing, open System Preferences > Accessibility > Captions and select the option for Prefer Closed Captions and SDH.
You can also customize the way captions or subtitles are displayed to suit your needs. Open System Preferences > Accessibility > Captions and select one of the predefined styles: Default, Large Text, or Classic.
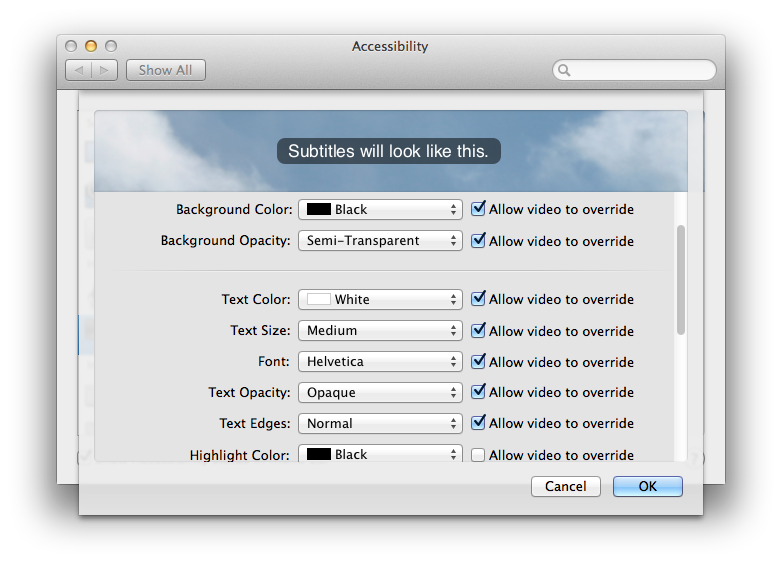
To create your own style, click the Add (+) button. You can change the font, size, and color of the text, along with the color and opacity of the background. A preview of your new style is shown at the top of the window.
When you are happy with your selections, click OK to save them. This style is then used as the default style for captions and subtitles in each application.
Additional Information
Not all videos include caption or subtitle tracks. Check the documentation for the video you are using to see if it includes these features.
Some third party websites and apps may provide custom caption controls for videos. Check the documentation, or contact the website owner or app developer for more information.
Important: Information about products not manufactured by Apple is provided for information purposes only and does not constitute Apple’s recommendation or endorsement. Please contact the vendor for additional information.
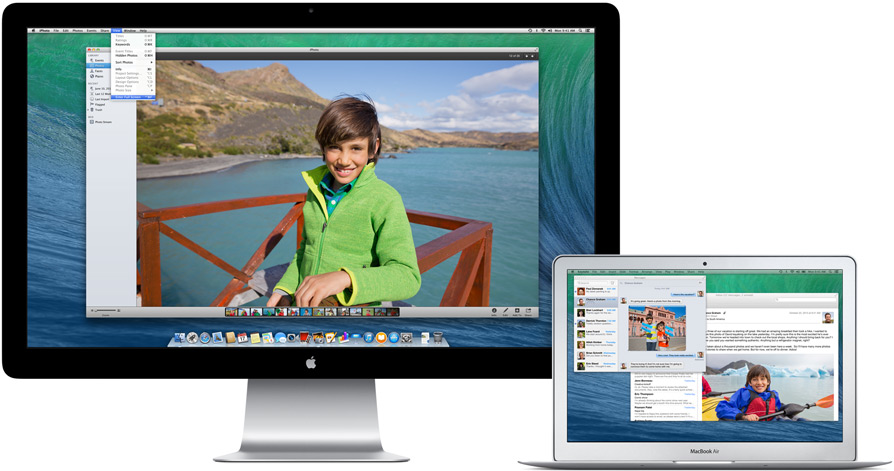
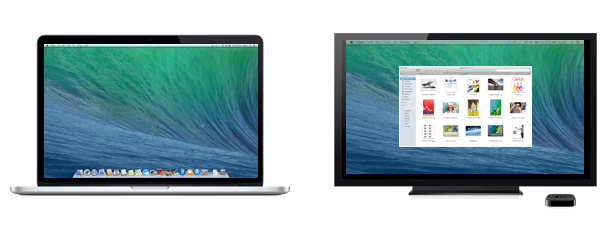
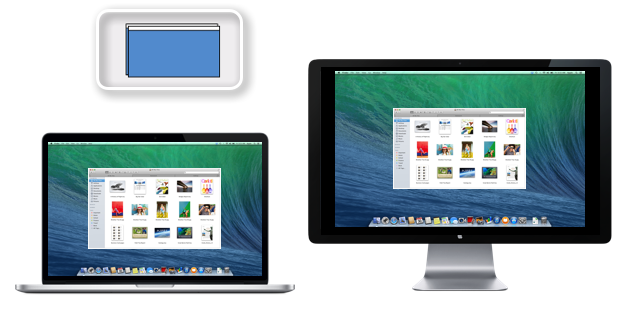
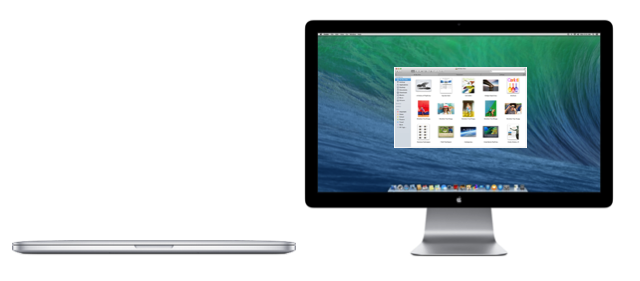
With an external display connected to your Mac, you can work the way you want. Each display has its own menu bar, and apps can run in full screen mode on each display. Want to use your HDTV as another display? You can easily do that with AirPlay and an Apple TV.
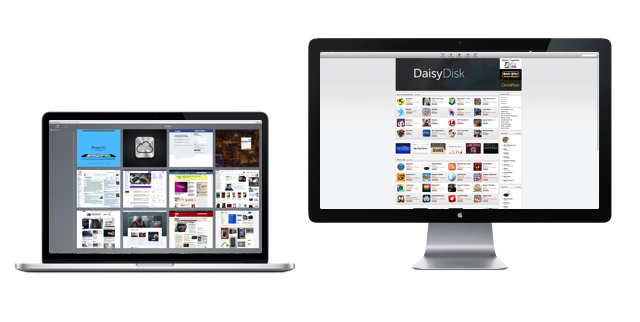
Each display connected to your Mac can have its own windows and full-screen apps. You can spread out your work however you like.
Move your pointer to the edge of the screen to move it to the next display.
Apple TV
With AirPlay and Apple TV, your HDTV works as a fully-functional display. You can move windows or entire spaces to your TV, or even mirror your computer's display.
With Mavericks, you can use full screen apps on each display independently. Open an app full screen on one display. On your other display, open an additional app as either windowed, or full screen.
To switch between full screen apps, move your pointer over to the app and click. You can also use Mission Control or press Command-Tab to change your focus.
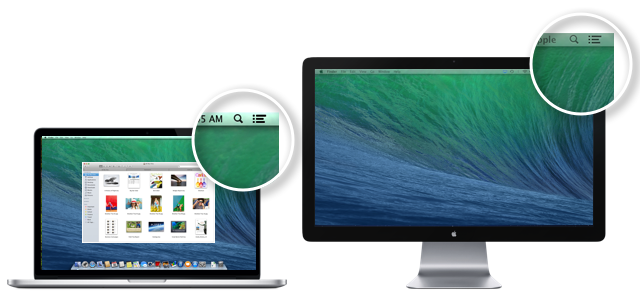
Working with the menu bar
Mavericks shows a menu bar on every screen. The menu bar on each display changes depending on which application your are working in. Click a window belonging to the app, select the app icon in the Dock, or press Command-Tab to switch between applications.
Working with the Dock
When the Dock is configured to appear at the bottom of your screen, it's available on whichever screen you’re working on. Just move your pointer to the bottom of either display. When the Dock is configured for the left or right position, it appears on the leftmost or rightmost display edge.
Tip: If you don't see your dock because it's set to hidden or there's a full screen app on the display, move your pointer to the location of the Dock. If the Dock still doesn't appear, swipe your pointer towards the Dock again to unhide it.
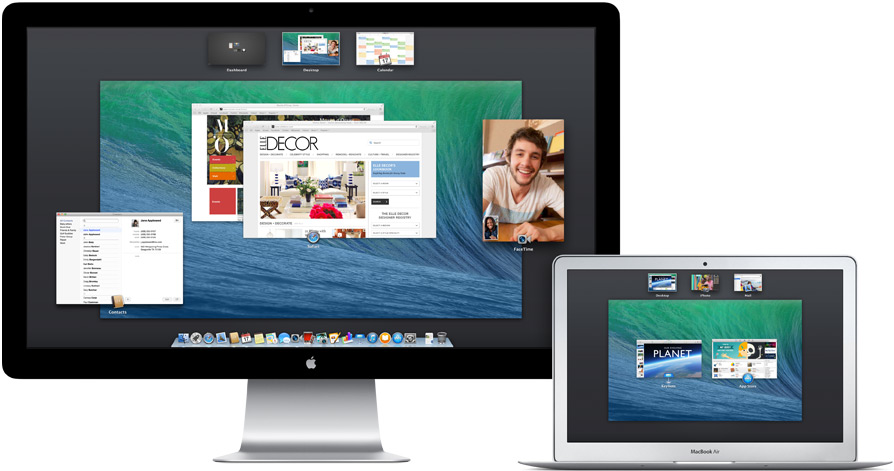
Using Mission Control to organize windows and full-screen apps
App windows are assigned to a single space. You can use Mission Control to see all of the Spaces assigned to each display and to move them. To move a Space, drag it from one display to the other.
Windows in Mavericks reside in a single space by default, so they usually don't span multiple displays. When a window is dragged between displays, it appears transluscent on one of the displays to indicate this. After you are done dragging the window, it snaps to one display.
If you need an app window to span multiple displays, deselect the option "Displays have separate Spaces" in the Mission Control pane of System Preferences.
You can also assign an app to a specific display space from the app's menu in the Dock. Windows assigned to a space always open there when the display you specified is connected.
More
To learn more about using multiple displays with OS X, select a topic from the list below.
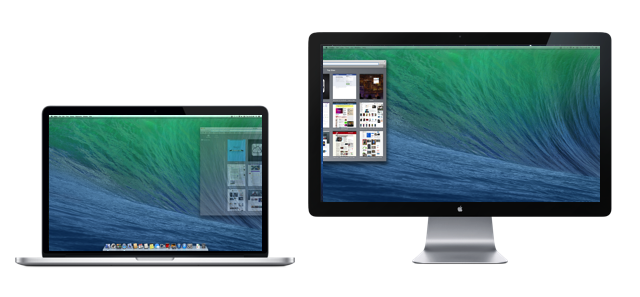
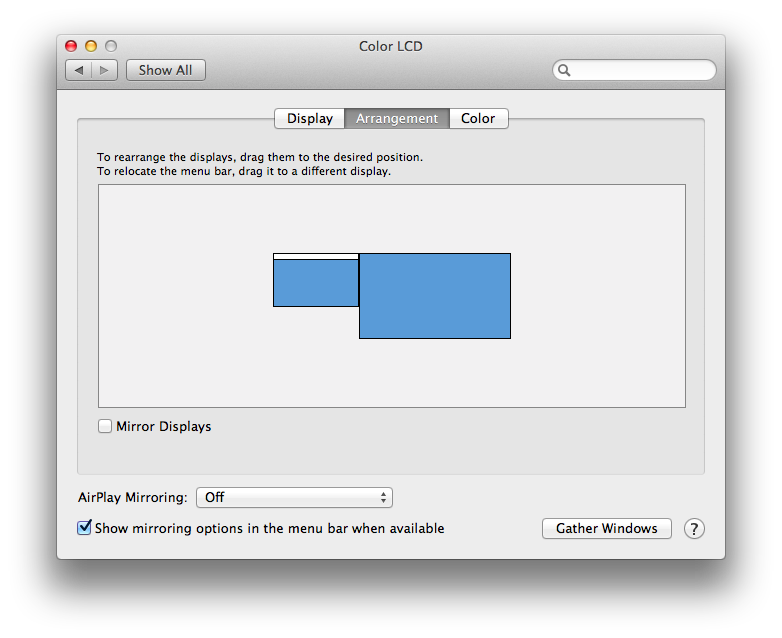
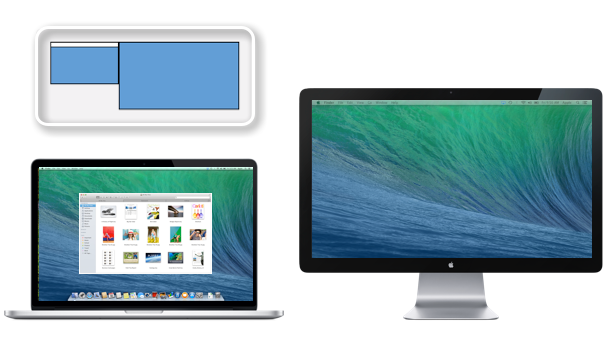
To help you navigate your pointer and windows, you can tell OS X where the displays are in physical relation to each other. When you move your pointer past the edge of one screen, it appears on the adjacent display.
The blue boxes in Displays preferences represent each display that's connected. The size of each box is relative to the current resolution of each display. In this example, the smaller box on the left is the display of a 13" MacBook Pro while the larger box on the right represents the Apple 27" Thunderbolt Display.
Drag any of the blue boxes to change the location of a display in relation to your additional screens. You can use this feature to make sure your connected displays match their real world location when navigating windows. The white bar at the top of the blue box represents the menu bar. Drag the white bar onto the blue box representing the display you want as your primary display.
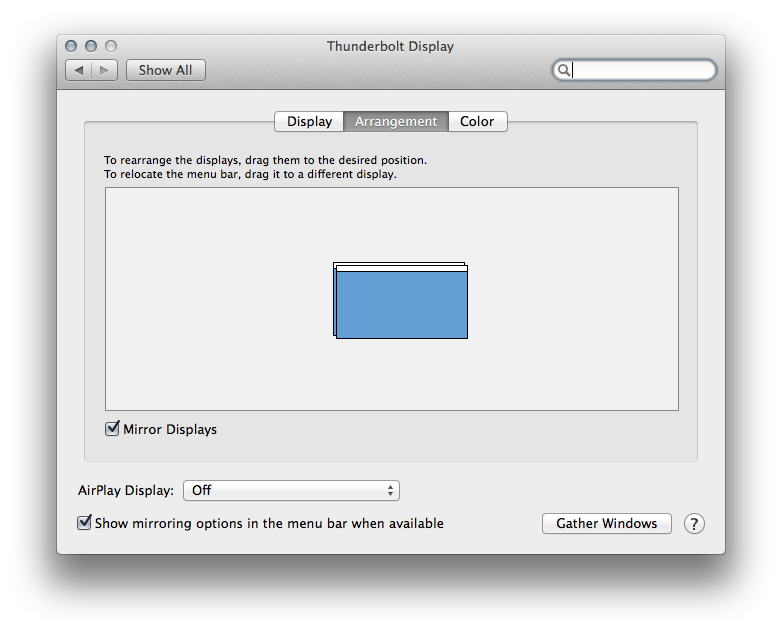
Video Mirroring
Video mirroring simultaneously shows the same image on multiple displays. Use these steps to make one display show the exact same images and windows as the other display.
Make sure your additional display is properly connected and powered on.
From the Apple () menu, choose System Preferences.
From the View menu, choose Displays.
Click the Arrangement tab.
Enable (check) "Mirror Displays" in the bottom-left corner of the Arrangement pane.
Tip: Select "Show mirroring options in the menu bar when available" to add a shortcut menu to the top of your screen. This menu () is a quick way to select an Apple TV or Television to use as a display. The menu appears when an HDTV is connected to your Mac, or when an AppleTV is available on your network.
The blue boxes represent each display that is connected. The white bar at the top of both boxes represents your menu bar. It is shown on both displays because they are showing the same information.
Note: When using video mirroring, you may see black bars on the sides of the screen image if the dimensions of both of your displays aren't the same.
Closed lid mode
You can also connect a display to a notebook Mac when its lid is closed.
To work in closed lid mode, you need to you connect your Mac to AC power, and use an external keyboard, mouse, or trackpad. If you don't connect your power adapter to the computer, it may not wake from sleep when an external display is connected and the lid is closed.
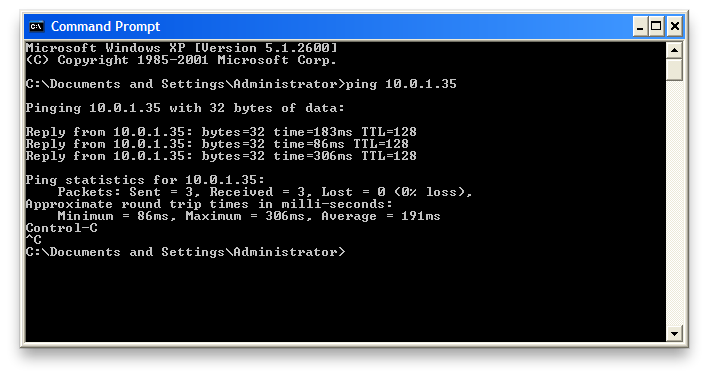
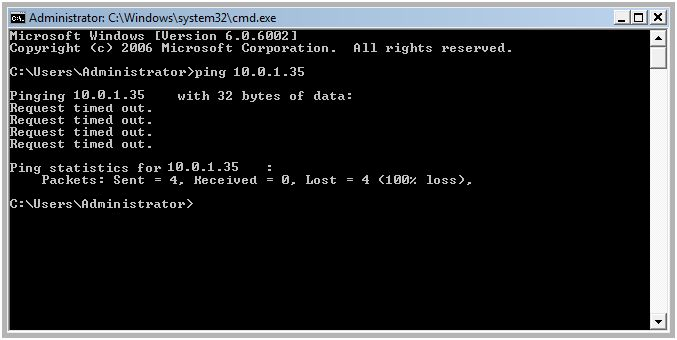
First, find and note the IP address of the computer, Apple TV, or device you are trying to connect to, such as "10.0.1.35" or "my-imac.local".
Mac: Open System Preferences and type "IPv4" into the search field in the upper-right and press Return.
Windows: Type cmd in the search bar then press the return key. Type ipconfig and press Return. The IP address of the computer you are viewing is displayed next to the line "IPv4 Address".
Apple TV: Go to the Settings menu on Apple TV, select General > Network.
For iPhone, iPad, or iPod touch connected via Wi-Fi: Tap Settings > Wi-Fi, and tap the blue arrow next to the Wi-Fi network you are connected to.
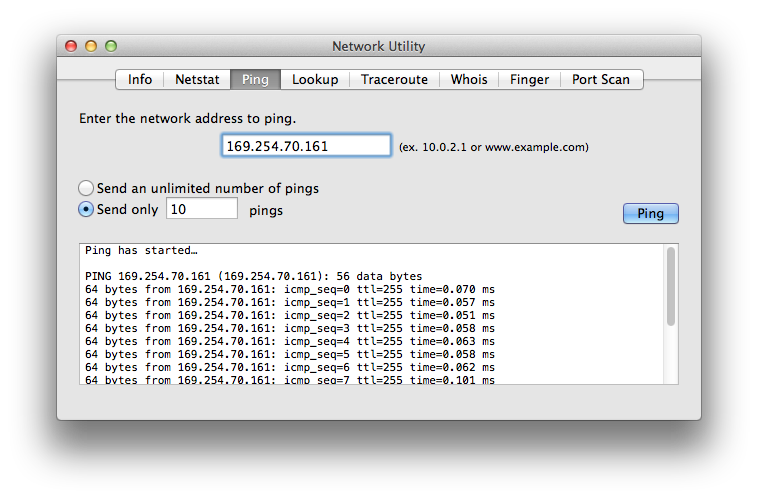
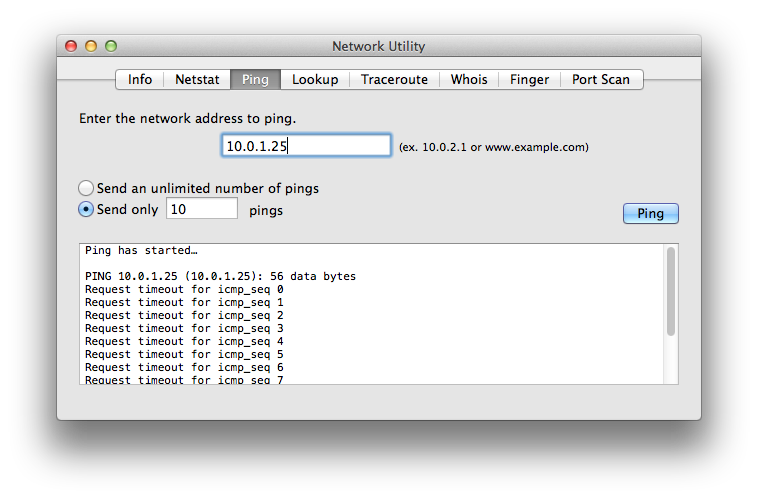
Next, use Ping to confirm that basic network communication with the target device is working. Ping tells you if an address you specify can be reached. If Ping doesn’t work when trying to connect to a device on your local network, troubleshoot a network connection issue. Note: Ping response is sometimes disabled by the recipient, or your network provider. If you are testing a connection to a device outside of your local network, try the "Test specific ports" steps of this article instead.
Find out which TCP and UDP ports Apple software uses, then follow these steps to find out if that port is accessible on your computer. For example, if you want to make sure iTunes sharing is accessible, test to see if port 3689 is reachable on your computer.
To test which ports are accessible (open) on your local computer, use the steps for your operating system below.
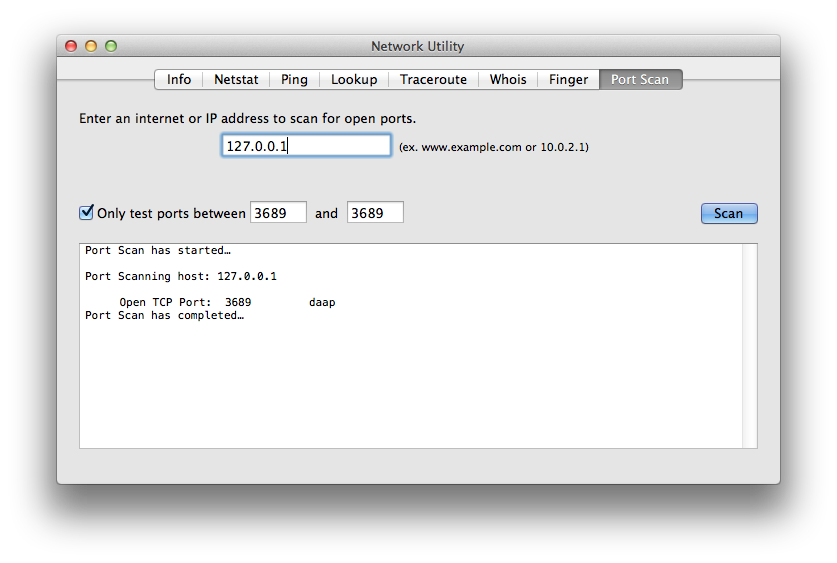
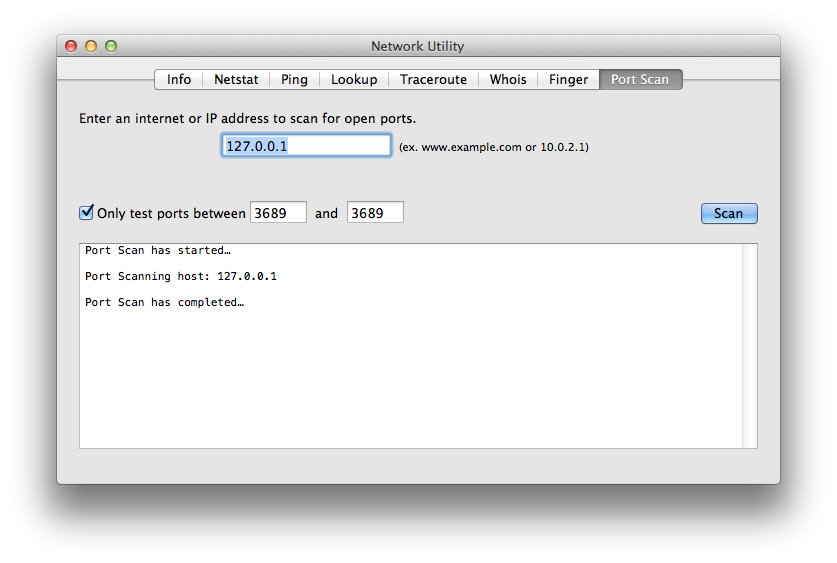
Enter the IP address 127.0.0.1 in the Port Scan field.
Select the "Only test ports" checkbox.
Enter the applicable port from this article (such as 3689 for iTunes Music Sharing or AirTunes) in both port number fields.
If the issue you are testing involves iTunes, be sure iTunes is open and running in the background. Then, click the Scan button. If you do not see "Open TCP Port:…" in the scan results, check the security software that is installed on the local computer you are testing.
Successful port tests show that the port you specified is open:
Unsuccessful port tests display no open port results for the specified range:
Checking local open ports using Windows
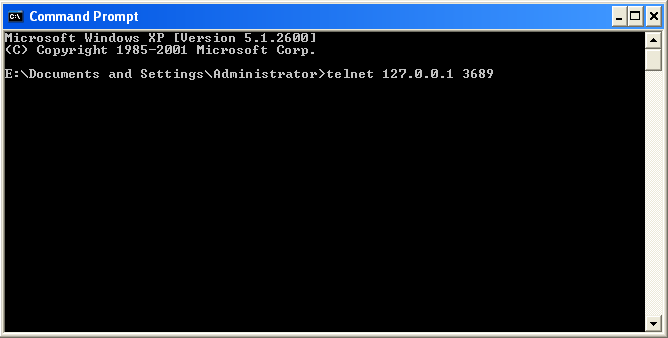
Type cmd in the search bar and press Return.
Type telnet followed by the port you want to test from this article (such as 3689 for iTunes Music Sharing or AirTunes/AirPlay).
Press Return three times in a row.
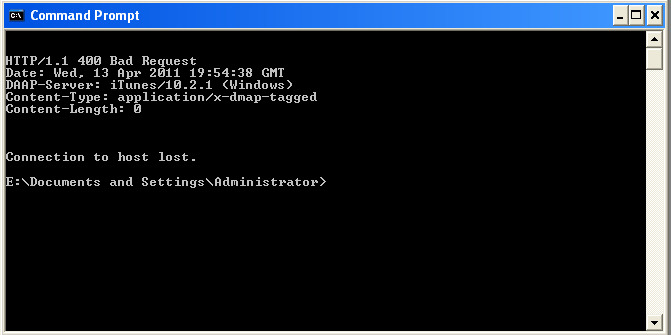
If the issue you are testing involves iTunes, be sure iTunes is open and running in the background. If you see "Command not found" when trying to open Telnet, you may need to download Telnet from Microsoft.
If the request was successful, the message "400 Bad Request" appears, similar to the following:
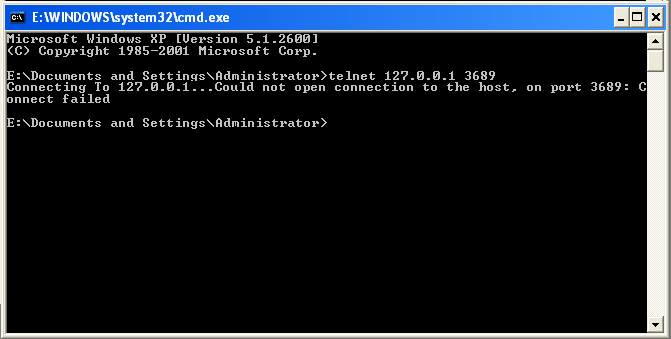
If the request was not successful, a "Connect failed" message appears, similar to the image below. If this is the case, check the security software of the Windows PC that is installed on the computer you are testing.
Test port availability on a different computer on your network
Test that the desired ports are accessible on a different computer or device on your network. Take note of the IP address of the destination computer or device. To find the IP address, use the steps above under "Testing basic connectivity between 2 computers or devices". Identify which port or set of ports you wish to scan, based on which issue your are having. (See Well known TCP and UDP ports used by Apple software products for a list of ports, and take note of the ports pertaining to your issue.
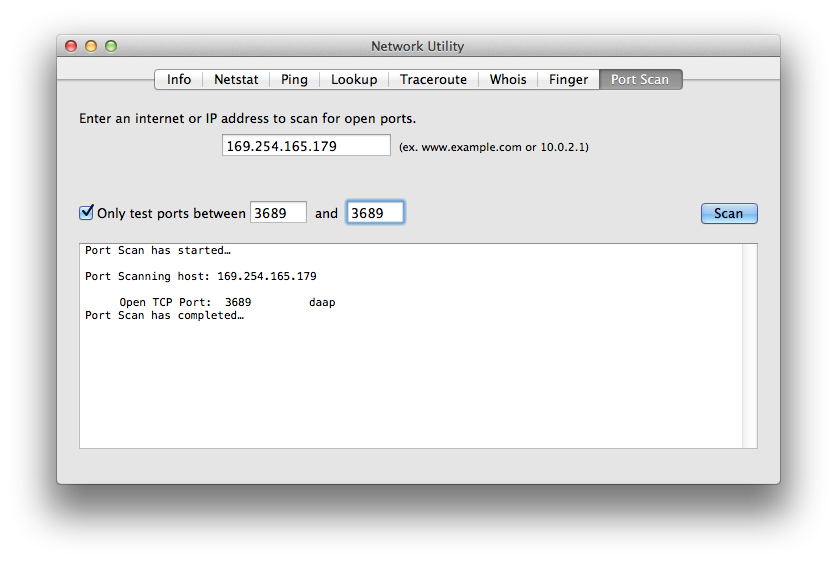
Checking a remote computer using OS X
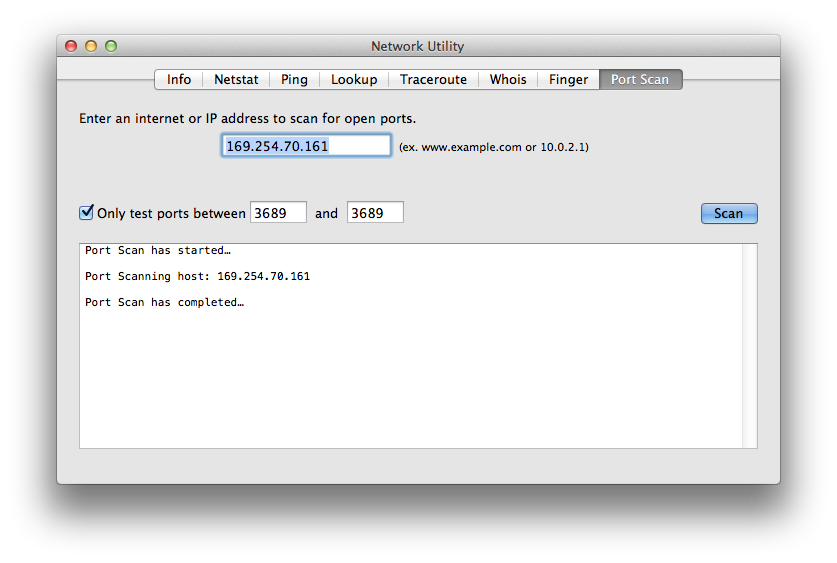
Open Network Utility from the Applications > Utilities menu. Click the "Port Scan" tab and enter the IP address of the destination computer or device. (An example may be 10.0.1.35.) Check the "Only test ports…" check box and enter the applicable port from this article (such as 3689 for iTunes Music Sharing, AirTunes/AirPlay) in both port number entries. If the issue you are testing involves iTunes, be sure iTunes is open and running on the destination computer. Then, click the "Scan" button. If you do not see "Open TCP Port:…" (highlighted below) in the scan results, check the security software of the Mac or PC that is installed on the destination computer you tried reaching.
Below is an example of a successful test of port 3689 on a destination computer:
Below is an example of an unsuccessful local test of port 3689.
If this occurs, test whether or not the same port is accessible by following the steps above under "Test ports on your local computer". If the same port is accessible on the other computer locally, the issue may lie in the network configuration. Check your network settings or network administrator. If the port is not accessible on the other computer locally, check the security software on the destination computer.
Checking a remote computer using Windows
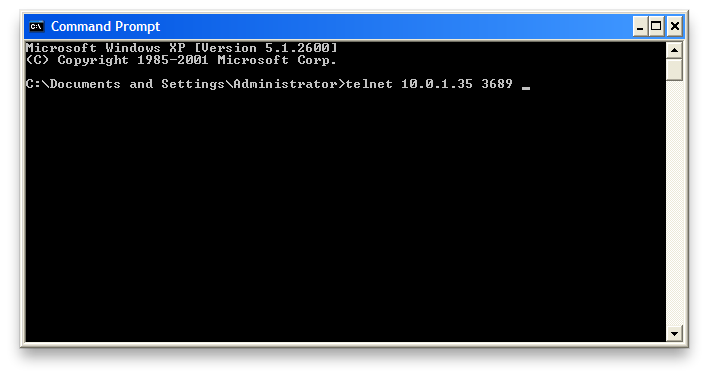
Type cmd in the search bar and press return.
Type telnet followed by the IP address of the destination computer or device, (for example, 10.0.1.35), then type the applicable port number you wish to test from this article.
Press the return key 3 times in a row.
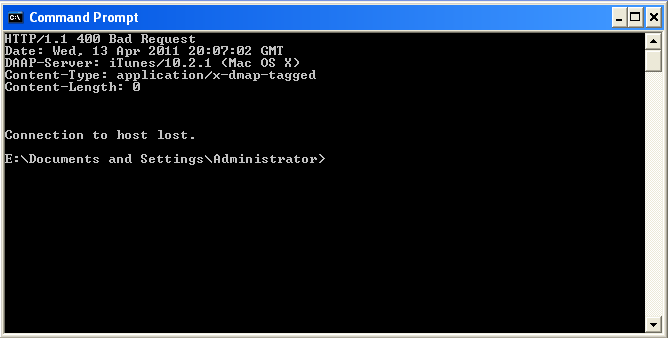
If the issue you are testing involves iTunes, be sure iTunes is open and running on the destination computer. If you see "Command not found" when trying to open Telnet, you may need to download Telnet from Microsoft.
If the request was successful, you will see a message "400 Bad Request" similar to the following:
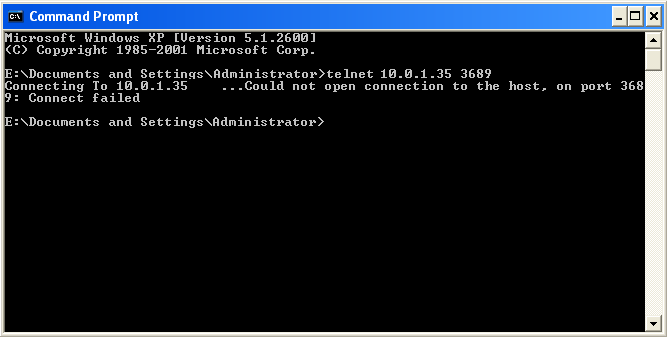
If the request was not successful, you will see a "Connect failed" error, similar to the image below.
If this occurs, test whether or not the same port is accessible by following the steps above under "Test ports on your local computer". If the same port is accessible on the other computer locally, the issue may lie in the network configuration. Check your network settings or network administrator. If the port is not accessible on the other computer locally, check the security software on the destination computer.
Learn which braille displays you can use with VoiceOver on OS X Mavericks v.10.9 or later.
OS X includes USB and Bluetooth drivers for braille displays that can be used with VoiceOver. Here is a list of braille displays that you can use with OS X Mavericks.
Alva
Alva BC640 - USB or Bluetooth
Alva BC680 - USB or Bluetooth
Alva 544 Satellite - USB
Alva 544 Satellite Traveller - USB
Alva 570 Satellite Pro - USB
Alva 584 Satellite Pro - USB
American Printing House for the Blind (APH)
APH Refreshabraille 18 - USB or Bluetooth
Baum
Baum PocketVario 24 - USB or Bluetooth
Baum Pronto! 18 - USB or Bluetooth
Baum Pronto! 40 - USB or Bluetooth
Baum SuperVario 32 - USB or Bluetooth
Baum SuperVario 40 - USB or Bluetooth
Baum SuperVario 80 - USB or Bluetooth
Baum VarioConnect 12/Conny 12 - Bluetooth. Note: VoiceOver may identify this display as "HumanWare BrailleConnect 12".
Baum VarioConnect 24 - USB or Bluetooth
Baum VarioConnect 32 - USB or Bluetooth
Baum VarioConnect 40 - USB or Bluetooth
Baum VarioPro 64 - USB
Baum VarioPro 80 - USB
Deininger
Deininger Pegasus 42/4 CR - USB
Deininger Pegasus 82/8 CR - USB
Eurobraille
Eurobraille Esys 12 - USB or Bluetooth
Eurobraille Esys 24 - USB or Bluetooth
Eurobraille Esys 40 - USB or Bluetooth
Eurobraille Esys Light 40 - USB or Bluetooth
Eurobraille Esys 64 - USB or Bluetooth
Eurobraille Esys 80 - USB or Bluetooth
Freedom Scientific
Freedom Scientific Focus 14 Blue - USB or Bluetooth
Freedom Scientific Focus 40 - USB
Freedom Scientific Focus 40 Blue - USB or Bluetooth
Freedom Scientific Focus 44 - USB
Freedom Scientific Focus 70 - USB
Freedom Scientific Focus 80 - USB
Freedom Scientific Focus 80 Blue - USB or Bluetooth
Freedom Scientific Focus 84 - USB
Freedom Scientific PAC Mate 30 - USB
Freedom Scientific PAC Mate 40 - USB
Freedom Scientific PAC Mate BX420 (Display Only) - USB
Freedom Scientific PAC Mate BX440 (Display Only) - USB
Freedom Scientific PAC Mate QX420 (Display Only) - USB
Freedom Scientific PAC Mate QX440 (Display Only) - USB
HandyTech
HandyTech Active Braille 40 - USB or Bluetooth
HandyTech Basic Braille 16 - USB or Bluetooth
HandyTech Basic Braille 20 - USB or Bluetooth
HandyTech Basic Braille 32 - USB or Bluetooth
HandyTech Basic Braille 40 - USB or Bluetooth
HandyTech Basic Braille 48 - USB or Bluetooth
HandyTech Basic Braille 64 - USB or Bluetooth
HandyTech Basic Braille 80 - USB or Bluetooth
HandyTech Braille Star 40 - USB or Bluetooth
HandyTech Braille Star 80 - USB
HandyTech Braille Wave - USB or Bluetooth
HandyTech Braillino - Bluetooth
HandyTech Easy Braille - USB or Bluetooth
HandyTech Modular Evolution 64 - USB
HandyTech Modular Evolution 88 - USB
Harpo
Harpo BraillePen - Bluetooth
Harpo BraillePen 12 - Bluetooth
HIMS
HIMS Braille Edge 40 - USB or Bluetooth
HIMS BrailleSense OnHand 18 - USB or Bluetooth
HIMS / GW Micro
HIMS / GW Micro BrailleSense - USB or Bluetooth (with optional Bluetooth module)
HIMS / GW Micro BrailleSense Plus - USB or Bluetooth
HIMS / GW Micro SyncBraille 20 - USB
HIMS / GW Micro SyncBraille 32 - USB
Humanware
Humanware BrailleConnect 12 - Bluetooth
Humanware BrailleConnect 24 - USB or Bluetooth
Humanware BrailleConnect 32 - USB or Bluetooth
Humanware BrailleConnect 40 - USB or Bluetooth
Humanware BrailleNote Apex BT - USB or Bluetooth
Humanware BrailleNote Apex QT - USB or Bluetooth. Note: VoiceOver only supports the navigation keys.
Humanware BrailleNote mPower BT 18 - Bluetooth
Humanware BrailleNote mPower BT 32 - Bluetooth
Humanware BrailleNote PK - Bluetooth. Note: Identified as "Humanware BrailleNote mPower BT 18" by VoiceOver
Humanware Brailliant 24 - USB or Bluetooth
Humanware Brailliant 32 - USB or Bluetooth
Humanware Brailliant 40 - USB or Bluetooth
Humanware Brailliant 64 - USB or Bluetooth
Humanware Brailliant 80 - USB or Bluetooth
Humanware Brailliant BI 32 - USB or Bluetooth
Humanware Brailliant BI 40 - USB or Bluetooth
KGS
KGS Braille Memo Pocket 16 - USB or Bluetooth
MDV
MDV Lilli - USB
MDV MB408L - Bluetooth
Ninepoint Systems
Ninepoint Systems Cebra - USB
Ninepoint Systems Ninepoint - Bluetooth
Ninepoint Systems Novem - USB or Bluetooth
Nippon Telesoft
Nippon Telesoft Mini Seika 8 - USB or Bluetooth
Nippon Telesoft Mini Seika 16 - USB or Bluetooth
Nippon Telesoft Seika Version 3 - USB
Nippon Telesoft Seika Version 4 - USB or Bluetooth
Important: Information about products not manufactured by Apple is provided for information purposes only and does not constitute Apple’s recommendation or endorsement. Please contact the vendor for additional information.
The Mac App Store relies on having the correct Date and Time settings to authenticate its connection. Check to see if the Date and Time settings are correct by taking the following steps:
Choose System Preferences from the Apple menu ().
Click the Date & Time icon in the System Preferences window that appears.
Make sure that "Set date and time automatically:" is selected, and that the selected server is set to your region.
For example, in North America it should be set to "Apple Americas/U.S. (time.apple.com)".
Verify that the correct date and time are displayed in this preference pane.
Choose the Time Zone tab.
Make sure that the correct Time Zone is selected.
Missing Serial Number
The system serial number is used for authentication purposes. If the serial number is not displayed in About This Mac, the Mac App Store can't authenticate its connection.
Choose System Preferences from the Apple menu ().
Click on the version number under OS X in the window that appears. The information should change to a build number.
Click on the build number under OS X. The information should change to your computer's serial number.
If no serial number is displayed, contact AppleCare for further assistance.
Invalid or incorrect Network Preferences
Creating a new Network Location can assist in isolating potential Network Preference issues.
Use the following steps to reset the cache of accepted certificates.
Open the Finder.
Choose Go to Folder from the Go menu.
Type /var/db/crls/ in the Go window.
Click Go.
Delete crlcache.db and ocspcache.db by dragging these files to the Trash.
Enter an administrator password if you are prompted.
Restart the system and test for the issue.
Edit your Keychain.
The Keychain holds passwords and certificates used to create authenticated connections from apps such as Mac App Store. If the issue still happens after following the previous steps, try editing your Keychain.
Open Keychain Access located in /Applications/Utilities/
Select Certificates from the left hand column under Category
Type Class into the search field in the top right corner of the Keychain Access window and press return.
Look through the list of results for any certificates that have a blue + over the icon.
Double-click on a certificate that has the blue + over the icon to ‘Get info’ on the certificate.
Click the disclosure triangle to the left of the word Trust to reveal the certificates permissions.
Change Secure Sockets Layer (SSL): to ‘No Value Specified’ then close the window.
Confirm the Administrator password in the window that will appear.
Double-click on the same certificate that was opened in step 5.
Again Click the disclosure triangle to the left of the word Trust to reveal the certificates permissions.
Change When using this certificate: to ‘Use System Defaults’ then close the window.
Again confirm the Administrator password in the window that will appear.
Repeat steps 5 through 12 for any certificates that have a blue + over the icon. (Generally there are only one or two that will need to be edited.)
Restart the system and test for the issue.
Important: If the certificates do not allow themselves to be modified as is needed in steps 5 through 11, you need to reinstall OS X. After reinstalling, attempt these steps again.
Choose System Preferences from the Apple menu ().
Click Accessibility, then select Switch Control from the list of accessibility options.
Click the General tab, then select Enable Switch Control.
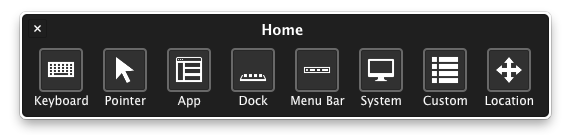
You should now see the Switch Control Home row appear:
To customize Switch Control, select the Navigation or Timing panes in Switch Control Accessibility preferences. To learn about each of these options, click the Help button within the pane.
Setting up switches
Use Switch Control preferences in the Accessibillity pane of System Preferences to set up one or more adaptive switches that perform an action when pressed. You can use a mouse, keyboard or dedicated switch hardware connected over USB or Bluetooth to act as a switch. You can also change an existing switch's actions.
By default, the spacebar is used as a switch when Switch Control is enabled.
To add a switch, click the Add button (+), then press your adaptive switch. Enter a name, then select an action such as Stop Scanning. To have the switch run a script or open an app, click Custom, then select the script or an app.
To remove a switch: Select a switch in the list, then click the Remove button (-).
To change the behavior of an existing switch, select a switch in the list, click the Action pop-up menu (looks like a gear), then change the name or action. To use a different switch for the action, click Reassign.
Scanning and selecting items
Scan items
By default, when you press the Select Item switch, Switch Control starts stepping through a panel, group, or user interface, highlighting each item or group as it scans. If you select an item, the scan pauses (unless you are using the option to keep scanning after a selection is set). To resume the scan, press the switch. If you turned auto scanning off, press the Move To Next Item switch to advance the scan. Switch Control repeats (or loops) a scan, as set in the Navigation pane.
Select an item
When an item is highlighted, press the Select Item switch. If the selected item is a group (and you didn’t set the option to resume scanning after a selection), press the switch to scan the group, then press the switch to select an item in the group. To exit a group, press the switch when the group is highlighted (or if you hear “step out,” if you set the option to have Switch Control speak while navigating).
If you need to use the pointer to click an item that isn't part of an app's interface, you can use Pointer mode to scan the screen and click an item.
Click to begin scanning horizontally.
When the range finder highlights the area you want to click, click your switch again.
Click another time to precisely refine your horizontal position.
The next click starts the vertical range finder scan.
Click again to refine your horizontal position.
Click your switch a final time to click the element on the scren that is currently under the blue crosshair you created on the screen.
Using panels
Set panel options
In a panel, click the Select Item switch when the Panel Options icon (looks like a gear) in the top-right corner is highlighted. Then, click the switch again when the option you want to set is highlighted. You can decrease or increase the size of the panel, and increase or decrease its transparency.
Return to the Home row
In a panel, click the Select Item switch when the Home icon in the top-right corner is highlighted. In the interface, press the switch when the Home row is highlighted.
Tips for the Home row
Keyboard Type text in a document or field by scanning the keyboard in the panel, opening a group of keys, and then selecting a key. Watch the first group: It contains suggested words based on the keys pressed so far. You can save typing time by selecting a suggested word. Other keyboards may be available in the Custom panel.
Pointer To move the pointer to an area of the screen, select Move. You'll see a vertical block start to glide across the screen. When you press the Select Item switch, the block stops and a vertical blue line starts to glide across the block. Press the switch again to either stop the blue line, or substantially slow it down before you press the switch again to stop it (based on the setting of Gliding Cursor Precision in the Navigation pane). When you do the same horizontally, you'll see the pointer move to the intersection of the two blue lines.
App Scan items and groups in the active window of the current app.
Dock Scan the items in the Dock.
Menu Bar Scan the menu bar group, then the menu extras group.
System Control the volume or display brightness of your Mac, and control media playback.
Custom Keyboard appears here if no custom panels are available, and will display the same keyboard that’s shown in the Keyboard panel.
Location Use this to reposition the Switch Control Home row on the screen.
 Twitter
 Facebook