Knowledge base

OSX Mavericks: Kotoeri Japanese input method sometimes appears to generate incorrect characters

Posted in Apple Mac OS

In OS X Mavericks, Kotoeri uses the Latin keyboard layout at the prompts listed above when typing Japanese text. This causes differences in the keyboard layout when multiple languages are enabled as Input Sources. For example, if Kotoeri and French are both enabled as Input Sources, a Japanese keyboard registers the keypress of a “Q” key as an “A” instead. 

To change this behavior, disable any additional languages besides Japanese from the Input Sources tab of Keyboard preferences in System Preferences.
Read Full Article

OS X Mavericks: Enable access for assistive devices and applications

Posted in Apple Mac OS

Learn how to enable assistive devices and applications in OS X Mavericks.

If you use an assistive device or app, use these steps to enable it in Mavericks: 

  1. Open System Preferences from the Apple menu ().
  2. Click the Security & Privacy icon.
  3. Select the Privacy tab.
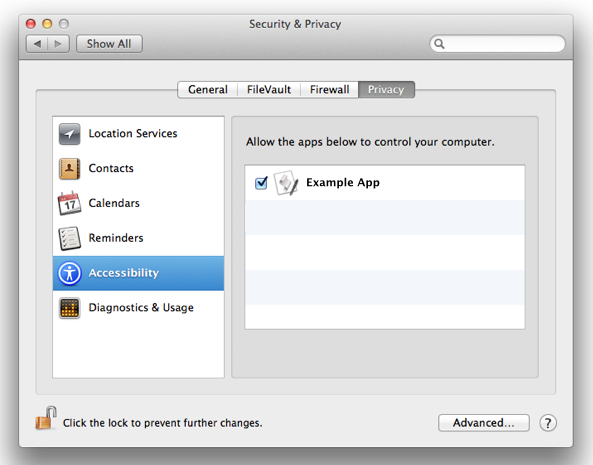
  4. Select Accessibility from the list on the left side of the Privacy pane.
  5. Click the lock icon in the lower left corner of the window and enter an admin account and password when prompted.
  6. Select the checkbox next to the name of the device or app that is requesting access. 

system preferences window

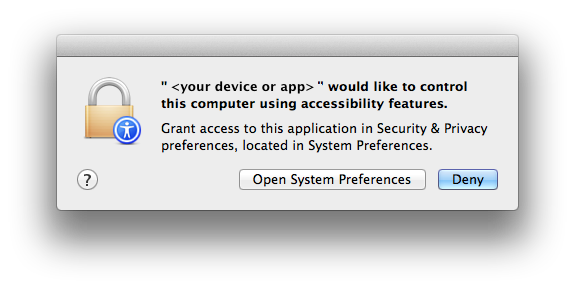
If you haven't already enabled the device or app in System Preferences, you may see an alert message like the following:

control alert

Click "Open System Preferences" from this alert to be taken directly to the Accessibility section of Security & Privacy preferences.


Additional Information

Some applications may need to be re-opened before this setting takes effect.

See also:

Last Modified: Nov 1, 2013
Helpful?
Yes
No
One Moment Please
Thanks for your feedback.
71% of people found this helpful.
Email this article
Print this page
  • Last Modified: Nov 1, 2013
  • Article: HT6026
  • Views:

    1926
  • Rating:
    • 71.0

    (19 Responses)

Additional Product Support Information

    Mac App Store: "Cannot connect" or "Cannot connect to the App Store. An internet connection is required"

    Posted in Apple Mac OS

     Incorrect Date and Time settings

    The Mac App Store relies on having the correct Date and Time settings for authentication purposes. Check to see if the Date and Time settings are correct by taking the following steps:

    1. Click on the Apple () in the Menubar and choose System Preferences.
    2. Select the Date & Time pane.
    3. Ensure that "Set date and time automatically:" is selected, and that the chosen server is set to your region.
      For example, in North America it should be set to "Apple Americas/U.S. (time.apple.com)".
    4. Verify that the correct date and time are displayed in this preference pane.
    5. Choose the Time Zone tab.
    6. Ensure that the correct Time Zone is selected.


    Missing Serial Number

    The system serial number is used for authentication purposes. If the serial number is not displayed in About This Mac, the Mac App Store cannot authenticate the connection.

    1. Click on the Apple () in the Menubar and choose About This Mac.
    2. Click on the Version number under OS X and it will change to a Build number.
    3. Click on the Build number under OS X and it will change to the Serial number.
    4. If no serial number is displayed, contact AppleCare for further assistance.


    Invalid or incorrect Network Preferences 

    Creating a new Network Location can assist in isolating potential Network Preference issues. 


    Invalid or incorrect Certificates

    Use the following steps to reset the cache of accepted certificates.

    1. Open the Finder.
    2. Choose Go to Folder... from the Go menu.
    3. Type: /var/db/crls/
    4. Click Go.
    5. Delete crlcache.db and ocspcache.db by dragging these files to the Trash.
    6. Enter an administrator password if you are prompted.
    7. Restart the system and test for the issue.

    If the issue persists, try editing your Keychain.

    The Keychain holds passwords and certificates used to create authenticated connections from apps such as Mac App Store.

    1. Open Keychain Access located in /Applications/Utilities/
    2. Select Certificates from the left hand column under Category
    3. Type Class into the search field in the top right corner of the Keychain Access window and press return.
    4. Look through the list of results for any certificates that have a blue + over the icon.
    5. Double-click on a certificate that has the blue + over the icon to ‘Get info’ on the certificate.
    6. Click the disclosure triangle to the left of the word Trust to reveal the certificates permissions.
    7. Change When using this certificate: from ‘Use System Defaults’ to ‘No Value Specified’ then close the window.
    8. Confirm the Administrator password in the window that will appear.
    9. Double-click on the same certificate that was opened in step 5.
    10. Again Click the disclosure triangle to the left of the word Trust to reveal the certificates permissions.
    11. Change When using this certificate: from ‘No Value Specified’ to ‘Use System Defaults’ then close the window.
    12. Again confirm the Administrator password in the window that will appear.
    13. Repeat steps 5 through 12 for any certificates that have a blue + over the icon. (Generally there are only one or two that will need to be edited.)
    14. Restart the system and test for the issue.

    Important: If the certificates do not allow themselves to be modified as is needed in steps 5 through 11, please perform a standard reinstallation of OS X then attempt these steps again.

    Read Full Article

    OS X: About the Accessibility Options shortcut

    Posted in Apple Mac OS

    Learn about the Accessibility Options shortcut in OS X.

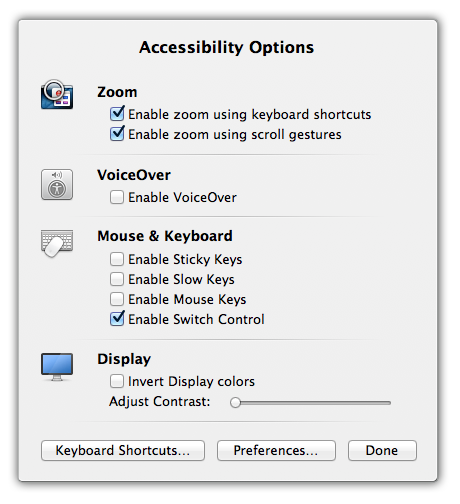
    OS X includes an Accessibility Options shortcut that lets you quickly turn on or off common accessibility features, including Zoom, VoiceOver, Sticky Keys, Slow Keys, and Mouse Keys, Switch Control, and Invert Display colors

    accessibility options window 

    To reveal the Accessibility Options window

    • On the built-in keyboard of a Mac notebook computer, press Function-Command-Option-F5 (Fn-⌘-⌥-F5).
    • If you are using an external keyboard, press Command-Option-F5 (⌘-⌥-F5).

     If you accidentally activate the Accessibility Options window, click Done to close it. You can also click anwhere outside of the window to close it. 

    Additional Information

    Last Modified: Nov 4, 2013
    Helpful?
    Yes
    No
    One Moment Please
    Thanks for your feedback.
    60% of people found this helpful.
    Email this article
    Print this page
    • Last Modified: Nov 4, 2013
    • Article: HT5424
    • Views:

      23881
    • Rating:
      • 60.0

      (335 Responses)

    Additional Product Support Information

    OS X Mavericks: Home folder appears to be different after completing Setup Assistant

    Posted in Apple Mac OS

    Where did my files go?

    You may be asked to create a new user during installation if the OS X installation process is interrupted. For example, if you forced the computer to power off before installation was complete.

    If you create and log in as a new user, you won't see your original files and your desktop picture and other settings may be different. This is because the files and folders you are looking for are in the home folder of your original user account. If this happens, just log out of the new user you created, and log into your original user:  

    • From the Apple menu () choose Log Out. Then, select your original user account from the login window to log back in using your original user name and password.

    If you want to automatically log into your original user account every time you start up your Mac, follow these steps:

    1. Open System Preferences from the Apple menu ().
    2. Click Users & Groups
    3. Click the lock in the lower left corner of the Users & Groups window.
    4. Enter an administrator user name and password.
    5. Click the Login Options button.
    6. Select your original user account name from the "Automatic login:" pop-up menu.
    7. Close the System Preferences window to save your changes.

    Verify that you are now able to see your original home folder and documents. You can then remove the temporary user account if needed. Make sure you haven’t left any files in the account’s home folder before you delete it.

    If you don't see your original user account

    If you can't log into an account that existed before upgrading, use the following steps to see your original user accounts.

    1. When requested, enter a new temporary user name and password that you will remember 
      Note: This account name needs to be different from any others already stored on this computer.
    2. If required, log in using the temporary user account you just created.
    3. From the Apple menu () choose System Preferences, then click Users & Groups.
    4. Click the lock icon in the lower left corner of the Users & Groups window. Then, enter the password of the temporary user you created.
    5. Select your original user account from the Other Users list.
    6. Make sure Allow user to administrate this computer is selected for your original user account.
    7. From the Apple menu () choose Log out.
    8. Log back in using your original user name and password.

    Verify that you are now able to see your original home folder and documents. You can then remove the temporary user account if needed. Make sure you haven’t left any files in the account’s home folder before you delete it.

    Read Full Article

    OS X: How to disable automatic login when FileVault is enabled

    Posted in Apple Mac OS

    OS X Mavericks lets you disable automatic login when FileVault is enabled using one of the methods described below.

    Passwords

    When disabling automatic login, two passwords are required while starting up:

    • One password is needed to unlock the disk at the EFI Login Window.
    • Another password is needed to log in at the regular Login Window.

    These passwords can be the same if you are logging in as the user who unlocked the disk.

    Command line

    Use the following command to disable automatic login when FileVault is enabled:

    sudo defaults write /Library/Preferences/com.apple.loginwindow DisableFDEAutoLogin -bool YES


    Use the following command to allow automatic login when FileVault is enabled:

    sudo defaults delete /Library/Preferences/com.apple.loginwindow DisableFDEAutoLogin


    Profile Manager

    You can use Profile Manager to create a Custom Settings payload with the following information.

    • Preference Domain: com.apple.loginwindow
    • Key: DisableFDEAutoLogin
    • Type: Boolean
    • Value: On (checked)


    Last Modified: Nov 6, 2013
    Helpful?
    Yes
    No
    One Moment Please
    Thanks for your feedback.
    100% of people found this helpful.
    Email this article
    Print this page
    • Last Modified: Nov 6, 2013
    • Article: HT5989
    • Views:

      770
    • Rating:
      • 100.0

      (4 Responses)

    Additional Product Support Information

      OS X Mavericks: Check Date & Time preferences for "This copy of the Install OS X Mavericks application can't be verified…" Installer message

      Posted in Apple Mac OS

      This message can appear if the date and time aren't set correctly on your computer. Use these steps to check your date and time, then try installation again. 

      Check your Date & Time System Preference by following these steps:

      1. Quit the OS X Mavericks installer.
      2. Choose "System Preferences" from the Apple menu ().
      3. Click the "Date & Time" icon in the System Preferences window.
      4. Click the "Date & Time" tab in the System Preferences pane that appears.
      5. If the padlock in the lower left is locked, click it and enter an administrator name and pasword when prompted.
      6. Make sure the "Set date and time automatically" checkbox is selected and the appropriate region is chosen in the field to the right of the checkbox.
        Alternatively, manually set the date and time to an accurate setting (for example, the date should be set later than Oct 1, 2013).

      Re-open the Install OS X Mavericks app (located in the Applications folder) and proceed with installation.

      Read Full Article

      OS X: Books missing in iBooks after importing from iTunes

      Posted in Apple Mac OS

      Use these steps to update iBooks and migrate your remaining books.

      1. Begin by updating to iBooks 1.0.1. You can install this update from the Updates tab of the Mac App Store, or by choosing Software Update from the Apple menu ().
      2. Once iBooks has been updated to iBooks 1.0.1 re-migrate your books by selecting File > Move books from iTunes.

      This moves any additional PDFs or books from iTunes that weren't previously migrated.

      Read Full Article

      OS X: About Mail Update for Mavericks

      Posted in Apple Mac OS

      Mail Update for Mavericks is recommended for all OS X Mavericks users

      About the update

      Mail Update for Mavericks includes improvements to general stability and compatibility with Gmail, including the following:

      • Fixes an issue that prevents deleting, moving, and archiving messages for users with custom Gmail settings
      • Addresses an issue that may cause unread counts to be inaccurate
      • Includes additional fixes that improve the compatibility and stability of Mail

      Installing the update

      • You should back up your system before installation. To do this you can use Time Machine.
      • You may experience unexpected results if you have third-party system software modifications installed, or if you've modified the operating system through other means.
      • Choose Apple menu () > Software Update to check for the latest Apple software via the Mac App Store, including this update.
        Other software updates available for your computer may appear, which you should install. Note that an update's size may vary from computer to computer when installed using Software Update. Also, some updates must be installed prior to others. Use Software Update until it reports "No Updates Available".
      • Do not interrupt the installation process once you have started to update your system.

      You can also download the manual update installer. This is a useful option when you need to update multiple computer, but only want to download the update once. Standalone installers are available from Apple Support Downloads.

      Important: Information about products not manufactured by Apple is provided for information purposes only and does not constitute Apple’s recommendation or endorsement. Please contact the vendor for additional information.
      Last Modified: Nov 7, 2013
      Helpful?
      Yes
      No
      One Moment Please
      Thanks for your feedback.
      0% of people found this helpful.
      Email this article
      Print this page
      • Last Modified: Nov 7, 2013
      • Article: HT6030
      • Views:

        0

        Additional Product Support Information