Knowledge base

Hide and unhide purchases in the iTunes Store

Posted in Apple iTunes

Use iTunes on a Mac or PC to hide or unhide purchased music, movies, TV shows, and apps. To hide books, use iBooks on a Mac and iTunes for Windows on a PC.

You can't hide purchases using an iPhone, iPad, or iPod touch, unless you're a member of a Family Sharing group. Family Sharing group members can hide App Store purchases in the App Store.

Read Full Article

Use iTunes Radio on your computer, iPhone, iPad, iPod touch, or Apple TV

Posted in Apple iTunes

Create and modify stations

You can create new stations based on artist, track, genre, or sub-genre. To create a new station, tap the Plus   icon under My Stations. When asked, type an artist name, track name, or genre or select a genre from the list. Before you create a station by genre, iTunes Radio will play a preview of that station for you. After you decide on a genre, tap the Plus   icon to the right of the genre name to create your station.

Read Full Article

Use Restrictions to prevent purchasing on your iPhone, iPad, or iPod touch

Posted in Apple iTunes

Prevent in-app purchases or disable purchasing

After you tap Enable Restrictions, you'll see what's allowed on your device. To prevent only in-app purchases, turn off In-App Purchases. If you want to disable purchasing completely, turn off iTunes Store, iBooks Store, Installing Apps, and In-App Purchases.

You can also prevent purchases by removing your payment method from your account.

Read Full Article

Manage your associated devices in iTunes

Posted in Apple iTunes

When you turn on iTunes Match, Family Sharing, or Automatic Downloads, or when you download past purchases on your computer, iPhone, iPad, or iPod touch, that device becomes associated with your Apple ID. You can associate your Apple ID with up to 10 devices, with a maximum of 5 computers at any time. Each computer must also be authorized using the same Apple ID. You don't need to authorize your iPhone, iPad, or iPod touch.

After you associate a device with your Apple ID, you can't associate that device with another Apple ID for 90 days.

Read Full Article

Troubleshooting Sync Services on Windows with Microsoft Outlook 2003, Outlook 2007, or Outlook 2010

Posted in Apple iTunes

Which option are you using to store your data in Microsoft Outlook?

By default, your Outlook data is stored in Personal Folders format (PST) unless you are using an Exchange Server to access your data. If you are using Outlook with an Exchange Server, your data may be stored in an OST file if you have Cached Exchange Mode turned on. An iPhone, iPad, or iPod touch syncing via iTunes will sync with the default PST or OST file. When using an OST file, only information stored locally, or cached on your computer, will be available to sync.

Note: You may be able to sync your iPhone, iPad, or iPod touch directly with your Exchange server. For more information on syncing directly with an Exchange server, contact your Exchange Administrator. There are resources for Exchange Administrators, including the iPhone Enterprise Deployment guide on www.apple.com/support/iphone/enterprise.

Read Full Article

Volume Purchase Program: Requesting free iLife and iWork apps for Mac

Posted in Apple iTunes

If your business or educational institution purchased new Mac computers on or after October 1, 2013 and is part of the Apple Volume Purchase Program, you can request managed distribution for Keynote, Numbers, Pages, GarageBand, and iMovie for Mac for qualifying computers.

Requirements

  • You must be enrolled in the Volume Purchase Program (VPP).
  • You need a proof of purchase (invoice or purchase order) for the computers.
  • The number of eligible OS X Yosemite-compatible computers must be clearly marked on your proof of purchase.

Requesting the apps

  1. Go to the site below that is appropriate to your organization:
    Businesses and Enterprise
    Educational Institutions
  2. Select Mac OS Managed Distribution Licenses from the drop-down menu.
  3. Complete the rest of the form.
  4. Click Submit to send your request to Apple. Apple will contact you to follow up with your request.

If you are interested in receiving managed distribution versions of the iOS versions of these apps, see Volume Purchase Program: Requesting free iLife and iWork apps for iOS.


Read Full Article

About the 'Automatically Add to iTunes' folder

Posted in Apple iTunes

The iTunes Media folder contains an "Automatically Add to iTunes" folder. 

When you put iTunes-compatible content in this folder, iTunes analyzes it for compatibility and then adds it to your iTunes library. If a file isn't compatible, iTunes places it in the Not Added folder.

Find the "Automatically Add to iTunes" folder using the steps below:

  1. Mac: From the menu bar at the top of your computer screen, choose iTunes > Preferences.
    Windows: From the iTunes menu bar, choose iTunes > Preferences. You can turn the iTunes menu bar on by pressing the Control and B keys on your keyboard. Learn more about menus in iTunes for Windows.
  2. Click Advanced.
  3. The location of the iTunes Media folder is found under "iTunes Media folder location." The "Automatically Add to iTunes" folder is inside the iTunes Media folder.

Read Full Article

iPod nano (5th generation): How to copy your recorded videos to a PC

Posted in Apple iTunes

You can copy your recorded video on iPod nano (5th generation) to your Windows PC for viewing and backup.

Note: This article discusses copying recorded videos to a PC. See this article if you are using a Mac.

To copy your recorded video to your PC, the iPod must be enabled for disk use:

1. Connect iPod nano (5th generation) to your computer.

2. In iTunes, click iPod in the device list.

3. Click the Summary tab.

4. If "Enable disk use" is not checked, select the checkbox and click the Apply button.

iTunes Summary tab

You will now be able to copy recorded videos to your PC.

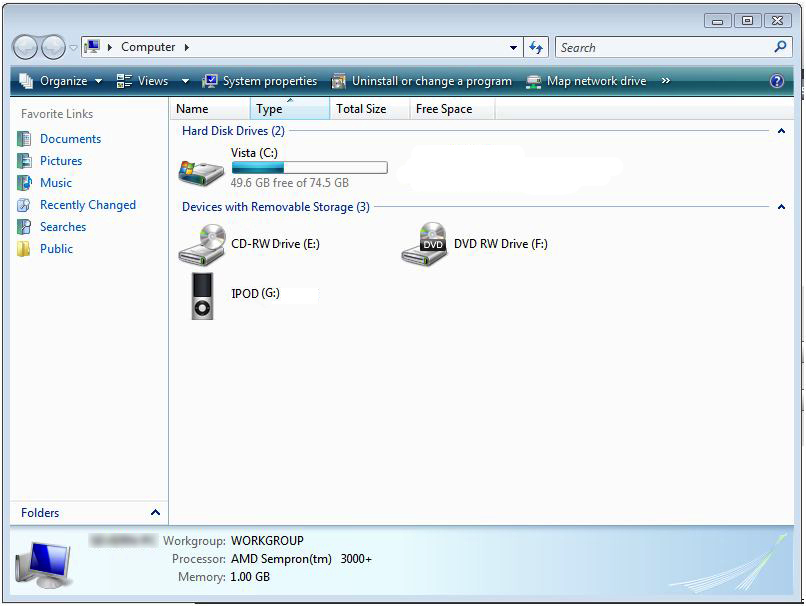
Using Windows Explorer or My Computer on your PC, the iPod nano will appear on the computer as an external disk with the same name you gave the iPod during the initial setup in iTunes.

Devices with Removable Storage

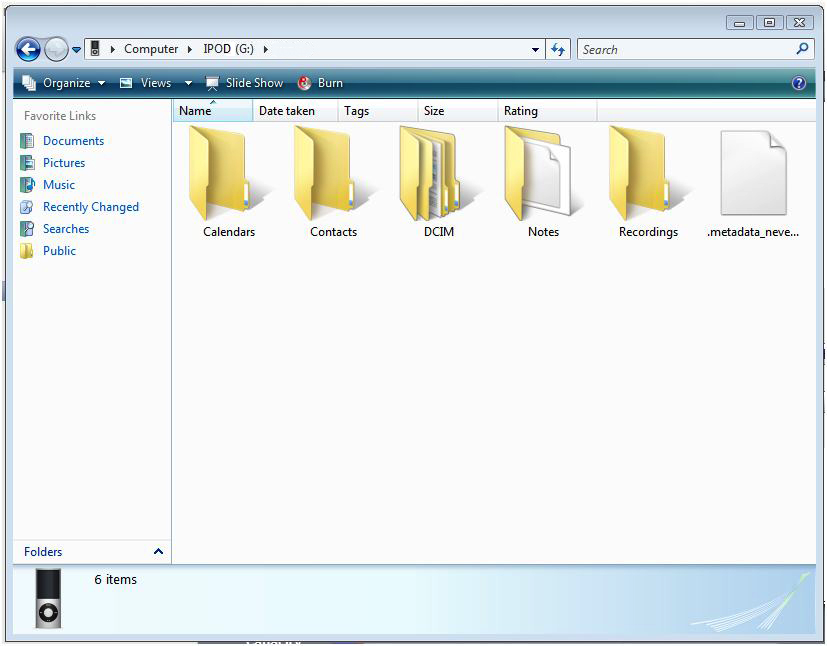
The DCIM folder on iPod nano stores your recorded video. You can copy this folder to your computer so that you can view the video on your PC, or to back up the video files.

DCIM folder

Once the recorded video is copied to your PC, double-click the file to watch the video using QuickTime or Windows Media Player*. See the documentation that came with your computer for assistance.

Note: To edit your recorded video, use either QuickTime Pro or third-party video-conversion software that supports converting .mp4 video files to the .avi file format.


* Windows Media Player may require you to install additional video codecs to play videos recorded from an iPod nano (5th generation).

Read Full Article

If you see error 0x80090318 when you try to open the iTunes Store

Posted in Apple iTunes

If you have software on your computer that monitors Internet traffic, you might see error 0x80090318 when you:

  • Open the iTunes Store.
  • Update or back up iOS devices.
  • Start the Apple Mobile Device Service.
  • Sign in to the iCloud Control Panel.

This type of software might use a Layered Service Provider (LSP) which can help identify the particular program installed. Software that monitors Internet communication includes both valid programs, such as security or content filtering software, and potentially unwanted programs that use ad-injection, sometimes called adware.

Other indications that potentially unwanted software is installed on your computer include your search engine changing without you changing it or an increase in the number of pop-up ads displayed in your browser. Use the steps below to identify and remove this software.

Read Full Article

If iTunes repeatedly prompts you to authorize your computer

Posted in Apple iTunes

Authorize your purchases with the correct account name

The items you're trying to play might have been purchased using a different iTunes Store account. To determine which account was used to purchase an item, follow the steps below:

  1. Select a purchased song in your library.
  2. Mac: From the menu bar at the top of your computer screen, choose File > Get Info.
    Windows: Press Control and B on your keyboard to turn on the iTunes menu bar. From the menu bar, choose File > Get Info. Learn more about menus in iTunes for Windows.
  3. Click the File tab. Make note of the Account Name that appears in the list. This is the account name (Apple ID) that you need to use when you authorize your computer to play this purchase.
    The Apple ID that appears is the one that you used when you purchased the item. The Apple ID you used to purchase the item doesn't change, even if you change your Apple ID.
  4. Authorize your computer.

If you authorized the Apple ID that is shown in the Summary File tab, check your purchase history for that Apple ID. If your purchase history doesn't reflect the purchase of the items in your iTunes library, think about any other Apple ID you might have created, and authorize your computer for that Apple ID.

If you forgot the password to one of your accounts, recover it using Apple's password-recovery website.

Read Full Article