Mac Basics: Printing in OS X
Learn about adding a printer, and printing in OS X Mavericks, and Mountain Lion.
Adding A Printer
![]()
For most USB printers, all you have to do is connect the printer to your Mac. OS X automatically sees the printer, and downloads any drivers if necessary. Then, you're ready to print. You can also quickly add a nearby AirPrint or network printer. If you want to make sure your printer is compatible with OS X, check this list.
Before you begin
Before adding a printer to your Mac, check the following:
- Choose Software Update from the Apple menu to make sure OS X is up to date. This also updates the database of available printer software provided to Apple by printer vendors. If this is not done, you may see messaging that software is not available.
- Make sure the printer is powered on, has paper, and doesn't have any issues such as a paper jam, low ink, or alerts displayed on its control panel. If the printer has an issue that can't be cleared, contact the printer vendor for guidance.
- If your printer connects wirelessly using Wi-Fi, make sure it is properly connected to the same Wi-Fi network as your computer. The printer may have to be connected to the Mac initially using USB. See Overview on how to connect a Wi-Fi printer to your Wi-Fi network for more information.
- Adding, managing, or removing print queues and software may require an administrator account name and password. Apps that are open before adding your printer may need to be quit and re-opened in order to see all the features of the added printer.
- Important: Avoid installing printer drivers from the discs that came with your printer. The software on these discs may not be as new as what is available using Software Update. Instead, follow the instructions that came with the printer to unpack, install ink or toner, and insert paper. Then, use the instructions in this article to set up the printer on your Mac.
Printer Setup
Select the kind of printer you want to connect from the list below for more information.
Add a USB printer
Connect the USB printer to the Mac, and a print queue will be automatically created for it. If the Mac already has current software for the printer, the print queue is created for you in the background. If software is needed, OS X will automatically prompt you.
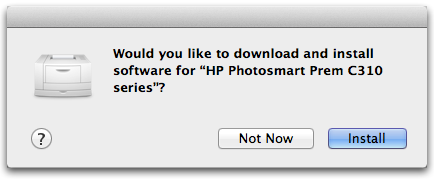
If prompted, follow the onscreen software install instructions to complete the process.
Add an AirPrint or nearby network printer
With OS X Lion and later, you can quickly add a printer that is nearby on your network. This includes:
- AirPrint printers that are on your Wi-Fi or local network.
- Nearby Wi-Fi printers or wired network-based printers that are on your local network and support Bonjour.
- A printer connected to the USB port of a Time Capsule or AirPort base station on the home network.
- A printer that is being shared by another Mac on the home network.
To add a nearby printer from the print sheet: Select the printer you want from the Printers pop-up menu.
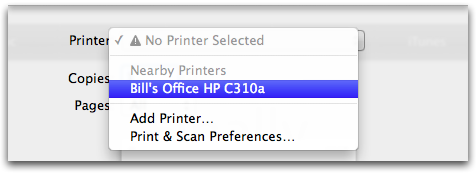
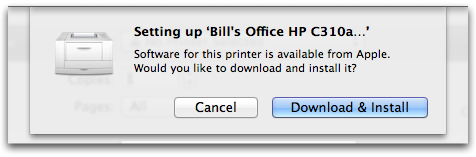
If the printer is an AirPrint-compatible, OS X adds it without downloading and installing any additional software. If software is otherwise needed for the printer, OS X connects to an Apple server to download the latest available drivers. Make sure your computer is connected to the Internet to download this software.
Use System Preferences
You can also add a printer from System Preferences. This is useful if you know the IP address of a network printer.
- Choose Apple menu > System Preferences Then choose View > Print & Scan.
Note: If the Print & Scan lock icon is locked, click the lock icon and, when prompted enter an administrator name and password to unlock it.
Click the add printer (+) button to add a printer. You can also click and hold the add printer to quickly select a nearby printer on your network that you want to add.
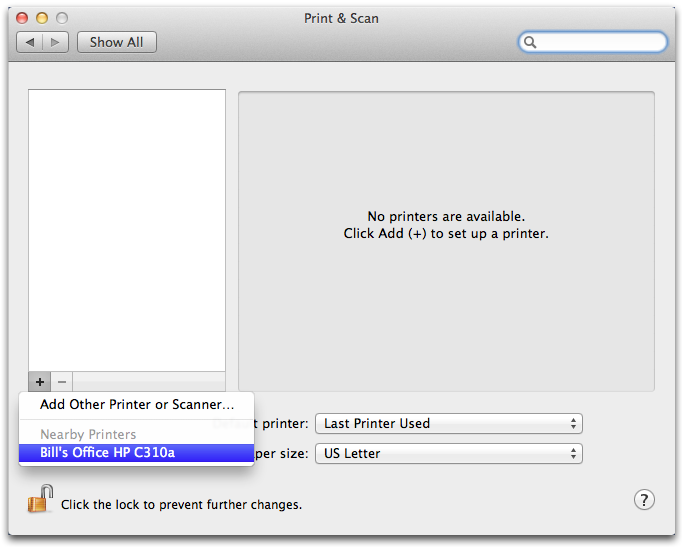
If there are no nearby printers on your network, select "Add Other Printer or Scanner".
Tip: To directly open the Add Printer dialog box, click the Add (+) button.
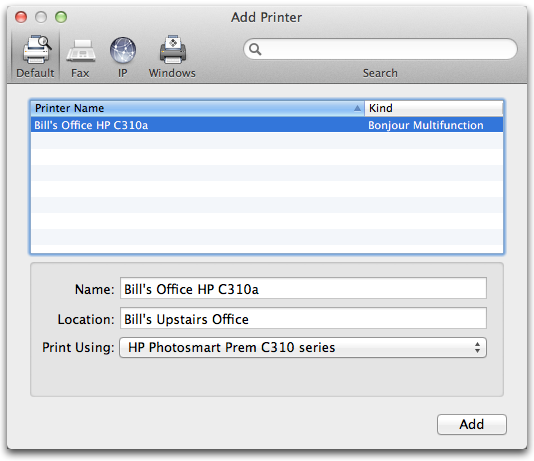
From the Add Printer toolbar there are these choices:
- Default – Use this option to display a list of all printers your Mac already sees connected to your computer through USB, a network connection, or other methods. Select a printer you see here and click Add. If there is a long list of printers, you can search for the printer you want using the search field in the top-right.
- Fax – Use this option to add a queue for a third-party Fax device connected to the Mac.
- IP – Use this option to add a network printer that is not nearby. Printers that support the Internet Printing Protocol (IPP), Line Printer Daemon (LPD), and HP Jetdirect (Socket) can be added as IP printers. You need to know the IP address or URL of a printer (such as 10.0.1.1 or myprinter.example.local) to add it using this method. If you're not sure what your printer's IP address is, ask your network administrator or check the printer's documentation.
- Windows – Use this option to add a printer that is shared using the Windows printer sharing protocol (CIFS/SMB). See File Sharing for details about how to add a Mac to a Windows Workgroup. Configuring the Sharing pane of System Preferences may be needed to see some Windows printer shares.
How to print
Once you have your printer set up, all you have to do is choose File > Print from any app that can print. As a shortcut, you can also type ⌘P (Command-P). When you print a document, OS X displays a print sheet where you can set additional options for your print job.
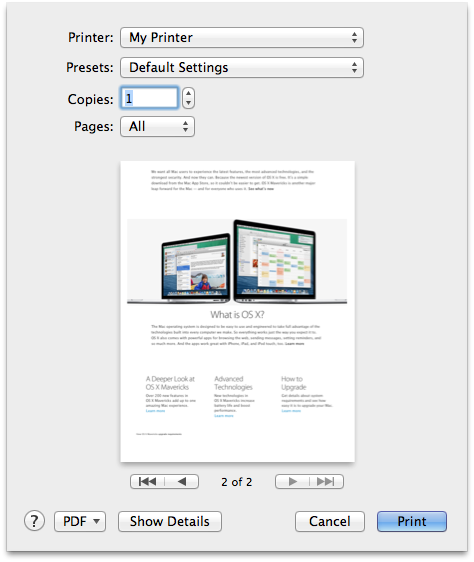
From the basic print sheet you have these options:
- Choose the destination printer from the Printer pop-up menu. If you don't see your printer, choose Add Printer from this menu.
- Choose the printer presets to apply to the print job from the Presets menu. Presets are pre-configured combinations of printer feature options.
- Enter the number of copies the printer should output in the Copies field.
- Select which pages you want to print using the Pages field, including printing a single page, all pages, or a specific range.
- The print sheet also includes a preview of the print job if the app supports it. Use the arrows under the preview to review each page of the print job before it prints.
- Click the Help button (?) in the lower left corner of the print sheet to see more information about printing.
- Use the PDF button to create a PDF of your printout instead of a physical print. Click and hold the button to see a menu of additional options.
For more information about using the PDF feature, see the "Generate PDF output" section of this article. - Clicking cancel takes you back out of the print sheet without printing.
- Click Print to accept your current print settings, and to send your document to the printer. Once clicked, your print job appears in the printer's queue.
Clicking the Show Details button gives you additional control of how your printout is handled.
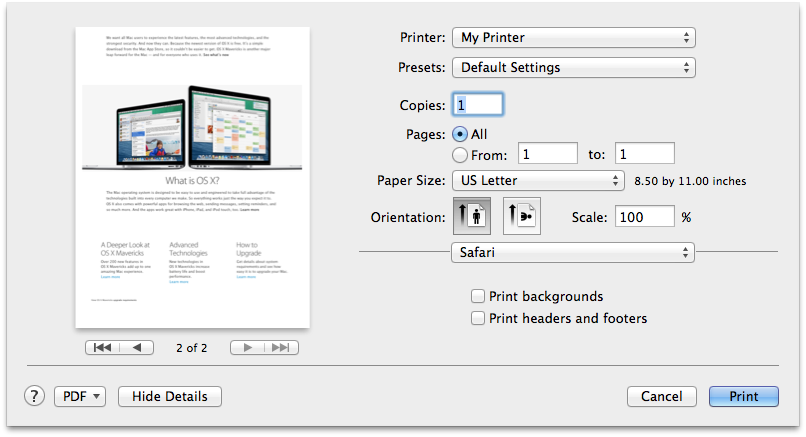
In addition to the details shown in the standard print sheet, the Details sheet gives you these options:
- Choose the Paper Size menu to match the size of your printed output to match the paper in your printer. You can create and manage custom paper sizes here as well.
- The Orientation buttons allow you to choose portrait or landscape output.
- Make the content of your printout a larger or smaller size by changing the value of the Scale field. The print preview changes to reflect scaling changes you make.
- The Application and Printer settings menu depend on the printer and application used. Specific printer-related features appear in this menu.
- Use the Save Preset option in the Presets menu to save your current settings so that you can easily apply them to future print jobs.
- Clicking Hide Details returns the print sheet to its shorter, standard view.
Tip: Your images don't need to be any larger than 360 dots per inch (dpi). Trying to print images greater than this resolution takes longer to print and uses more space on your startup drive, without any discernible change in print quality. See this article for more information.
Additional Print Options
You can also manage your print jobs, and print directly to a PDF file instead of a printer. Click on any of the topics below to learn more.
Generate and manage PDFs
Preview the print job as a PDF or save it as a PDF file (with metadata).
Click the "PDF ▾" button in any printer sheet, and the PDF workflow menu will drop down with these options:
- "Open PDF in Preview" - Generates a PDF of the print job and opens it in the application Preview.
- "Save as PDF…" - Creates a PDF of the print job to a destination of your choice with options to add metadata to the PDF (Title, Author, Subject and Keywords). Metadata is useful when you use Spotlight.
- Clicking "Security Options" will open the PDF Security Options dialog box, there are these options:
- Require password to open document
- Require password to copy text, images and other content
- Require password to print document
- Clicking "Security Options" will open the PDF Security Options dialog box, there are these options:
- "Save as PostScript…" - Generates a PostScript file of your print job to a destination of your choice.
- "Fax PDF" - Generates a PDF of the print job and sends it to your fax device for transmission. Note: An OS X Mountain Lion or OS X Lion compatible third-party fax device is needed.
- "Mail PDF" - Generates a PDF of the print job is attached to a new email document. Add email recipients and send it.
- "Add PDF to iTunes" – Generates a PDF of the print job will be added to iTunes, where you can add it to iBooks.
- "Save PDF to Web Receipts Folder" - Generates a PDF of the print job will be saved to your "~/Documents/Web Receipts" folder.
- "Edit menu…" - Add / remove printing workflows. See Automator to learn how to create new printing workflows.
Manage the printer queue and printer dock icon
Once a print job is started, the printer dock icon appears. Click the printer dock icon to open the printer queue, which is a list of print jobs that are printing, on hold, or paused. The print queue will also display messages sent from the printer; for example, "The printer is not connected."
Control-clicking the icon will bring up the Dock menu for your printer queue, as shown.
![]()
Tags on the printer queue icon include:
- Red tag with a number indicates the number of print jobs in your printer queue, the above example is indicating two print jobs.
- Green tag with a pause symbol indicates the printer queue has been paused, as shown above. Note: There is no green icon when the printer queue is resumed.
- Yellow tag with a bolt icon indicates there is an issue with the printer; for example, the printer is not currently connected to your Mac.
You can also open the print queue from the "Print & Scan" pane of System Preferences. Here is a sample print queue:
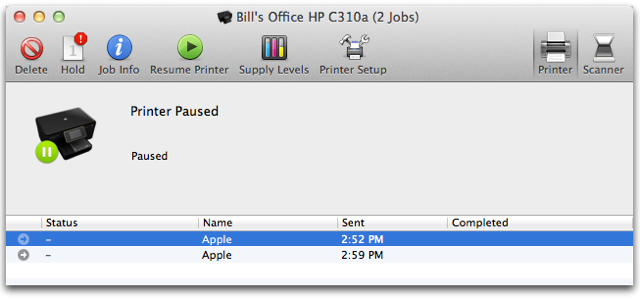
From the printer queue you can perform the following:
- Delete – Delete print jobs
- Hold / Resume – Hold or resume print jobs
- Job Info – Click to see the printer options of the print job
- Pause / Resume – Pause or resume the printer queue
- Supply Levels – Click to see the supply levels of your printer; options depend on the model of printer
- Printer Setup – Click to see options for naming your printer queue, and other choices; the options depend on the model of printer
- Printer / Scanner – Present if you are connected to a Multi-Function Printer. Alternate between the two buttons to switch from Printer Queue to Scanner Tool. See this article for scanning details
- Tip: Click on a print job to highlight it, then press the Spacebar to see a Quick Look of your print job; alternatively, click the arrow beside the job's name
Share your printer
To enable printer sharing, open the Sharing pane of System Preferences, then select the Printer Sharing "On" checkbox found in the list of services on the left side.
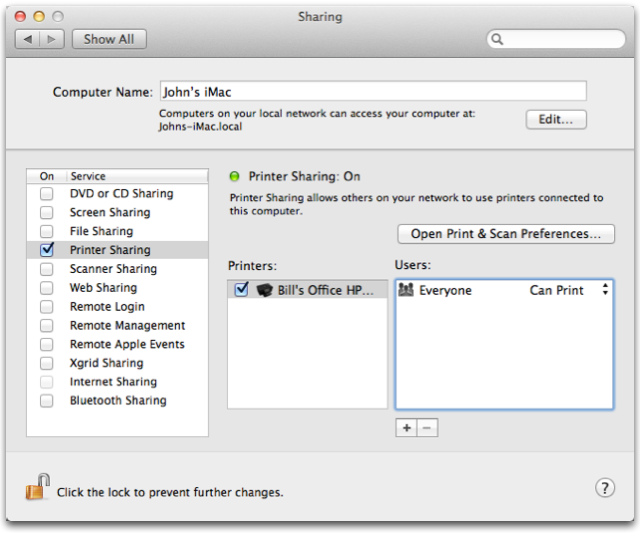
Choose which print queue to share by selecting its checkbox in the Printers column.
By default, the "Everyone" group can print to your shared Printer Queue. If you want to control access to your shared printer, click the + (plus) button below the Users column. Highlight one or more users or groups in the sheet that appears, and click Select to add them. Once added, the Everyone group access will be set to "No Access".
Tip: If you want a Windows PC to use a Mac printer share to print, install Bonjour Print Services for Windows.
More Information
Apple Resources
- OS X: Printer and scanner software available for download
- AirPrint Basics
- Troubleshooting printer issues in OS X
- OS X: Connecting a Wi-Fi printer to your Wi-Fi network
- Mac Basics: Using a scanner
- USB printer troubleshooting for AirPort Express, AirPort Extreme, and AirPort Time Capsule
Third-party information
- See this Microsoft page for information about Windows CIFS browse protocol
- See this Microsoft page for information about troubleshooting Windows CIFS protocol
Third-party printer websites
- Visit HP's website
- Visit Canon's website
- Visit Epson's website
- Visit Brother's website
- Visit Lexmark's website
- Visit Samsung's website
Additional Information
 Twitter
 Facebook
- Last Modified: Feb 12, 2014
- Article: HT4670
Views:
1261762
- Rating:
(2001 Responses)
Additional Product Support Information
