Knowledge base

Using the Mac Pro (Late 2013) on its side

Posted in Apple Portable Computers

Although the Mac Pro (Late 2013) is designed to operate in an upright position, you can also use it on its side.

The Mac Pro (2013) has a fan system capable of cooling the computer in a vertical or horizontal orientation as long as you follow these guidelines.

  • Provide enough space at each end of the computer for unrestricted airflow into the base and out the exhaust at the top. Make sure that the air intake and exhaust ports are not covered.
  • When using multiple Mac Pro (Late 2013) computers, do not direct the exhaust at the top of one Mac Pro towards the intake of another system. Place the computers side by side with a gap of at least several inches between them.
  • When on its side, secure the Mac Pro (Late 2013) to be sure that it doesn't roll. Place the computer on a protective surface that will not scratch or damage the enclosure. Note: The Apple Limited Warranty does not cover cosmetic damage to the enclosure.
  • Orient the computer so that the Input/Output (I/O) panel remains accessible during use.


Last Modified: Jan 2, 2014
Helpful?
Yes
No
One Moment Please
Thanks for your feedback.
Email this article
Print this page
  • Last Modified: Jan 2, 2014
  • Article: HT6099
  • Views:

    0

    Additional Product Support Information

    Compressor 4.1: Troubleshooting Distributed Processing

    Posted in Apple Portable Computers

    Important: Back up your Compressor custom settings.

    Prior to performing the steps in this article, make sure that you have a current backup of your Compressor custom settings. Your backups are located in ~/Library/Application Support/Compressor, and your custom settings are located in the Settings folder.


    Collapse All | Expand All


    Troubleshooting

    1. Reset Compressor's Distributed Processing

    Note: If you're transcoding using a group of shared computers, follow these steps on all computers in the group.

    1. In Compressor, choose Compressor > Preferences (or press Command-Comma) and select My Computer.
    2. Deselect “Allow other computers to process batches on my computer.”
    3. Quit Compressor by choosing Compressor > Quit Compressor (or press Command-Q).
    4. In the Finder, hold down the Option key and choose Library from the Go menu.
    5. In the Library folder that opens, open the Application Support folder. Move the Compressor folder to the Trash.
    6. If you've used Compressor 3.5.x or 4.0.x on your computer, you may have an Apple Qmaster folder on your system that you can remove.

      See the steps below to remove this folder, or continue to step 7.


    7. Restart your computer.

    Remove the existing Apple Qmaster folder

    Compressor 4.0.x:

    1. If Compressor 4.1 is running, quit Compressor by choosing Compressor > Quit Compressor.
    2. In the Finder, hold down the Option key and choose Library from the Go menu.
    3. In the Library folder that opens, open the Application Support folder. Move the Apple Qmaster folder to the Trash.
    4. Restart your computer.

    Compressor 3.5.x:

    1. If Compressor 4.1 is running, quit Compressor by choosing Compressor > Quit Compressor.
    2. In the Finder, open your startup disk and navigate to /Library/Application Support/Apple Qmaster/.
    3. Move the Apple Qmaster folder to the Trash.
    4. Restart your computer.

    2. Resolve the "...cannot be processed on more than one computer because file copy is not supported" alert

    You may see this alert if NFS cannot export the location of the source file. This could be due to the drive that your source file is located on having certain permissions, such as being set up as a network volume or formatted as ExFAT.

    If you receive this alert when submitting a batch using a group of shared computers, follow these steps:

    1. In Compressor, choose Compressor > Preferences (or press Command-Comma) and then select Shared Computers.
    2. From the list of shared computers (on the left), select the group you're submitting a batch to and deselect "Enable automatic file sharing."
    3. Then, manually mount the volume that the source file is located on for each computer in the group.

    Read Full Article

    Compressor 4.1: Opens to a gray window

    Posted in Apple Portable Computers

    To address this issue, remove the Compressor Layouts folder. The next time you open Compressor, it will create a new Layouts folder, and the Compressor window will work as expected.

    Follow these steps for OS X Mavericks:

    1. In the Finder, hold down the Option key and then choose Library from the Go menu.
    2. In the Library folder that opens, go to Application Support > Compressor.
    3. Drag the Layouts folder from the Compressor folder to the Trash.

    Read Full Article

    Mac Pro (Late 2013): Memory specifications

    Posted in Apple Portable Computers

    Learn which kinds of memory to use with your Mac Pro (Late 2013) computer. 

    General

    The Mac Pro (Late 2013) has four memory slots that you can upgrade with up to 64GB of memory using 1866 MHz DDR3 ECC compliant memory DIMMs. To ensure compatibility, Apple recommends that you use Apple-approved memory. You can purchase Apple-approved memory online from the Apple Store or by visiting an Apple Retail store or Apple Authorized Reseller.

    Requirements

    When you upgrade the memory in your Mac Pro (Late 2013) it must meet these requirements.

    • 1866 MHz DDR3 full length DIMM. Mixing memory speeds is not recommended.
    • Error-correcting code (ECC).
    • 4GB, 8GB, or 16 GB DIMMs.
    • Unbuffered (UDIMM) or Registered (RDIMM). Do not mix UDIMMs and RDIMMs.
    • 240 pin DIMM.
    • 1.5 or 1.35 volts.
    • Use the same size memory modules across all slots to maximize performance.
    • DIMMs with heatsinks are not supported and may damage the DIMM mechanism.

    Important: All DIMMs must be 1866MHz DDR3 ECC compliant. The Mac Pro supports both unbuffered UDIMMs and registered RDIMMs, but it is important not to mix these two types of memory. Mixing UDIMMs and RDIMMs will result in a memory error tone when you turn on your computer.

    Recommended configurations

    Total Memory DIMM Slot 1 DIMM Slot 2 DIMM Slot 3 DIMM Slot 4
    12GB 4GB ECC UDIMM 4GB ECC UDIMM 4GB ECC UDIMM  
    16GB 4GB ECC UDIMM 4GB ECC UDIMM 4GB ECC UDIMM 4GB ECC UDIMM
    32GB 8GB ECC UDIMM 8GB ECC UDIMM 8GB ECC UDIMM 8GB ECC UDIMM
    64GB 16GB ECC RDIMM 16GB ECC RDIMM 16GB ECC RDIMM 16GB ECC RDIMM


    Refer to Mac Pro (Late 2013): Installing or replacing memory for step by step memory installation instructions.

    Last Modified: Dec 23, 2013
    Helpful?
    Yes
    No
    One Moment Please
    Thanks for your feedback.
    Email this article
    Print this page
    • Last Modified: Dec 23, 2013
    • Article: HT6064
    • Views:

      0

      Additional Product Support Information

      Compressor 4.1: Enabling additional Compressor instances

      Posted in Apple Portable Computers

      Learn about enabling additional Compressor instances.

      Choose Compressor > Preferences (or press Command-comma) and click Advanced. Place a checkmark next to “Enable additional Compressor instances.” Then, choose a number of instances from the pop-up menu.

      Compressor changes the number of additional instances available in the pop-up based on the capabilities of your computer to optimize performance. In some cases the “Enable additional Compressor instances” checkbox may be grayed out. This is expected if Compressor will not allow for additional instances of Compressor to be enabled.

      Compressor checks the number of cores and the amount of memory you have and allows you to create one additional instance for every four cores and 2GB of memory (above the 2 GB minimum requirement). The following table shows the number of additional instances you can configure for different numbers of cores and available memory.  

        2GB RAM 4GB RAM 6GB RAM 8GB RAM 12GB RAM 16GB RAM 32GB RAM 64GB RAM
      4 cores 0 0 0 0 0 0 0 0
      8 cores 1 1 1 1 1 1 1 1
      12 cores 1 2 2 2 2 2 2 2
      16 cores 1 2 3 3 3 3 3 3
      24 cores 1 2 3 4 5 5 5 5

      Note: These are additional instances of Compressor. There is always one instance running when “Allow other computers to process batches on my computer” is turned on, even if Compressor is not open.

      For more information, refer to Enable one or more instances of Compressor in Compressor Help.

      Last Modified: Dec 22, 2013
      Helpful?
      Yes
      No
      One Moment Please
      Thanks for your feedback.
      Email this article
      Print this page
      • Last Modified: Dec 22, 2013
      • Article: HT6097
      • Views:

        0

        Additional Product Support Information

        Using 4K Ultra HD TVs with Mac computers

        Posted in Apple Portable Computers

        Learn about using 4K Ultra HD TVs with Mac computers.

        MacBook Pro (Retina, Late 2013) and Mac Pro (Late 2013) computers can use 4K Ultra HD TVs with OS X or Windows (using Boot Camp). 4K Ultra HD TVs using these specifications are supported via the HDMI port:

        • 3840-by-2160 resolution at 30Hz
        • 4096-by-2160 resolution at 24Hz (mirroring is not supported at this resolution)


        Ports and configurations for 4K Ultra HD TVs

        With the MacBook Pro (Retina, Late 2013), you can connect:

        • One 4K Ultra HD TV to the HDMI port and one Thunderbolt or third-party (non-4K) display via Thunderbolt.


        With the Mac Pro (Late 2013), you can connect:

        • Two 4K Ultra HD TVs1 and up to two 4K displays via Thunderbolt.

        • 1You can use the HDMI port for one of these and a Mini DisplayPort to high-speed HDMI adapter for the other. If you do, don't plug the second Ultra HD TV into the bottom two Thunderbolt ports on the Mac Pro since they are on the same bus as the HDMI port. Mac Pro (Late 2013): Using multiple displays explains in more detail how to use the different Thunderbolt configurations on the Mac Pro (Late 2013).


        Important: Information about products not manufactured by Apple is provided for information purposes only and does not constitute Apple’s recommendation or endorsement. Please contact the vendor for additional information.
        Last Modified: Dec 20, 2013
        Helpful?
        Yes
        No
        One Moment Please
        Thanks for your feedback.
        Email this article
        Print this page
        • Last Modified: Dec 20, 2013
        • Article: HT6008
        • Views:

          11864
        • Rating:
          • 81.0

          (125 Responses)

        Additional Product Support Information

        Mac Pro (Late 2013): Issues connecting a Thunderbolt device to another Thunderbolt device

        Posted in Apple Portable Computers

        Avoid adding Thunderbolt devices to a Thunderbolt series while printing, scanning, or when other processes are taking place related to that series of devices.

        Sometimes restarting the affected application will recover the devices, but you might need to disconnect the devices and plug them back in. Contact the device manufacturer to see if a software update is available that addresses its ability to handle a pause.

        Read Full Article

        Mac Pro (Late 2013): Audio ports

        Posted in Apple Portable Computers

        Learn about the audio ports on the Mac Pro (Late 2013).

        The Mac Pro (Late 2013) features two distinct audio ports.


        Audio out: The left audio port with a speaker icon is a 1/8" stereo minijack for audio line out. It can use analog audio and digital S/PDIF fibre optic cables. Audio devices you connect to the port will appear in System Preferences > Sound > Output. Note that this port does not support headsets or microphones.

        Headphone port: The right audio port with a headset icon is a 1/8" stereo minijack for headphones. When you plug in headphones to this port, sound is redirected from the internal speakers to the headphones. Headphones will appear in System Preferences > Sound > Output. If the headset contains a microphone, it will appear in System Preferences > Sound > Input. iPhone headsets including mic and inline controls are supported. Digital output devices are not supported on this port.

        Additional Information

        You can use the HDMI port as a digital audio port to compatible devices, such as surround sound receivers.

        Last Modified: Dec 20, 2013
        Helpful?
        Yes
        No
        One Moment Please
        Thanks for your feedback.
        Email this article
        Print this page
        • Last Modified: Dec 20, 2013
        • Article: HT6024
        • Views:

          0

          Additional Product Support Information

          Mac Pro (Late 2013): External features, ports, and connectors

          Posted in Apple Portable Computers

          Learn about the external features, port, and connectors on your Mac Pro (Late 2013) computer.

          All the ports and connectors shown here are located on the Input/Output (I/O) panel.


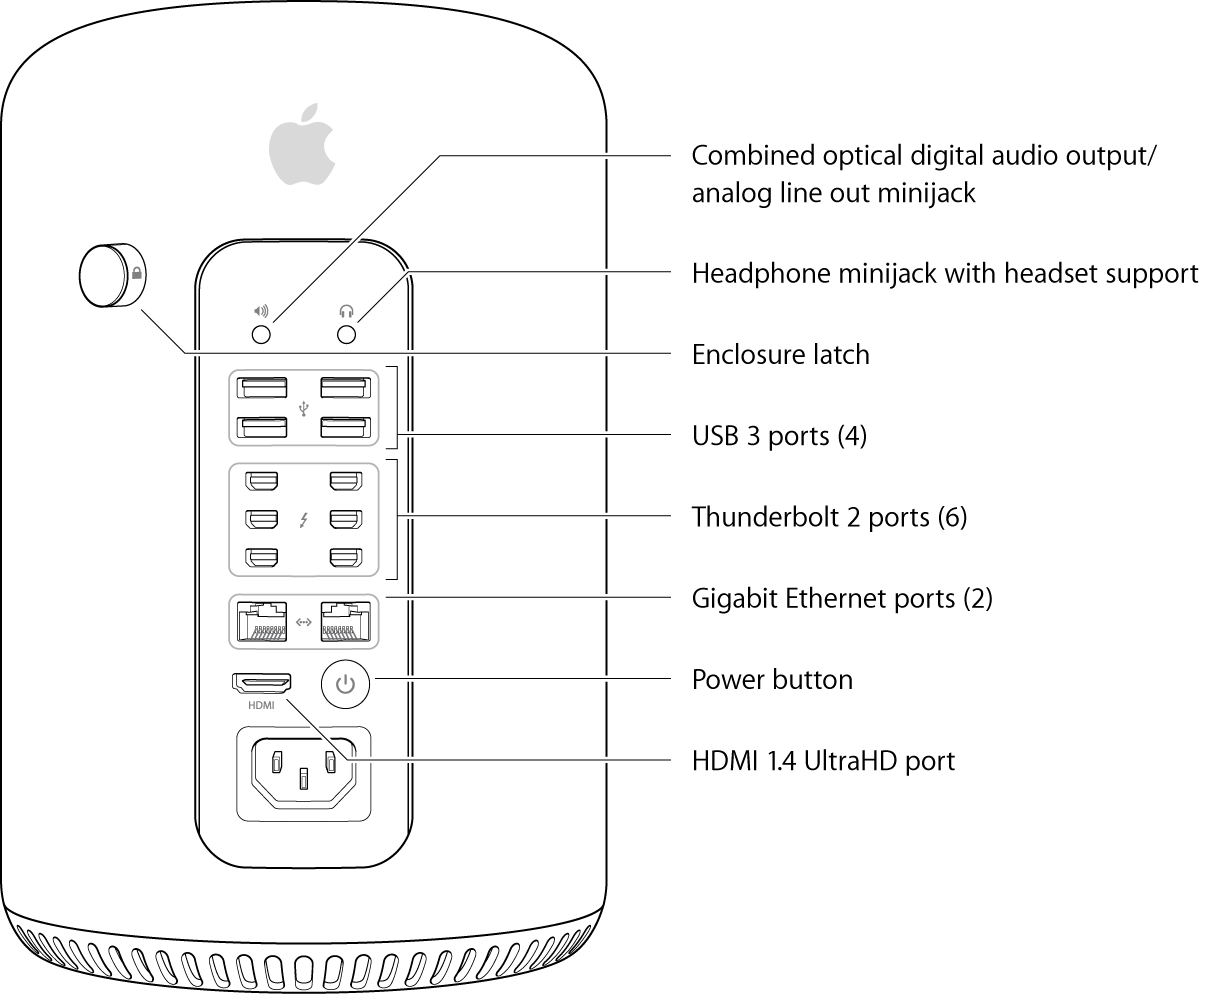
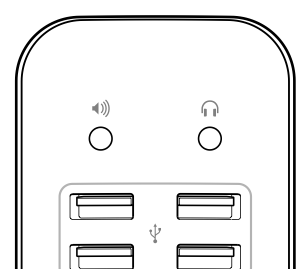
          Audio line out (digital/analog) minijack 
          The audio line out port is a 1/8" minijack that supports stereo analog audio and digital S/PDIF fiber optic cables. You can find audio devices you connect to this port in System Preferences > Sound > Output. This port does not support headsets or microphones.

          Headphone minijack
          The headphone out port is a 1/8" minijack that supports headphones and headsets. When you plug in headphones to this port, sound is redirected from the internal speakers to the headphones. Headphones will appear in System Preferences > Sound > Output. If the headset has a microphone, it will appear in System Preferences > Sound > Input. iPhone headsets including mic and inline controls are supported. Digital output devices are not supported on this port.

          Enclosure latch
          This latches the enclosure to the system core. Keep the system latched during normal use. The enclosure must be on for you to be able to turn on the computer.

          USB 3 ports (4)
          There are a total of four USB 3 ports. You can connect USB 3, USB 2, and USB 1.1 devices to these ports.

          The USB ports use USB Type A connectors which have four pins each. USB 3 (also known as "SuperSpeed USB") can transfer data up to 5Gbps. USB 3 devices can use up to 900mA of power (compared to USB 2 device which can use up to 500mA). Use USB 3 cables to take advantage of this functionality. For complete information on using USB 3 devices, see Using USB 3 devices on Mac computers FAQ.

          Thunderbolt 2 ports (6)
          Thunderbolt is a revolutionary I/O technology that supports high-resolution displays and high-performance data devices through a single, compact port.

          The Mac Pro (Late 2013) features six Thunderbolt 2 ports connected using three independent Thunderbolt 2 controllers. Each port supports up to 20Gb/s of data throughput using channel bonding. Thunderbolt supports up to six devices per port for a total of up to 36 devices connected to your Mac Pro.

          Thunderbolt 2 is backward and forward compatible with Thunderbolt devices, allowing Thunderbolt devices to connect to Thunderbolt 2 ports and Thunderbolt 2 devices to be connected to Thunderbolt ports at Thunderbolt speeds.

          Mac Pro (Late 2013) Thunderbolt ports support the following technologies as well.

          • Mini DisplayPort output using a Mini DisplayPort to Mini DisplayPort cable.
          • DVI output using a Mini DisplayPort to DVI Adapter.
          • VGA output using a Mini DisplayPort to VGA Adapter.
          • Dual-Link DVI output using Mini DisplayPort to Dual-Link DVI Adapter. This supports the 30-inch Apple Cinema HD Display.
          • HDMI audio and video output using a third-party Mini DisplayPort to HDMI Adapter.


          Gigabit Ethernet ports (2) 
          There are two built-in 10/100/1000 Gigabit Ethernet ports. You can use these to connect an Ethernet cable from a cable or DSL modem, hub, switch, or router, or to connect to another Mac computer. The Ethernet port also supports jumbo frames. The connected device can be a 10Base-T, 100Base-TX, or a 1000Base-T device, and the port automatically detects which type of device is connected. You don't have to use an Ethernet crossover cable to connect to other Ethernet devices.

          HDMI port
          Use the HDMI port to connect a compatible HDMI display, TV, or projector. Mac Pro supports HDMI 1.4 to enable connections to UltraHD and 4K displays. The HDMI port supports the following resolutions.

          • 1080p resolution at up to 60Hz
          • 3840-by-2160 resolution at 30Hz
          • 4096-by-2160 resolution at 24Hz
          Last Modified: Dec 20, 2013
          Helpful?
          Yes
          No
          One Moment Please
          Thanks for your feedback.
          Email this article
          Print this page
          • Last Modified: Dec 20, 2013
          • Article: HT6067
          • Views:

            0

            Additional Product Support Information

            Mac Pro (Late 2013): Using multiple displays on Windows 8 via Boot Camp

            Posted in Apple Portable Computers

            Learn about using multiple displays via Thunderbolt, Mini DisplayPort, and HDMI connections on your Mac Pro (Late 2013) with Windows 8.

            What display configurations can I use with my Mac Pro (Late 2013)?

            You can connect up to six displays to your Mac Pro (Late 2013) running Windows 8 via Boot Camp. Check the list below to be sure you're setting up your displays in a supported configuration via the HDMI and Thunderbolt ports.

            You can connect:

            • Six Apple LED Cinema Displays (27-inch) or third-party displays via Thunderbolt. For best results, attach displays to different Thunderbolt busses when possible (see figure below).
            • Three Apple Thunderbolt Displays (27-inch). Connect only one per Thunderbolt bus (see figure below). Note: You could connect three more LED Cinema Displays (27-inch) or third-party displays, one per Thunderbolt bus, for a total of six displays.
            • Two Apple Thunderbolt Displays (on Thunderbolt bus 1 and 2) and one 4K Ultra HD TV using HDMI.
            • Two 4K displays (on Thunderbolt buses 1 and 2) and one 4K Ultra HD TV on HDMI).


            Which 4K displays can I use?

            You can use the Sharp PN-K321 and the ASUS PQ321Q with the Mac Pro (Late 2013). These displays require using a Mini DisplayPort to DisplayPort cable or a High-Speed HDMI cable to connect to your Mac Pro.

            Notes:

            • European versions of these displays do not have an HDMI port. 
            • Some Windows 8 applications might display only half of the screen on a 4K display when using 60Hz. Change the 4K settings on the display using the display's built-in controls to 30Hz to display a full screen when using these applications.

            Can I connect DVI displays?

            Yes, with an appropriate adapter. Use two or fewer DVI displays (or other TMDS signaling devices) with your Mac Pro at the same time. Use only one if you are also using an HDMI device.

            Where can I find more information on connecting displays to my Mac Pro (Late 2013)?


            Important: Information about products not manufactured by Apple is provided for information purposes only and does not constitute Apple’s recommendation or endorsement. Please contact the vendor for additional information.
            Last Modified: Dec 20, 2013
            Helpful?
            Yes
            No
            One Moment Please
            Thanks for your feedback.
            Email this article
            Print this page
            • Last Modified: Dec 20, 2013
            • Article: HT6068
            • Views:

              0

              Additional Product Support Information