Knowledge base

Mac Pro (Late 2013): Using multiple displays

Posted in Apple Portable Computers

Learn about using multiple displays (such as monitors, TVs, and projectors) with your Mac Pro (Late 2013) via Thunderbolt, Mini DisplayPort, and HDMI connections.

What display configurations can I use with my Mac Pro (Late 2013)?

You can connect up to six displays to your Mac Pro (Late 2013). Check the list below to be sure you're setting up your display in a supported configuration via the HDMI and Thunderbolt ports. Note: Windows has different specifications for connecting multiple displays.

You can connect up to:

  • Six Apple Thunderbolt Displays (27-inch), Apple LED Cinema Displays (27-inch), or third-party Mini DisplayPort displays.
  • Three 4K displays: two connected via Mini DisplayPort and one connected via HDMI.
  • One 4K Ultra HD TV or 4K display using HDMI and four Apple Thunderbolt Displays (27-inch), Apple LED Cinema Displays (27-inch), or third-party Mini DisplayPort displays.
  • Two 4K Ultra HD TVs: one connected via HDMI and one connected via Mini DisplayPort with high-speed HDMI adapter (see note below).


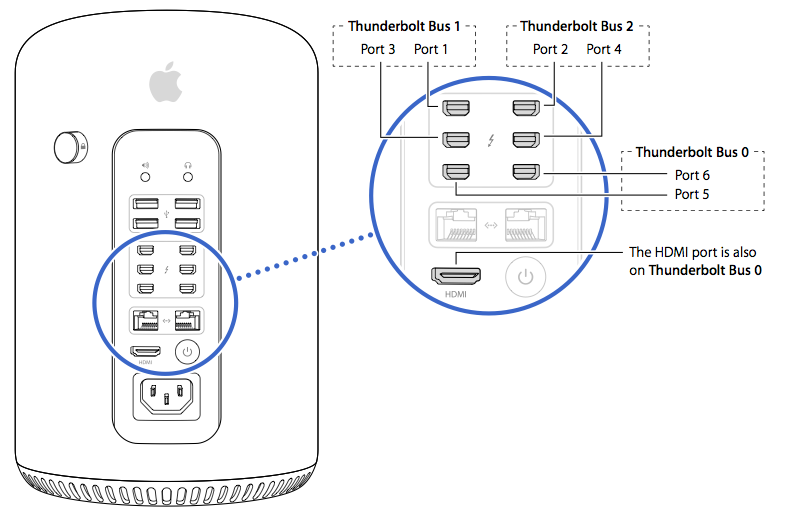
Note: Attach displays to different Thunderbolt busses when possible (see figure below). Do not attach more than two displays to any Bus. This means that if you use the HDMI port, be sure to then only use one of the bottom two Thunderbolt ports (Bus 0). 


Which 4K displays can I use?

You can use the Sharp PN-K321 and the ASUS PQ321Q with the Mac Pro (Late 2013). These displays require using a Mini DisplayPort to DisplayPort cable or a High-Speed HDMI cable to connect to your Mac Pro. European versions of these displays do not include an HDMI port.

Note that these displays default to 30 Hz (instead of 60 Hz) and need to be manually configured to 60 Hz using the display's built-in controls.

  • For the Sharp PN-K321, you can modify this under Settings > DisplayPort STREAM.
  • For the ASUS PQ321Q, you can modify this under OSD menu > Setup > DisplayPort Stream.


Can I use more 4K Ultra HD TVs in addition to one connected to the HDMI port?

Yes. You can connect one additional 4K Ultra HD TV by using an adapter that conforms to the High Speed HDMI cable standard and connecting it to a Thunderbolt port. Check with the manufacturer of the cable to determine if it supports this standard. Do not use Thunderbolt Bus 0 to connect this additional device if you've connected a 4K Ultra HD TV to the HDMI port.

Are display rotation and scaling supported with my connected 4K Ultra HDTV or 4K display?

Scaling and display rotation are supported for a 4K Ultra HD TVs or 4K displays using the HDMI port. When rotating a 4K Ultra HD TV or 4K display at 90 or 270 degrees, the resolution will change to 1080p.

Can I connect DVI displays?

You can use two DVI displays with your Mac Pro. If you connect a third display via HDMI, it will cause one of the three displays to become inactive. To avoid this, consider using Thunderbolt, Mini DisplayPort, or VGA for connecting additional displays if you are already using two DVI displays.

Which displays are active during startup?

Usually only one connected display will illuminate until OS X is finished starting.


Important: Information about products not manufactured by Apple is provided for information purposes only and does not constitute Apple’s recommendation or endorsement. Please contact the vendor for additional information.
Last Modified: Dec 20, 2013
Helpful?
Yes
No
One Moment Please
Thanks for your feedback.
Email this article
Print this page
  • Last Modified: Dec 20, 2013
  • Article: HT5918
  • Views:

    0

    Additional Product Support Information

    Mac Pro (Late 2013): Installing or replacing memory

    Posted in Apple Portable Computers

    This article explains how to properly remove and install memory DIMMs on the Mac Pro (Late 2013).

    The Mac Pro (Late 2013) has four user-upgradeable memory slots supporting up to 64GB of memory when all four slots are filled using 1866 MHz DDR3 ECC RDIMMs. 

    Before upgrading memory

    Make sure that the memory you plan to use is compatible with your system. The Mac Pro supports both unbuffered UDIMMs and registered RDIMMs, but it is important not to mix these types of memory. DIMMs which are not properly installed or do not meet the system requirements may affect system performance or not be recognized by the system.

    Apple recommends that you use Apple-approved DIMMs. DIMMs from older Mac Pro computers should not be used in your new Mac Pro. You can purchase Apple-branded memory online from the Apple Store or by visiting an Apple Retail store or Apple Authorized Reseller.

    Refer to Mac Pro (Late 2013): Memory specifications for additional information.

    Removing and installing memory

    Part 1: Remove the enclosure

    1. Before you open your Mac Pro, shut it down by choosing Shut Down from the Apple () menu.
    2. If the computer is warm to the touch, wait approximately 5-10 minutes for the computer to cool down.
    3. Touch the metal enclosure on the outside of the Mac Pro to discharge any static electricity. 
      Important: Always discharge static before you touch parts or install components inside your Mac Pro. To avoid generating static, don't move around the room until you finish installing the memory and slide the enclosure back onto the computer.
    4. Unplug all the cables and the power cord from your Mac Pro. Do not attempt to install memory while its plugged in.
    5. Slide the enclosure latch to the right to unlock the enclosure.

    6. Lift the enclosure straight up and off the computer and carefully set it aside.

    7. The DIMM slots are now visible from the left and right side of the I/O panel.

    Part 2: Removing existing DIMMs

    Your Mac Pro shipped with DIMMs already installed in some or all of the DIMM slots. Before upgrading the memory, you may need to remove some or all of the DIMMs. Refer to the table below to determine how your Mac Pro is configured and to determine which DIMMs you need to remove and replace to maintain a recommended memory configuration. See the numbered steps following the table to locate specific DIMM slots.

    Important: All DIMMs are 1866MHz DDR3 ECC. Do not mix UDIMMs and RDIMMs.

    12GB 4GB ECC UDIMM 4GB ECC UDIMM 4GB ECC UDIMM  
    16GB 4GB ECC UDIMM 4GB ECC UDIMM 4GB ECC UDIMM 4GB ECC UDIMM
    32GB 8GB ECC UDIMM 8GB ECC UDIMM 8GB ECC UDIMM 8GB ECC UDIMM
    64GB 16GB ECC RDIMM 16GB ECC RDIMM 16GB ECC RDIMM 16GB ECC RDIMM

    Remove DIMMs by following these steps.

    1. There are a total of four DIMM slots, two are located to the left, and two are located to the right of the Mac Pro I/O panel. 
    2. To access the DIMM slots, press the RAM bay release lever identified by a white triangle (A) located at the top of each DIMM bank. When pressed, the DIMM slots will swing out making them easily accessible.
    3. Locate the DIMM(s) to be removed. The slots are number 1-4 (B). Using your thumb and index finger from each hand, gently grip the DIMM at each end and carefully remove the DIMM by pulling the DIMM straight out of the DIMM slot. Do not twist or force the DIMM out of the socket or damage may occur. Remove the outer DIMMs first to make the inner DIMMs easier to remove.

    4. Place the removed DIMMs into an ESD (electrostatic discharge) protective bag.

    Part 3: Installing DIMMs

    Each DIMM (F) has a notch (E) that must line up with the key (D) inside of the DIMM slot (C). Note: The key/notch position is different on each side of the computer.

    1. Locate the DIMM slot closest to the interior of the computer and confirm that no DIMM is there. 
    2. If available, use canned air to blow dust and other contaminants out of the DIMM slot. Note: Keep the can vertical to avoid spraying propellants onto the DIMM slots.
    3. Gently hold the DIMM ends and insert it into the slot. Ensure horizontal alignment of the DIMM prior to applying any force.
    4. Insert the DIMM at the angle determined by the open DIMM mechanism.
    5. Insert gently until bottom edge of DIMM is touching the gold contacts, then apply more force to fully seat the DIMM.
      • Do NOT force the DIMM. If the DIMM doesn't insert, verify that the key (D) and notch (E) are aligned.
      • Do NOT rock the DIMM into the seated position.
      • Do NOT insert DIMMs while the DIMM mechanism is in the locked position.
      • Do NOT bend or twist the DIMM during insertion.    
    6. Press the RAM bay back into place after installing all DIMMs.

    Part 4: Reinstall the enclosure

    1. Carefully lower the enclosure over the Mac Pro being careful not to touch any of the circuit boards.
    2. You may need to gently push down on the enclosure in order for it to seat fully.

    3. Once the enclosure is fully seated, slide the enclosure latch to the left to lock it. 

    4. If the enclosure latch does not move all of the way to the left, verify that the enclosure is properly installed and fully seated, then try again.
    5. You are now ready to connect a power cord, display, and other peripherals. Power on your Mac Pro and verify that your system is operating properly.

    Memory verification

    To verify that the memory was correctly installed and is recognized by the Mac Pro, follow these steps.

    1. From the Apple () menu, choose About this Mac.
    2. Click More Info. A window with general information about your Mac will appear.

    3. Click the System Report button to bring up more detailed information on the memory installed in the computer. 
    4. Click the Memory tab.
    5. Check to be sure that the memory you installed is listed and appears as you expect it to. In the image below, the DIMMs are annotated (DIMM1, DIMM2, DIMM3, DIMM4) so you can identify the corresponding DIMMs which are numbered 1, 2, 3, and 4 at the bottom of the DIMM mechanism.
    6. If one or more memory slots that you installed memory in are listed as empty, shut down your computer and follow the steps again to verify that the memory is correctly installed. Refer to Mac Pro (Late 2013) Memory Specifications to confirm that the memory meets the requirements for your Mac Pro.
    7. If you continue to have issues with memory you installed,  Contact Apple Support for information about the support options available to you.


    Last Modified: Dec 20, 2013
    Helpful?
    Yes
    No
    One Moment Please
    Thanks for your feedback.
    Email this article
    Print this page
    • Last Modified: Dec 20, 2013
    • Article: HT6054
    • Views:

      0
    • Rating:
      • 100.0

      (1 Responses)

    Additional Product Support Information

    Mac Pro (Late 2013): Removing and installing flash storage

    Posted in Apple Portable Computers

    The Mac Pro (Late 2013) can have up to 1TB of internal PCIe-based flash storage. Follow the instructions in this article to remove and install flash storage.

    The Mac Pro (Late 2013) has one user-accessible flash storage slot supporting flash storage capacities of 256GB, 512GB, or 1TB. 

    Before removing flash memory, make sure your data is backed up. Also, be sure you are planning to use a compatible flash storage device.

    Part 1: Remove the enclosure

    1. Before you open your Mac Pro, shut it down by choosing Shut Down from the Apple () menu.
    2. If the computer is warm to the touch, wait approximately 5-10 minutes for the computer to cool down.
    3. Touch the metal enclosure on the outside of the Mac Pro to discharge any static electricity.
      Important: Always discharge static before you touch parts or install components inside your Mac Pro. To avoid generating static, don't move around the room until you finish installing the flash storage device and slide the enclosure back onto the computer.
    4. Unplug all the cables and the power cord from your Mac Pro. Do not attempt to install flash storage while the Mac Pro is plugged in.
    5. Slide the enclosure latch to the right to unlock the enclosure.

    6.  

    7. Next, lift the enclosure straight up and off the computer and carefully set it aside.

    Part 2: Remove existing flash memory

    1. The flash storage device (A) is attached to the graphics board by a T8 Torx screw.

    2. Using a T8 screwdriver, remove the screw that secures the flash storage device to the graphics board. Do not let the screwdriver make contact with other areas of the graphics board or damage may result.
    3. Place the T8 Torx screw in a safe place. You will need it when installing other flash storage.
    4. With one hand, gently hold the sides of the flash storage device and gently lift it straight up to disengage it from the flash storage connector located at the bottom of the device.
    5. Once disengaged from the flash storage connector, pull the flash storage device away from the graphics board and place it into an electro-static discharge (ESD) protective bag.

    6. DO NOT pull the flash storage device away from the graphics board until it has completely disengaged from the flash storage connector or you may damage the connector.


    Part 3: Installing flash memory

    1. Before reinstalling the replacement flash storage, carefully inspect the connector. The flash storage is keyed with a thin slot that connects with the flash storage connector to prevent incorrect installation.
    2. Orient the flash storage so that it will connect with the flash storage connector.
    3. While holding the flash storage parallel to the graphics board, place the flash storage contacts into the graphics board flash storage connector.
    4. Gently push down until it is fully seated. Do not force the flash storage device into position. If the flash storage device doesn't appear to fit, verify that you are using a compatible device, and that the key on the flash storage device is oriented correctly to connect with the flash storage connector on the graphics board.

    5. With the flash storage device in place, carefully install the T8 screw that you removed earlier. Do not let the screwdriver make contact with other areas of the graphics board or damage may result.

    Part 4: Reinstall the enclosure

    1. Carefully lower the enclosure over the Mac Pro being careful not to touch any of the circuit boards.
    2. You may need to gently push down on the enclosure in order for it to seat fully.

    3. Once the enclosure is fully seated, slide the enclosure latch to the left to lock it.

    4. If the enclosure latch does not move all of the way to the left, verify that the enclosure is properly installed and fully seated, then try again.
    5. You are now ready to connect a power cord, display, and other peripherals.
    6. If the drive isn't already formatted with a file system or doesn't have a bootable operating system, start up in Internet Recovery mode by holding down the Command, Option, and R keys. Once started, you can format and reinstall OS X or restore data using a Time Machine backup if you have one available.


    Last Modified: Dec 20, 2013
    Helpful?
    Yes
    No
    One Moment Please
    Thanks for your feedback.
    Email this article
    Print this page
    • Last Modified: Dec 20, 2013
    • Article: HT6061
    • Views:

      0

      Additional Product Support Information

      Mac Pro (Late 2013): How to find the serial number

      Posted in Apple Portable Computers

      Learn how to find the serial number for your Mac Pro (Late 2013) computer.

      You can find your serial number in several places:

      • In OS X
      • On the bottom surface of the computer
      • On the original product packaging
      • On the original receipt (or invoice)

      In OS X

      Click the Apple () menu and choose About this Mac. Then, click the More Info button. The serial number is listed in the Overview tab.

      On the bottom surface of the computer

      You can find the serial number on the computer's bottom surface as shown below.

      On the original product packaging

      If you still have the original packaging for your Mac Pro, you can find the serial number on the barcode label that is affixed to the packaging.

      On the original receipt (or invoice)

      Some retailers may include the serial number for your Mac Pro on the receipt.

      Last Modified: Dec 20, 2013
      Helpful?
      Yes
      No
      One Moment Please
      Thanks for your feedback.
      Email this article
      Print this page
      • Last Modified: Dec 20, 2013
      • Article: HT6062
      • Views:

        0

        Additional Product Support Information

        Mac Pro (Late 2013): Recommended software and firmware updates

        Posted in Apple Portable Computers

        OS X software and firmware updates are available for Mac Pro (Late 2013) computers.

        How can I install the most recent software and firmware updates?
        From the Apple () menu, choose Software Update. Install any updates related to OS X.


        How can I tell if I have the most current OS X software?
        From the Apple () menu, choose About This Mac. If you see "Version 10.9.1" or later, your Mac Pro is up to date.
         

        How can I tell if I have the most current firmware?
        From the Apple () menu, choose About This Mac and click More Info. Then, click System Report. You are up to date if you see the following in the "Boot ROM Version" field: "MP61.0116.B04".

        If you do not see these version numbers, you should run Software Update and follow the instructions until there are no more available updates listed for your computer.

        Last Modified: Dec 20, 2013
        Helpful?
        Yes
        No
        One Moment Please
        Thanks for your feedback.
        Email this article
        Print this page
        • Last Modified: Dec 20, 2013
        • Article: HT6091
        • Views:

          0

          Additional Product Support Information

          iMac (Late 2013): Understanding the first startup cycle

          Posted in Apple Portable Computers

          This is normal during the first startup cycle when the iMac is configuring the RAM power settings to ensure that the computer is maximizing its energy efficiency. This setup period may last up to thirty seconds. This duration will vary depending on the number and capacity of the RAM DIMMs installed. Don't push the power button again until you allow the iMac to complete the process; it will automatically continue to start up once it has completed the task.

          Subsequent startup sequences will not include the RAM power setting configuration and the iMac will power up immediately.

          Note: Installing additional system RAM or resetting the Non-Volatile RAM (NVRAM) will cause the computer to go through the configuration process again.

          Read Full Article

          About the transition to Compressor 4.1 white paper

          Posted in Apple Portable Computers

          Learn about the transition to Compressor 4.1 white paper.

          Compressor 4.1 introduces a new, improved interface and various workflow enhancements that differ from workflows in previous versions of Compressor. The transition to Compressor 4.1 white paper, structured according to the major parts of a transcoding workflow, uses the Compressor 4.0.7 application for comparison to discuss how to complete important tasks in Compressor 4.1.

          Last Modified: Dec 20, 2013
          Helpful?
          Yes
          No
          One Moment Please
          Thanks for your feedback.
          Email this article
          Print this page
          • Last Modified: Dec 20, 2013
          • Article: HT6096
          • Views:

            0

            Additional Product Support Information

            About the VPN Update for OS X Server

            Posted in Apple Portable Computers

            The VPN Update for OS X Server fixes an issue that could prevent L2TP VPN connections.

            The VPN Update for OS X Server is available both as an automatic software update from the Mac App Store, and as a manual download from Apple Support Downloads.

            If you have enabled the L2TP VPN service in OS X Server (Mavericks) and users are unable to connect, install the following updates on the server:

            • The OS X Mavericks v10.9.1 Update
            • The VPN Update for OS X Server
            Last Modified: Dec 19, 2013
            Helpful?
            Yes
            No
            One Moment Please
            Thanks for your feedback.
            Email this article
            Print this page
            • Last Modified: Dec 19, 2013
            • Article: HT6080
            • Views:

              0

              Additional Product Support Information