Knowledge base

OS X Server: Adjusting message size limits for the Mail service

Posted in Apple Portable Computers

The message size limit may be increased or disabled via use of the serveradmin command in Terminal.

In OS X Server (Mountain Lion) and OS X Server (Mavericks), the default Mail service configuration limits delivery of messages to 10 MB or less. Messages larger than 10 MB will be rejected by the Server.

To change the message size limit, execute the following command:

sudo serveradmin settings mail:postfix:message_size_limit = number

The number in the command above is equal to the desired message size limit in bytes.  To calculate the correct value for the desired size limit, multiply the MB value by 1048576. For example, for a 20 MB limit, the calculation would be 20x1048576=20971520.  The number in the above command would therefore be 20971520.

Note: Excessively small values will result in the loss of non-delivery notifications, when a bounce message size exceeds the local or remote MTA's message size limit.

Additional Information

To disable the message size limit, execute the following command:

sudo serveradmin settings mail:postfix:message_size_limit_enabled = no


Note: The size limit can be reinstated by using the same command with a value of yes in place of no.


You can check the current message size limit value with this command:

sudo serveradmin settings mail:postfix:message_size_limit
Last Modified: Nov 27, 2013
Helpful?
Yes
No
One Moment Please
Thanks for your feedback.
Email this article
Print this page
  • Last Modified: Nov 27, 2013
  • Article: HT5627
  • Views:

    21605
  • Rating:
    • 62.0

    (202 Responses)

OS X Server (Mountain Lion): How to install missing profiles and applications to iOS devices in Profile Manager

Posted in Apple Portable Computers

Learn how to install missing device configuration profiles to iOS devices using Profile Manager in OS X Server (Mountain Lion).

In some situations, configuration profiles and associated apps may be missing from iOS devices, such as when a user cancels the app install when the configuration profile is first sent from the Profile Manager server.

These missing profiles and applications can be installed from server using Profile Manager. Devices can be updated by device, device group, or by association with a user or group of users.

  1. In Profile Manager, select the Device, Device Group, User or Group to update.
  2. Click the Action (gear) button and select Update Info.
  3. You will be presented with a list of devices to update. Click the Update Info button to proceed.

In addition to updating device information, any missing configuration profiles or associated apps will be installed.

Last Modified: Nov 27, 2013
Helpful?
Yes
No
One Moment Please
Thanks for your feedback.
Email this article
Print this page
  • Last Modified: Nov 27, 2013
  • Article: HT5366
  • Views:

    17216
  • Rating:
    • 57.0

    (359 Responses)

Additional Product Support Information

iPhoto 9.5: Syncing albums with Facebook

Posted in Apple Portable Computers

Learn about the information synced to Facebook albums in iPhoto 9.5.

The information synced to Facebook albums has changed in iPhoto 9.5.

  • For albums first synced to Facebook in iPhoto 9.5, iPhoto will sync the information in the description field for the photo to the caption on Facebook.
  • For albums first synced to Facebook in an earlier version of iPhoto, iPhoto will continue to sync the information in the title field to the caption on Facebook.


If you would like the existing Facebook albums to sync with iPhoto's description field instead of the title, remove your Facebook account in iPhoto's Accounts preferences, and then re-add it.


Additional Information

Photos in your Facebook albums that are not stored locally in your iPhoto Library do not have a description field in the Info panel. Because of this, you won't be able to update your Facebook caption for these photos within iPhoto.

Important: Mention of third-party websites and products is for informational purposes only and constitutes neither an endorsement nor a recommendation. Apple assumes no responsibility with regard to the selection, performance or use of information or products found at third-party websites. Apple provides this only as a convenience to our users. Apple has not tested the information found on these sites and makes no representations regarding its accuracy or reliability. There are risks inherent in the use of any information or products found on the Internet, and Apple assumes no responsibility in this regard. Please understand that a third-party site is independent from Apple and that Apple has no control over the content on that website. Please contact the vendor for additional information.
Last Modified: Nov 22, 2013
Helpful?
Yes
No
One Moment Please
Thanks for your feedback.
Email this article
Print this page
  • Last Modified: Nov 22, 2013
  • Article: HT5885
  • Views:

    2741
  • Rating:
    • 63.0

    (32 Responses)

Additional Product Support Information

iWork for Mac: Importing and exporting iWork '09 documents

Posted in Apple Portable Computers

Learn what to expect when using iWork for Mac to open documents created in iWork ’09 and what to expect when using iWork for Mac to export documents to iWork ’09.

Importing from iWork ’09

To import an iWork ’09 document, choose File > Open. Then, select the document and click Open. Or, you can drop the document on the Pages, Numbers, or Keynote icon in the Dock.

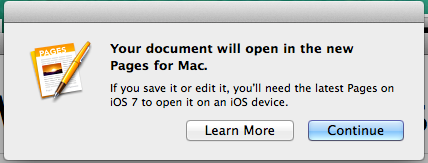
The first time you open an iWork ’09 document in one of the new iWork for Mac apps, you will see a dialog. This dialog lets you know that saving or editing the document requires you to use the latest version of the app on iOS 7 if you want to work with the document on iOS after using it on your Mac. 

When you open an iWork '09 document, you might see a list of features in your document that are supported in iWork ’09 but not in the new iWork for Mac apps.

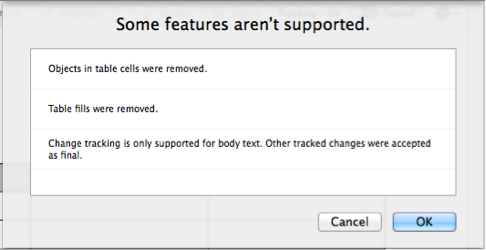
  • If you click Cancel, your document will close and the iWork ’09 features will be preserved.
  • If you click OK, your document will open and you’ll be able to see what the document looks like without the iWork ’09 features. You’ll still be able to revert to the iWork ’09 version if you close the document without saving or by reverting from the File menu.

The first time you save or edit an iWork ’09 document in one of the new iWork for Mac apps, a dialog will ask you to confirm that you want to convert the document to the new iWork file format.

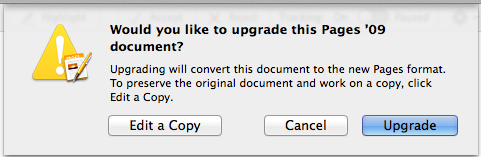
  • Clicking Upgrade converts the document to the new format.
  • Clicking Cancel cancels the save or edit.
  • Clicking Edit a Copy converts a copy of the document to the new format while preserving the original in the iWork ’09 format.

Reverting your document to a previous version

If you have already upgraded your document to the new iWork file format and would like to revert back to a version of the document that you can open in iWork '09, do one of the following:

  • You can revert to the most recent iWork '09 version by selecting File > Revert To.
  • If you edited the document and want to preserve the edits, you can save the file as an iWork ’09 document by choosing File > Export To. Then, choose Pages ’09, Numbers ’09, or Keynote ’09.

Changes that occur when importing from iWork ’09 

You'll see warnings about most of these changes in the "Some features aren't supported" dialog.

All Apps

  • Rotation is removed from tables and charts. 
  • Table fills are removed. 
  • Grouped wedges in pie charts are ungrouped. 
  • Custom number formats are removed from charts. 
  • OS X search (Spotlight) metadata is removed.  

Pages

  • Change tracking is only supported for body text. Other tracked changes are accepted as final. 
  • Linked text boxes are unlinked. 
  • Objects in table cells are removed. 
  • Links to other Pages files are removed. 
  • Bookmarks are hidden in Pages for Mac, but if you export your document back to Pages ’09 they will reappear.

Numbers

  • Table categories are removed. 

Keynote 

  • The “Require password to exit show” setting is removed. To set a new password, choose Keynote > Preferences > Slideshow, then select “Require password to exit slideshows.” Enter a password when prompted, then click Set Password. This password will apply to all presentations played on this computer. 
  • Slide objects layered behind master objects are moved in front of the master objects. 
  • Slides indented more than six levels are promoted to level six. 
  • Links to other Keynote files are removed. 
  • Rotation is removed from object placeholders. 
  • The following transitions are converted to Dissolve: Blur, Burn, Droplet, Falling Tiles, Flash, Grid, Motion Dissolve, Radial, Shutter. 
  • The Revolve transition is renamed Object Flip. 
  • Convergence builds are converted to Dissolve. 
  • The following types of builds are removed: Builds on master slides, smart builds, builds on chart legends, builds on slide numbers.

Exporting to iWork ’09

To export to iWork ’09 

To export a document in iWork ’09 format, choose File > Export To > Keynote ’09 / Pages ’09 / Numbers ’09, then follow the on-screen instructions.  

Changes that occur when exporting to iWork ’09 

All Apps

  • Curved shadows and contact shadows are converted to drop shadows. 
  • Comments on objects are removed. 
  • Anchored objects are converted to floating or inline objects. 
  • The following formulas are removed: INTERSECT.RANGES, POLYNOMIAL, SERIESSUM, UNION.RANGES, WEIBULL. Note: The last calculated values are exported. 
  • Interactive charts are converted to regular charts. 
  • Bubble charts are converted to scatter charts. 
  • Vertical text—such as Chinese, Japanese, and Korean—isn’t fully supported in iWork ’09. 

Pages

  • Tables of contents are converted to plain text. They won’t update automatically in Pages ’09. 
  • Right-to-left text—such as Arabic and Hebrew—isn’t fully supported in Pages ’09. 

Numbers

  • If a document contains "OR" filters within a column and "AND" filters across columns, all filter rules are exported; "AND" filters are converted to "OR". 
  • Duration-based filters and conditional highlights are removed. 

Keynote 

  • The following transitions are converted to Dissolve: Clothesline, Object Cube, Object Pop, and Switch. 
  • The Object Flip transition is renamed Revolve. 
  • The following build-in effects are converted to Dissolve: Blur, Fade and Scale, Twist and Scale, Fireworks. 
  • The following build-out effects are converted to Dissolve: Blur, Fade and Scale, Twist and Scale, Crumble, Vanish. 
  • Emphasis builds are removed. Emphasis builds are Blink, Bounce, Flip, Jiggle, Pop, and Pulse. 
  • Comments on table cells are removed. 
  • Links are removed from grouped objects. 


Additional Information

For more information about iWork ’09 features we plan to reintroduce, see About the new iWork for Mac: Features and compatibility.

Last Modified: Nov 21, 2013
Helpful?
Yes
No
One Moment Please
Thanks for your feedback.
Email this article
Print this page
  • Last Modified: Nov 21, 2013
  • Article: HT5994
  • Views:

    6405
  • Rating:
    • 65.0

    (92 Responses)

iCloud: iWork for iOS document icon is dimmed, or ‘Cleaning’ appears under the app icon

Posted in Apple Portable Computers

“Cleaning” appears when your device is clearing the app's cache, which is a temporary storage area for documents and other data. You don't need to do anything: just wait for the word to go away, which means the process is complete. No data is lost during cache cleaning, because your documents are stored on iCloud.

After the cache is cleared, document icons in the iWork app may be dimmed and show a download arrow. Tap the document to download and open it as normal. If you can't open the document, contact iCloud Support for help.

More information about cache cleaning
On devices using iOS 5 or later, cache cleaning occurs automatically when the device has less than 1 GB of available storage. This storage-management feature is designed to optimize the performance of your iOS device when space is limited. The cache for infrequently used documents is cleared first.

Read Full Article

iMovie (2013): About video card compatibility

Posted in Apple Portable Computers

Installing iMovie (2013) previously required a computer with an OpenCL-capable video card. This requirement was removed, and you can install iMovie version 10.0.1 on any Mac with OS X Mavericks.

To update to the latest version of iMovie:
  1. Open the Mac App Store
  2. Click the Updates tab.
  3. Click Update All or click the Update button next to iMovie.


Additional Information

 To learn more about iMovie (2013) system requirements, visit iLife System Requirements.

Last Modified: Nov 20, 2013
Helpful?
Yes
No
One Moment Please
Thanks for your feedback.
Email this article
Print this page
  • Last Modified: Nov 20, 2013
  • Article: HT6023
  • Views:

    7614
  • Rating:
    • 71.0

    (443 Responses)

Additional Product Support Information

iMovie (2013): Updating projects and events from previous versions of iMovie

Posted in Apple Portable Computers

Learn how you can update projects and events created with previous versions of iMovie to work with iMovie (2013).

When you first open iMovie (version 10.0 or later), the dialog below appears and asks "Do you want to update your projects and events?"

To update later

If you choose Update Later, you can update projects and events by following these steps.

  1. Open iMovie.
  2. From the menu bar, choose File > Update Projects and Events.
  3. Click Update in the dialog that appears.

To update projects and events on external drives

  1. Verify that the iMovie Projects and iMovie Events folders are stored on the top-level of the drive.
  2. Open iMovie.
  3. Choose File > Update Projects and Events.

If updating is interrupted or takes an extended period of time

Some users have encountered reliability issues when updating projects and events with iMovie version 10.0. In these cases, iMovie appeared to stop responding while updating or quit unexpectedly. iMovie version 10.0.1 addresses these issues.

Before updating your projects and events, verify that the latest iMovie update is installed.

  1. Open the Mac App Store.
  2. Click the Updates tab.
  3. Click Update All or the Update button that appears next to iMovie.

After verifying that you have the latest version of iMovie, you can update your projects and events by following these steps.

  1. In the Finder, click the Go menu and choose Home.
  2. Open the Movies folder.
  3. Move the “iMovie Library” file to the Trash.
    Note: If you have imported content or created projects with iMovie version 10.0, do not delete this file.
  4. In the iMovie Projects and iMovie Events folders, you’ll find a file named “UpdatedtoiMovie10.” Move this file to the Trash from both folders.
  5. Open iMovie.
  6. Choose File > Update Projects and Events.

iMovie will update your projects and events. You can repeat these steps for projects and events stored on external drives.


After updating, your projects and events are placed in a new library which you can see in the iMovie sidebar.

  • Each event is marked with a star.
  • Your updated projects are in the Updated Projects event.
  • If you previously shared or finalized any of these projects, those video files will appear in the Finalized Movies event.

In the Finder, an “iMovie Library” file is created alongside your original “iMovie Projects” and “iMovie Events” folders.

These folders will continue to work with the previous version of iMovie, but you can delete them if you no longer want to work with them. To learn more, visit Removing old libraries after updating.

Last Modified: Nov 20, 2013
Helpful?
Yes
No
One Moment Please
Thanks for your feedback.
Email this article
Print this page
  • Last Modified: Nov 20, 2013
  • Article: HT6012
  • Views:

    6472
  • Rating:
    • 47.0

    (243 Responses)

Additional Product Support Information

iLife: System requirements

Posted in Apple Portable Computers

Learn more about iLife system requirements.

Mac Apps (2013) system requirements

iPhoto 9.5

  • OS X Mavericks 
  • Mac with Intel Core 2 Duo, Core i3, Core i5, Core i7, or Xeon processor
  • Recommended: 4 GB RAM with i3 processor (or faster)

iMovie 10.0.1

  • OS X Mavericks 
  • 2 GB of memory (4 GB recommended)

GarageBand 10.0

  • OS X Mavericks
  • Mac with Intel Core 2 Duo, Core i3, Core i5, Core i7, or Xeon processor
  • Recommended: 4 GB RAM with i3 processor (or faster)


System requirements for older versions of iLife

Additional Information

The Mac App Store also has system requirements for current versions of iLife applications (iPhoto, iMovie, and GarageBand).

Last Modified: Nov 20, 2013
Helpful?
Yes
No
One Moment Please
Thanks for your feedback.
Email this article
Print this page
  • Last Modified: Nov 20, 2013
  • Article: HT4411
  • Views:

    159242
  • Rating:
    • 58.0

    (572 Responses)

Additional Product Support Information

iBooks Author worldwide support contacts

Posted in Apple Portable Computers

Here's how to contact Apple for iBooks Author support.

Use this table to find the phone number for iBooks Author support for your country.

Australia 1-300-307-504 (low tariff number)
Hours: 9:00 a.m. to 7:00 p.m. U.S. central time, Monday–Friday
Austria 0800 070 2672
Hours: 9:00 a.m. to 7:00 p.m. U.S. central time, Monday–Friday
English only
Denmark 80 25 16 19
Hours: 9:00 a.m. to 7:00 p.m. U.S. central time, Monday–Friday
English only
France Metropolitan: (33) 0805 540 117
Hours: 9:00 a.m. to 7:00 p.m. U.S. central time, Monday–Friday
English only
Germany 0800 6645 307
Hours: 9:00 a.m. to 7:00 p.m. U.S. central time, Monday–Friday
English only
Ireland 0800 975 06153
Hours: 9:00 a.m. to 7:00 p.m. U.S. central time, Monday–Friday
Italy Telephone support: 800 915 902
Hours: 9:00 a.m. to 7:00 p.m. U.S. central time, Monday–Friday
English only
Japan iBooks Author email support at ibooksjp@apple.com 9:00 a.m. to 5:00 p.m. Japan standard time
Monday–Friday
English, 日本語
Netherlands 0800 0201 578
Hours: 9:00 a.m. to 7:00 p.m. U.S. central time, Monday–Friday
English only
Norway 800 56 951
Hours: 9:00 a.m. to 7:00 p.m. U.S. central time, Monday–Friday
English only
Spain Telephone support: 900 812 687
Hours: 9:00 a.m. to 7:00 p.m. U.S. central time, Monday–Friday
English only
Sweden (46) 020 100 528
Hours: 9:00 a.m. to 7:00 p.m. U.S. central time, Monday–Friday
English only
United States and
Canada
1-877-206-2092 (toll-free from United States and Canada)
Hours: 9:00 a.m. to 7:00 p.m. central time, Monday–Friday
United Kingdom 0800 975 06153
Hours: 9:00 a.m. to 7:00 p.m. U.S. central time, Monday–Friday
  1. Telephone numbers and hours of operation are subject to change.
  2. Local and national telephone rates apply.
  3. The cost is 0.05 GBP per minute when dialed from a landline within the United Kingdom. Call charges may vary when calling from a mobile phone.
Last Modified: Nov 19, 2013
Helpful?
Yes
No
One Moment Please
Thanks for your feedback.
Email this article
Print this page
  • Last Modified: Nov 19, 2013
  • Article: HT5901
  • Views:

    18

    Additional Product Support Information

    iPhoto '11 or later: About the Library Upgrader

    Posted in Apple Portable Computers

    Learn about the iPhoto Library Upgrader.

    The iPhoto Library Upgrader is a tool that prepares libraries from iPhoto 7 or earlier so you can upgrade them with the current version of iPhoto. You can download the tool here

    Note: If your library is from iPhoto 8 or later this tool is not required.

    Last Modified: Oct 22, 2013
    Helpful?
    Yes
    No
    One Moment Please
    Thanks for your feedback.
    Email this article
    Print this page
    • Last Modified: Oct 22, 2013
    • Article: HT5037
    • Views:

      324839
    • Rating:
      • 47.0

      (6156 Responses)

    Additional Product Support Information