Knowledge base

How to choose a startup disk on your Mac

Posted in Apple Mac OS

Temporarily change your startup disk with Startup Manager

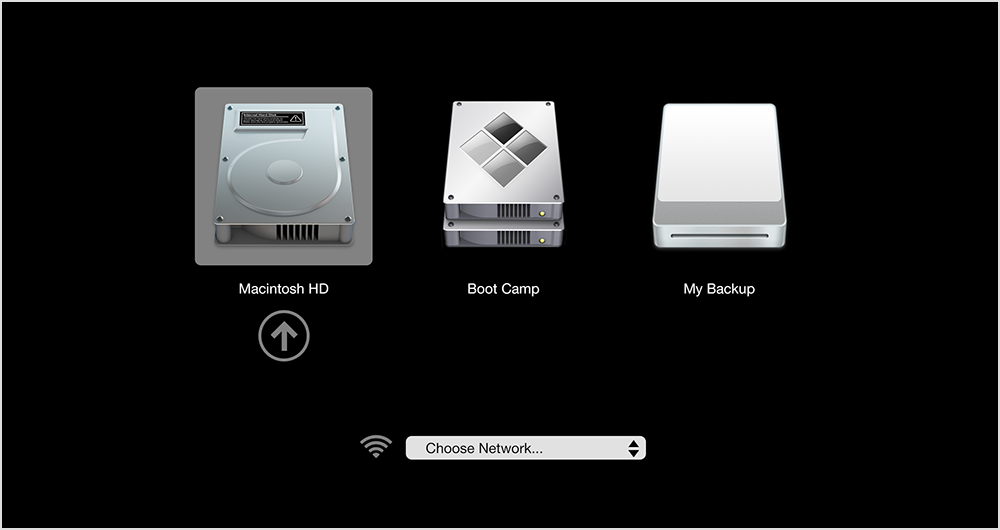
Startup Manager allows you to pick a volume to start from while the computer is starting up.

Use these steps to choose a startup disk with Startup Manager:

  1. Turn on or restart your Mac.
  2. Immediately press and hold the Option key. After a few seconds, the Startup Manager appears. If you don't see the volume you want to use, wait a few moments for Startup Manager to finish scanning connected drives.
  3. Use your mouse or trackpad, or left and right arrow keys to select the volume you want to use.
  4. Double-click or press the Return key to start up your Mac from the volume you selected.

If you have an optical drive connected to your computer, you can insert an installation disc to see it in Startup Manager. You can also attach FireWire or USB external hard drives that contain an operating system to add to the list of startup volumes. Startup Manager automatically adds bootable volumes as you connect them.

Read Full Article

How to type accents, emoji, and symbols on your Mac

Posted in Apple Mac OS

Accented characters

To type an accented or alternate version of a character, hold a key down until its alternate characters are displayed. 

To choose one of the characters displayed, type the number that appears under the character, or click the character you want to use. If you decide you don't want to type an accented character after holding a key, type another character, or press the escape (Esc) key.

If no additional characters are available for the key you're holding, the pop-over menu doesn't appear. The menu also isn't displayed when the Key Repeat slider is set to Off in the Keyboard pane of System Preferences.

Read Full Article

How to troubleshoot Wi-Fi connectivity in OS X Lion or earlier

Posted in Apple Mac OS

  • If you are still not able to get online, make sure that your computer has joined the correct Wi-Fi network.

    Your Wi-Fi network should be listed in the Wi-Fi menu. The Wi-Fi network with which your Mac is associated will be checked, as shown below:

    Select your network if it is not chosen. If your Wi-Fi network is secured using a password, you will be prompted to enter a password as shown below.

    AirPort authentication

    Note: If you do not know your network password, you will need to contact the administrator of your Wi-Fi network. If you are the administrator/owner of the network, you may need to configure your router in order to define the password for the network.

    Your Wi-Fi network may not be visible in the list. If the network is closed, it will not broadcast its network name. In order to join the Wi-Fi network, choose Join Other Network from the Wi-Fi menu. You will be prompted for the network name and security setting.

    AirPort closed network authentication

    Enter the name of your network and choose the Security your network uses.

    If your network is still not visible in your Wi-Fi network list, then it may be using an incompatible Wi-Fi standard. Most Macs support all common Wi-Fi standards. To check which standards your Mac supports, use Network Utility. Set the network interface to Wi-Fi and examine the information listed after "Model:"

  • Read Full Article

    iCloud storage upgrades and downgrades

    Posted in Apple Mac OS

    When you sign up for iCloud, you automatically get 5 GB of free storage for Mail, Backup, iCloud Photo Library, and iCloud Drive. Your purchased music, movies, apps, books, TV shows, and shared albums don’t count against that free storage. If you need more iCloud storage, you have two options:

    If you have an annual plan, you can upgrade or downgrade to one of the monthly plans above only.

    Read Full Article

    Manage your iCloud storage

    Posted in Apple Mac OS

    Reduce the size of your Photo Library

    If you don't use iCloud Photo Library, your Camera Roll is part of your iCloud backup. To check the size of the backup on your device in iOS 8 or later, tap Settings > iCloud > Storage > Manage Storage. (If you're using an earlier version of iOS, tap Settings > iCloud > Storage & Backup > Manage Storage.) Then tap the name of your iOS device. The backup size is under Photo Library. 

    To reduce the size of your Photo Library backup, save your photos and videos to your computer, then manually back up your iOS device. If you want to keep your photos and videos on your iOS device, you can turn off Photo Library in Backup using the steps above or purchase more storage. If there are any photos that you don't want to keep, you can delete them. Just open photos and select the item you want to delete. Then click the Trash icon and tap Delete Photo.

    iCloud Drive

    You can manage which files are stored in iCloud Drive from your Mac, PC, iPhone, iPad, or iPod touch.

    iOS

    You can use these steps to manage your files from your iPhone, iPad, or iPod touch:

    1. Tap Settings > iCloud.
      • If you're using iOS 8 or later, tap Storage > Manage Storage > iCloud Drive. 
      • If you're using an earlier version of iOS, tap Storage & Backup, then tap Manage Storage.
    2. Tap the name of the app that's using iCloud Drive.
    3. The individual files in that app will appear. You can either swipe left or click the Edit button to remove files.

    OS X Yosemite

    On a Mac using OS X Yosemite, you can manage your iCloud Drive files using the iCloud Drive folder in Finder:

    1. If you need to, turn on iCloud Drive on your Mac:
      1. Go to Apple menu > System Preferences and click iCloud.
      2. Sign in with your Apple ID.
      3. Turn on iCloud Drive. In Options, make sure that you select the apps for the files you want to manage.
    2. Open Finder and go to the iCloud Drive folder.
    3. Drag an item to the Trash, or move it to a different folder on your Mac.

    Windows

    On a PC using Windows 7 or later, you can manage your iCloud Drive files using Windows Explorer. Use these steps to add an iCloud Drive folder to Windows Explorer:

    1. Download and install iCloud for Windows.
    2. Sign in with your Apple ID.
    3. Enable iCloud Drive.

    iCloud.com

    You can manage your files from the iCloud Drive app at iCloud.com. Sign in to iCloud.com, click the iCloud Drive app, select the files that you want to delete, then click the Trash icon.

    Mail

    You can free up iCloud storage space by deleting email messages from your iCloud email account. You can also move email messages from your iOS device to your Mac or PC, where they no longer count against your iCloud storage.

    Use the steps below to delete messages from your account. Remember that messages with large attachments take up more space than simple text emails.

    iOS

    If your iOS device is configured to access iCloud email, you can delete messages from any mailbox, then empty the Trash to free up space:

    1. Swipe left across any message to delete it.
    2. Tap your Trash folder.
    3. Delete messages one at a time or delete all of them by tapping Edit, then tapping Delete All.

    OS X or Windows

    If you're using iCloud Mail with a desktop email app, such as OS X Mail or Microsoft Outlook, use these steps:

    • OS X Mail: Delete the messages that you no longer want, then choose Mailbox > Erase Deleted Items and select your iCloud email account from the menu.
    • Microsoft Outlook 2007 (Windows): Delete the messages that you no longer want, then choose Edit > Purge and select your iCloud account from the menu.
    • Microsoft Outlook 2010 and Outlook 2013 (Windows): Delete the messages that you no longer want. Outlook will permanently delete your messages the next time you close and restart the app.

    iCloud.com

    1. From your computer, sign in to iCloud.com.
    2. Click Mail.
    3. Delete the messages that you no longer want, then click the gear icon and select Empty Trash.

    Read Full Article

    Set up an Apple ID in iTunes

    Posted in Apple Mac OS

    To purchase and download from the iTunes Store, you need an Apple ID. If you've used other Apple services such as iCloud, the Mac App Store, or have purchased from the Apple Online Store, you can sign in to the iTunes Store using that same Apple ID.

    Before you create a new Apple ID, find out if you already have one. If you don't have an Apple ID, you can create one before you can start using the iTunes Store. 

    Create an Apple ID on a computer.

    Create an Apple ID on an iPhone, iPad, or iPod Touch.

    Read Full Article

    Final Cut Express: Troubleshooting Basics

    Posted in Apple Mac OS

    1. Open the Applications folder. Drag the Final Cut Express application to the Trash.
    2. Go to /Library/Receipts.
    3. In the Receipts folder, select the FinalCutExpress.pkg file.
    4. Choose View > as List to view the contents in a list.
    5. Click the Date Modified column header so you can easily see all of the receipts that were installed at the same time as Final Cut Express.
    6. Drag the FinalCutExpress.pkg receipt to the Trash, as well as any other items that have the same modification date within 3 minutes of the FinalCutExpress.pkg's modification date.
    7. Click the Name column header to sort the list alphabetically.
    8. Drag any other receipts whose names begin with "Final Cut Express" to the Trash.
    9. Insert your Final Cut Express installation disc and install Final Cut Express.
    10. When finished, choose Software Update from the Apple () menu to update your software to the latest version.

    Read Full Article

    Use iMovie (2014) with iCloud Drive

    Posted in Apple Mac OS

    iCloud Drive makes it easy to access files from all of your devices. Learn more about iCloud Drive.

    You can use iCloud Drive to store different types of files that you can use with iMovie, including:

    To export files to or import files from iCloud, you need an iCloud account and turn on iCloud Drive.

    iMovie for Mac libraries are not supported on iCloud Drive. If you want to move iMovie libraries between Mac computers, the best way to do so is by using an external drive. Learn how to move your iMovie library to a new location.

    Read Full Article

    Set up your Apple Watch

    Posted in Apple Mac OS

    Review your settings.

    Your iPhone settings for Usage and Diagnostics, Location Services, and Siri will transfer to your Apple Watch, and the other way around. So if you change the settings of these services, those changes will apply to both of your devices.
     

    Read Full Article

    Identify your iPod model

    Posted in Apple Mac OS

    iPod (5th generation Late 2006)—also known as iPod with video or Fifth Generation iPod

    • Navigation: Click Wheel
    • Capacity: 30 and 80 GB
    • Model number and date introduced: A1238: 2006-09

    The last three characters of the serial number will be one of these: V9K, V9P, V9M, V9R, V9L, V9N, V9Q, V9S, WU9, WUA, WUB, WUC, or X3N. The Fifth Generation U2 Special Edition iPod (30 GB Late 2006) serial number's last three characters are W9G.

    Read Full Article