Knowledge base

Resolve iOS update and restore errors in iTunes

Posted in Apple Mac OS

Information about products not manufactured by Apple, or independent websites not controlled or tested by Apple, is provided without recommendation or endorsement. Apple assumes no responsibility with regard to the selection, performance, or use of third-party websites or products. Apple makes no representations regarding third-party website accuracy or reliability. Risks are inherent in the use of the Internet. Contact the vendor for additional information.

Read Full Article

How to erase your iOS device and then set it up as a new device or restore it from backups

Posted in Apple Mac OS

Erase your device

Erasing all content and settings will delete all of the data from your device, including songs, videos, contacts, photos, calendar information, and anything else. All device settings are restored to their factory condition.

To remove all settings and information from your device, tap Settings > General > Reset > Erase All Content and Settings. Learn more about "Erase All Content and Settings."

If you can't erase your device, restore the device using iTunes.

Read Full Article

If you can't update or restore your iPhone, iPad, or iPod touch

Posted in Apple Mac OS

Use recovery mode

You might need to use recovery mode to restore your device in these cases:

  • iTunes doesn't recognize your device or says it's in recovery mode.
  • You see the Apple logo onscreen for several minutes with no progress bar.
  • You see the Connect to iTunes screen.

Learn what to do if you see the progress bar onscreen for several minutes.

To put your device into recovery mode, follow these steps:

  1. Turn off your device and leave it off.
  2. Plug in your device's USB cable to a computer with iTunes. 
  3. Hold down the Home button on your device as you connect the USB cable. Keep holding down the Home button until you see the Connect to iTunes screen.
    Screenshot showing the Connect to iTunes screen on iOS.
  4. When you see this screen, release the Home button. If you don't see this screen, try steps 1 through 3 again. 

When your device is connected, iTunes will open. You'll see a message saying that iTunes has detected an iPhone, iPad, or iPod touch in recovery mode.

iTunes dialog: "iTunes has detected an iPhone in recovery mode. You must restore this iPhone before it can be used with iTunes."

Use iTunes to restore your device. Restoring in recovery mode will erase your device. If you previously synced with iTunes or iCloud, you might be able to restore from your backup.

Read Full Article

Can't change the country of your iTunes Store, App Store, iBooks Store, or Mac App Store account

Posted in Apple Mac OS

Store credit balance

You must spend your balance before you can change stores.

If your store credit is less than the cost of a single item on the iTunes Store, App Store, iBooks Store, or Mac App Store, you can add a credit card to your account. When you buy an item, you will use the remaining store credit and charge the remainder of the purchase to your credit card.

If you don't have a credit card, contact iTunes Store support.

Read Full Article

Force an app to close on your Mac

Posted in Apple Mac OS

Learn more

Generally, you shouldn't need to use Force Quit unless you can't close an app normally.

The Finder is an app that your Mac keeps open, so there isn't an option to quit or close this app. If the Finder becomes unresponsive, you can use Force Quit to relaunch it. Select Finder in the Force Quit window, then click Relaunch.

If none of your apps are responsive, you can force your computer to restart.

Read Full Article

How to move data to your new Mac using Mountain Lion and earlier

Posted in Apple Mac OS

Migrating using FireWire or ThunderBolt

Note: If you are migrating from Mac OS X v10.4 to OS X Lion, see the Additional Information section below. Migrating from OS X Tiger v10.4 or earlier to OS X Mountain Lion v10.8 or later using Migration Assistant is not supported; see the Additional Information section below for more information.

  1. Make sure both computers are connected via FireWire or ThunderBolt before starting. If you connect the cables after Migration Assistant is already running, the source computer may not be properly detected.
  2. Restart the source (original) Mac while pressing and holding the "T" key.
  3. Open Migration Assistant (located in /Applications/Utilities/) on the target Mac, then click Continue.
  4. When the target Mac asks you for a migration method, select "From another Mac, PC, Time Machine backup, or other disk", and click Continue.
  5. Type in your admin password when prompted, and click OK.
  6. Select "From a Time Machine backup or other disk".
  7. Select the system that you would like to migrate.
  8. Your target Mac will ask you to select items to migrate.
  9. You can customize your selection by clicking to expand the disclosure triangles.
  10. After you click Continue, the Migration Assistant will begin to transfer files to your new Mac. The amount of time that it takes for migration to complete depends on the amount of data being transferred.

Note: To view documents that were migrated, choose Log Out from the Apple () menu, then login as the migrated user. The migrated documents will be located in the migrated user's home folder.

Read Full Article

Mac Basics: Use Mail on your Mac

Posted in Apple Mac OS

Attachments

To include an attachment, like an image or a document, drag it into your email message. Or click the Attachment button   in the message window, or choose File > Attach Files. Messages with attachments display a paper clip icon.

When you receive an attachment, double-click it to open it. You can also drag attachments out of the email message window, or choose File > Save Attachments if you want to keep the attached files somewhere else on your drive.

Mail Drop

In OS X Yosemite, you can use Mail Drop to send large files (up to 5 GB per message) like videos, presentations, and folders of images without having to worry about your email provider’s limitations on file size. Mail Drop is a free service built in to Mail in Yosemite and works with any email service as long as you are signed into iCloud on your Mac.

When you send a large attachment, Mail can automatically upload it to iCloud. If your recipients use Mail, they receive the attachment as part of your message. If they use another app or webmail, they receive a link to download the files. All you do is click Send, and Mail does the rest. Attachments are available for 30 days and don’t count against your iCloud storage.

Read Full Article

Mac Basics: Dictation lets you speak text instead of typing

Posted in Apple Mac OS

Accents, dialects and languages

The more you use Dictation, the better it understands you. Dictation learns the characteristics of your voice and adapts to your accent. For best results, select your dialect from the Language menu in the Dictation pane of System Preferences. Note that some languages (such as English) have multiple options available to choose from.

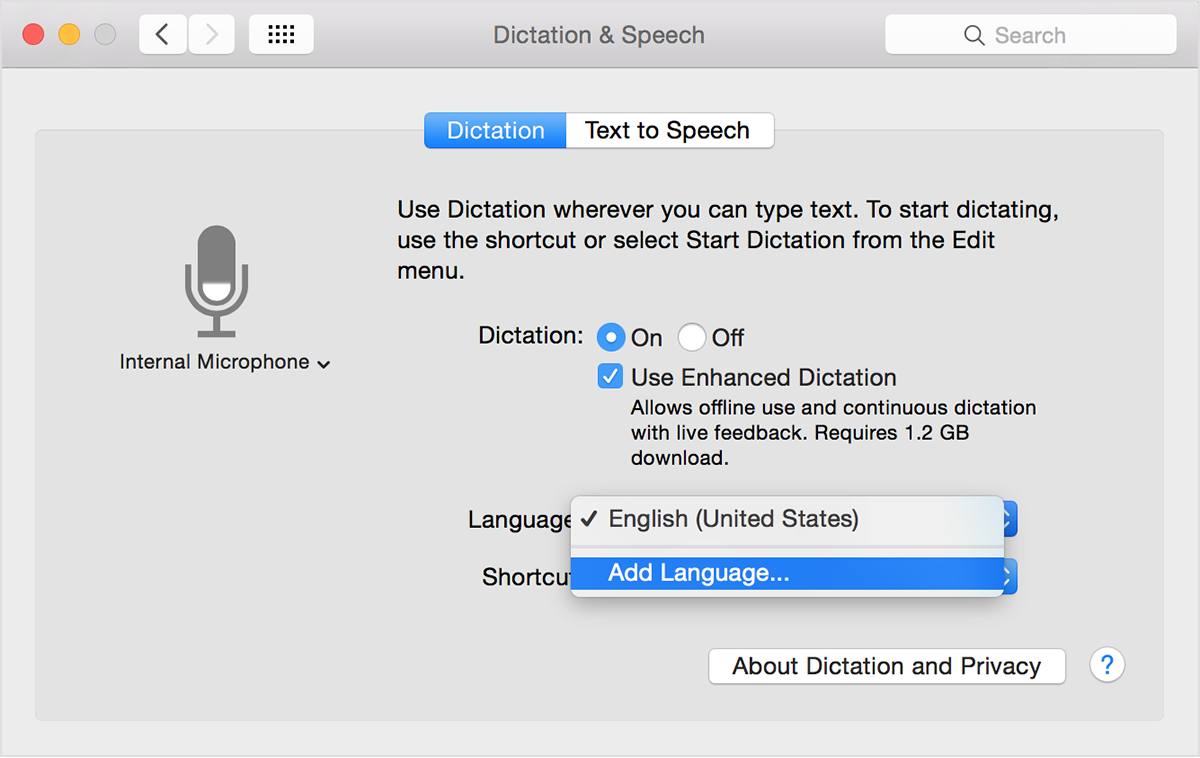
You can select which language to use for Dictation in the Dictation and Speech pane of System Preferences. If you don't see your language listed, you can add it. Make sure you are connected to the Internet, then follow these steps to add or remove a language for Dictation.

  1. From the Apple menu, choose System Preferences.
  2. Click the Dictation & Speech icon.
  3. Choose Add Language. from the Language pop-up menu.
  4. Select any languages you want to add. Deselect languages you no longer want to use.

The software needed for each language you select downloads from Apple. In OS X Yosemite, you can recover the disk space used by an installed language when you remove it. If you need to use the language again, the software downloads the next time you select the language.

Dictation in OS X Mountain Lion and later supports English (U.S., UK, and Australia), French, German, Japanese, Mandarin, Cantonese, Spanish, Korean, Canadian English, Canadian French, and Italian. Enhanced Dictation supports even more languages. To see a complete list, enable Enhanced Dictation and select Add Language from the Language menu.

Read Full Article