Knowledge base

Finding Audio Units plug-ins on your computer

Posted in Apple Logic

User Rating:  / 0

Audio Units are plug-ins that can be used to process audio by applications such as Logic Pro, Logic Express, Soundtrack Pro, GarageBand, and others. All Mac computers include a collection of Apple Audio Units, and many other manufacturers distribute plug-ins in Audio Units format.

Read Full Article

Logic Pro 8 and 9: Troubleshooting basics

Posted in Apple Logic

User Rating:  / 0

If Logic Pro isn't starting up properly or performing normally, try these basic troubleshooting steps to remedy the situation. Please note that these steps aren't exhaustive, and are not intended to cover any specific issue. They are fundamental, basic steps that are most effective in getting Logic Pro into good working order, and are the steps most often suggested by AppleCare Technical Support. If you are running Logic Pro 7, click here.

Read Full Article

Logic Pro/Express 8 and 9: How overlapping recordings are assigned to take folders

Posted in Apple Logic

User Rating:  / 0

Basic Principles

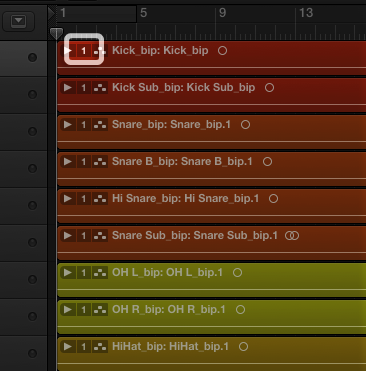
When you record audio to a track in Logic 8 and 9, the basic operation is the same as it ever was. A region is created on the track.

When you record over the same section of the timeline on the track, a take folder is created that contains all the recordings made on the track so far.

If you record in a new section of the song where there is no overlap, then a new region will be created.

Additional recording over the new section will result in a new take folder.

For more information on the basic operation of Takes in Logic 8 and 9, see the User's Guide. Now let's discuss the behavior of takes in cases where recordings overlap in various ways.

New recordings that partially overlap the end of an existing region

Let's say that you have a region on a track that spans bars one to five, and you make a new recording that starts a bit before bar five and continues past the end of the existing recording. Logic will either create a new independent region or a take folder that encompasses both the new and existing recordings. There are two factors that determine which will happen:


  • The count-in or pre-roll setting in Logic's Recording Options
  • 
	
  • The amount of overlap between the new and existing recordings
  • 


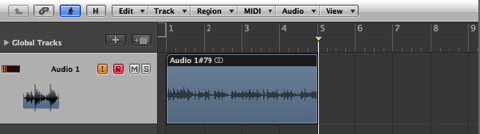
Logic compares these two intervals. If the overlap between the existing region and the new recording is equal to or less than the count-in or pre-roll, a new independent region is created.

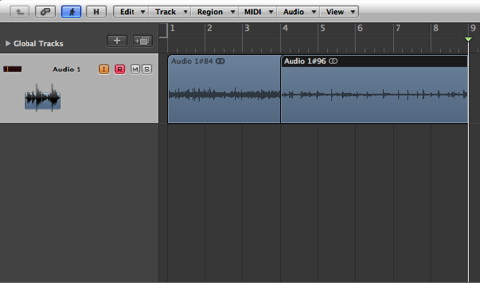
In the above image, a new recording was made starting at measure four, with a count-in setting of one measure. Because the overlap was one measure, which equaled the count-in setting, a new region was created. When this track is played, the original recording will play, until the start of the new region, which will play from that point onward.

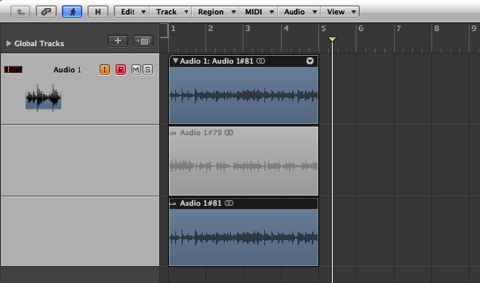
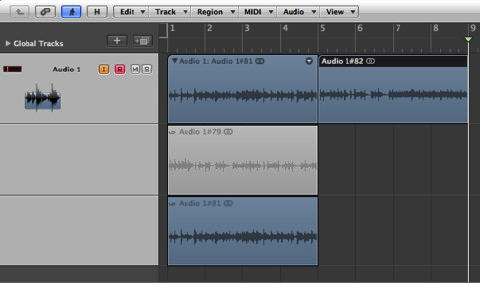
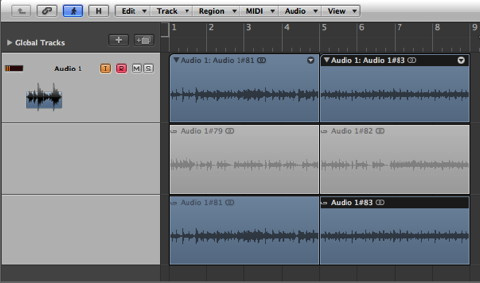
If the new recording overlaps the existing recording by more than the count-in or pre-roll setting, a take folder is created that encompasses both recordings.

In the above image, a new recording was made starting at 3 4 1 1, which overlapped the original recording by one measure plus one beat. Because this overlap is larger than the one measure count-in setting, a take folder was created extending from bar one to bar nine.

Keep in mind that the amount of overlap necessary to cause take folder creation will vary, depending on your count-in/pre-roll setting. If you specify a count-in of "none", then the "grace period" for take folder creation is two beats.

Recordings that span two adjoining regions or take folders

When new recordings overlap two adjoining take folders, the same basic interaction of count-in/pre-roll and amount of overlap apply. There are more possible variations, because Logic considers the amount of overlap in both directions. Let's look at four scenarios:

In the first scenario, the new recording starts less than the count-in/pre-roll amount from the end of the first take folder, and then continues into the second folder.

Logic places the new recording entirely within the second take folder, and extends it enough to the left to accommodate the new recording.

In the second scenario, the new recording starts well before the end of the first existing take folder, and extends less than the count-in/pre-roll amount into the second folder.

Logic places the entire recording entirely within the first take folder.

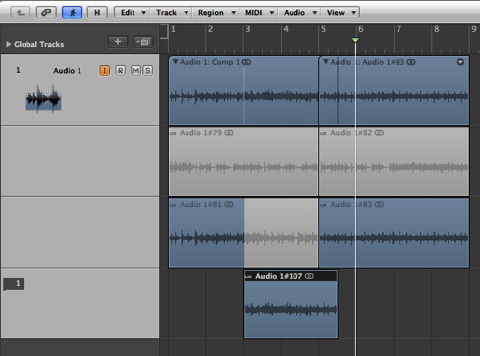
In the third scenario, the new recording overlaps both the first and second take folders by more than the count-in/pre-roll length.

The new recording is divided between the two take folders.

In the fourth scenario, the new recording overlaps both of the take folders by less than or equal to the count-in/pre-roll length.

An independent region belonging to neither take folder is created.

Read Full Article

Logic Pro/Express: Tips for balancing multi-core performance

Posted in Apple Logic

User Rating:  / 0

About core activity

Logic breaks tasks down into threads that can be assigned to a single core for execution. It's not possible to split a single thread across multiple cores, although a single core may run multiple threads at the same time. This is one reason that you may sometimes see uneven load distributions across the available cores on your computer. If one thread is very processor-intensive, the core running that thread may show much more activity than the cores running less demanding tasks. This is the main reason that you may get "Core Audio Overload" warning messages even though some of the cores on your system may not show significant activity. 

To monitor Logic as it uses the cores on your system, double-click the CPU meter in the Transport area.

A window displays a meter for each core.

The same concept applies to channel strips as well. Each channel strip—and all plug-ins it contains—is processed by one core. If you are using many processor-intensive plug-ins on a single channel strip, the core running it may show heavier activity. This is especially true if you are working at high sample rates (88.2 kHz or higher). 

Redistributing core loads

If you find that a single core has much higher activity, use these strategies to redistribute the load.

In the example below, there is a single Software Instrument channel strip with plug-ins routed directly to Output 1-2. The channel strip for Output 1-2 has a large number of plug-ins.

In this example there is activity on two cores:  the left core is handling the Software Instrument while the next core processes the Output 1-2 channel strip. You can use routing capabilities in Logic to distribute the load to more cores without changing the sound, as in the next image.

The resulting signal chain is Inst 1 > Aux 1 > Aux 2 > Out 1-2, as shown in this table:


Channel stripInput Output
 Inst 1  Bus 1
 Aux 1 Bus 1 Bus 2
 Aux 2 Bus 2 Out 1-2

Also, the first four plug-ins have moved from Output 1-2 to Aux 1 and the remaining four plug-ins to Aux 2. 

After adjusting the volumes to the respective channel strips appropriately, the result sounds identical, but now the load is distributed among four cores instead of two. You can use this concept to redistribute plug-ins from Audio channel strips, Software Instruments, Auxes, and Outputs (as in this example).

In the image above, there is still a very heavy load on a single core, even though it's using the routing described above. Notice the Inst 1 channel strip is selected. When a Software Instrument track is selected in the Arrange window, Logic enters "Live Input Mode". In this mode, Logic turns on every plug-in in the channel strip's signal path so the channel strip can be played live from a MIDI controller. All of this must be handled by a single thread and therefore just one core. It's a good idea to keep a track that uses an Audio channel strip selected in the Arrange window, unless you're actively playing or recording to a Software Instrument.

Read Full Article

Logic Pro X, MainStage 3: Where Apple Loops are installed

Posted in Apple Logic

User Rating:  / 0

When you install Logic Pro X or MainStage 3 and choose to install all the additional content, the Apple Loops are installed in /Library/Audio/Apple Loops/Apple. There will be a folder there for each collection installed:


  • 01 Hip Hop
  • 

  • 02 Electro House
  • 

  • 03 Dubstep
  • 

  • 04 Modern RnB
  • 

  • 05 Tech House
  • 

  • 06 Deep House
  • 

  • 07 Chillwave
  • 

  • Apple Loops for GarageBand
  • 

  • iLife Sound Effects
  • 

  • Jam Pack 1
  • 

  • Jam Pack Remix Tools
  • 

  • Jam Pack Rhythm Section
  • 

  • Jam Pack Symphony Orchestra
  • 

  • Jam Pack Voices
  • 

  • Jam Pack World Music
    

  • 


Loops you create in Logic Pro X are saved in your Home folder under /Audio/Apple Loops/User Loops/. To access these loops from the Finder:


  1. Choose Go > Go to Folder from the menu bar.
  2. 

  3. Type ~/Library/Audio/Apple Loops in the "Go to the folder" field.
  4. 

  5. Press the Go button.
  6. 


Read Full Article

Logic Pro X: Tips for phase-locked drum edits

Posted in Apple Logic

User Rating:  / 0

Use Flex editing to adjust the timing of groups of drums tracks while maintaining phase accuracy among the tracks.

Create a Group

First create a group for the drum tracks. You should do this before you record the tracks, but you can do this afterward if necessary. However, you need to create the group before you start editing the drum tracks. To create the group with these steps.


  1. Click inside the group slot in one of the drum track channel strips.
    
	
  2. 


  3. Choose a new group from the drop-down menu.
    
	
  4. 


  5. The Group Settings panel will open in the Inspector. Click to enable the options for Editing, Phase-Locked Audio, and Record. It's also a good idea to give the the group a descriptive name.
    
	
  6. 


  7. Close the Group Settings, then Option-click the group slot in each of the other drum track channel strips on the Mixer to assign them to the group.
    
	
  8. 


Record and Edit

Record the drum tracks. When you're done recording, use Quick Swipe comping to create the best composite take. Make any other edits, such as copying sections from one part of the song to another, and so on.

Flatten and merge

When you're satisfied with your comping and editing, flatten and merge the take folders with these steps.


  1. Open the Take Folder pop-up menu in the upper left corner of one of the take folders.
    
	
  2. 


  3. Choose "Flatten and Merge" from the menu.


    Note: This is recommended because phase-locked editing requires that all tracks in the group have the same start position and be exactly the same length. By merging all the regions and takes on each track to one audio file, discrepancies are less likely to appear. Also, because Logic's transient detection is file based, you need to go through the process of adjusting transients only once for each Q-Reference track.


  4. 


Choose tracks as Q-Reference

Decide which tracks should be used as Q-Reference tracks that will be used to determine quantization for the group. Typically, a snare and kick drum track are used as reference tracks. If you used multiple microphones on either drum, choose one track for each.


  1. Open one of the tracks you want to use as a reference in the Audio File Editor window and choose Audio File > Detect Transients.
  2. 
	
  3. After Logic analyzes the file, check the transients in the Audio File Editor to make sure they are positioned correctly. Use the plus and minus buttons to add or subtract transients, move incorrectly placed transients, or manually add or remove transients with the pencil or eraser tools.
  4. 
	
  5. Repeat these steps for any other files you will use as Q-Reference.
    
	Note: It's not necessary to adjust the transients for the other tracks in the group; their timing will be adjusted with sample accuracy based on the transients in the Q-Referenced tracks.
  6. 
	
  7. In the Track Header of the Tracks area, enable the Q-Reference button for the tracks to be used as timing reference.


    Note: If you need to return to the Audio File Editor window to adjust the transients for any of the tracks after this stage, it's very important to disable the Q-Reference buttons for all tracks in the group first, otherwise, the transient edits will not carry over to your subsequent timing adjustments.


  8. 
	
  9. In the Track Inspector for one of the tracks, click the Flex drop-down menu and choose one of the Flex Modes. For drums, Slicing is usually the best choice, but feel free to experiment with the others. The Flex Mode will be assigned to all tracks in the group.


  10. 


Enable Flex View in the Tracks area


  1. Click the local Edit menu in Tracks area.
  2. 
	
  3. Choose Show Flex Pitch/Time from the drop-down menu.
    
	
  4. 


Apply Timing Adjustments

Perform your timing adjustments. For example, apply quantization to the tracks, or manually insert flex markers and drag audio in the reference tracks to desired positions.

When you apply quantization, you may find that some transients are quantized to unexpected positions. For example, if you choose a quantize value of 1/8 note, you may find that in places where there is no transient on the 1/8 note grid, a transient in between grid positions, such as an in-between 1/16 note is moved to to the nearest 1/8 note. You can prevent this by setting an appropriate Q-Range value in the region parameter box:


  1. Click the Advanced Quantization disclosure triangle at the bottom of the region parameter box.
  2. 
	
  3. Click the up/down arrows to the right of the Q-Range parameter.
  4. 
	
  5. Choose a relatively short value, such as 1/24 or 1/32. Experiment until you get the result you want.
  6. 


Note: Q-Range limits quantization to transients that fall within the value you choose. For example, if you choose 1/32, then any transient farther away than 1/32 note from the quantization grid you choose will not be quantized.

Read Full Article