Small Room Acoustics - Trevor Wayne Howard
Small room acoustics is a challenging problem to conquer. With so many people working from their homes these days, it happens more and more that we are asked to take a room that is a small rectangle, and make it sound great. As you can imagine, a space like this needs careful treatment to assure that the reflections are tamed, while being careful not to make it too dead. With four drywall walls, a hard ceiling and a hard floor, you have to make good choices with regard to the type of sound control you choose, and their placement.
TV and Film composer Trevor Wayne Howard called upon Audio Perception to treat just such a room. This room was going to be a challenge, mostly because of its size. At just 9' 7" by 14' 2" with a 8' ceiling, the room comes in at 1086 cubic feet, which is 414 ft3 smaller than the 1500 ft3 that is the ITU and EBU minimum recommendation for critical listening rooms. Small rooms typically suffer from difficult acoustic problems more than larger rooms, primarily because of flutter echoes and early reflections that are too short. Small rooms also tend to have the worst room modes or standing wave problems, usually with not enough space in the room to treat them correctly. They also suffer from bass accumulating in the corners.
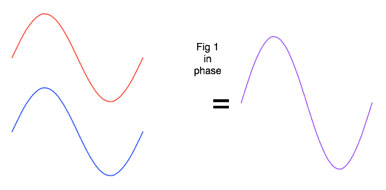 Room modes, also known as standing waves, are particularly difficult to deal with in these situations, and are caused when sound bounces between parallel surfaces. If the wavelength is a multiple of one of the room's dimensions, you will have a standing wave. When two sound waves that are in phase with each other are combined (Fig 1), the
 energy or volume of the resulting wave is increased. When two sound waves that are 180° out of phase with each other are combined (Fig 2), the energy is canceled out. The frequency of 39.9 Hz (Fig 3)
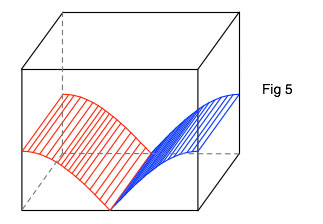
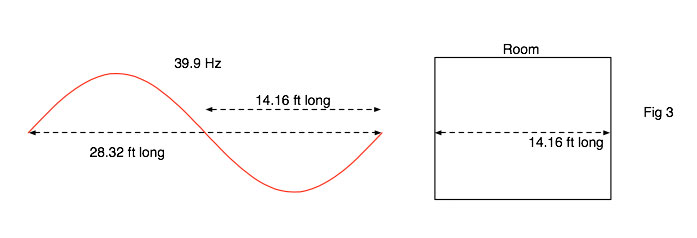 has a wavelength of 28.32 ft long. Resonance modes occur when the distance between the room's walls equals half the wavelength of a sound wave. Since the length of Trevor's room is precisely 14.16 ft (14' 2") which is equal to 1/2 the length of 39.9, a standing wave is formed. The exact center of the room (Fig 4,5)
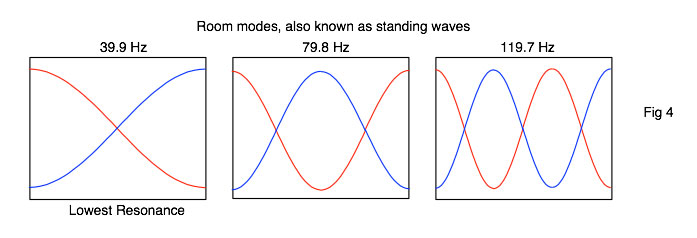 will have complete cancellation of 39.9 Hz, and there is extra volume energy built up along the front and back wall. If we multiply the frequency by two, then there are two dead spots at 79.8 Hz, and three dead spots at 119.7 Hz; the dead spots are called nodes (Fig 6) and the boosted sections of a wave are the anti-nodes. Standing waves are typically a problem in the room at low frequencies below 300 Hz.
When choosing the listening position, you usually want your ears at about 38% of the room depth, or 38% of the distance between the front wall and rear wall. That number isn't carved in stone, it's just a common starting point. You never want the listening position at the 50% point as you will 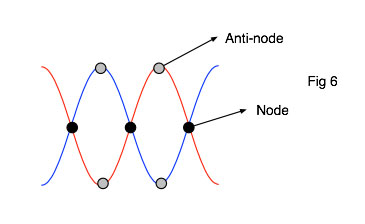
 have many mode problems to deal with. With smaller rooms that is difficult because by the time you get the speakers placed in the room, giving them a little distance from the front wall, and angled properly, the spot where they cross at, the "sweet spot", is usually far out into the room pressing way past the optimal 38% starting point. Unfortunately, in a room of this limited size, you have to make some compromises in the listening position, usually cheating it back a little more than what is optimum. (For a better understanding of studio acoustics, including flutter echoes, room modes, early reflections, speaker placement and more, check out our series on Studio Acoustics here.)
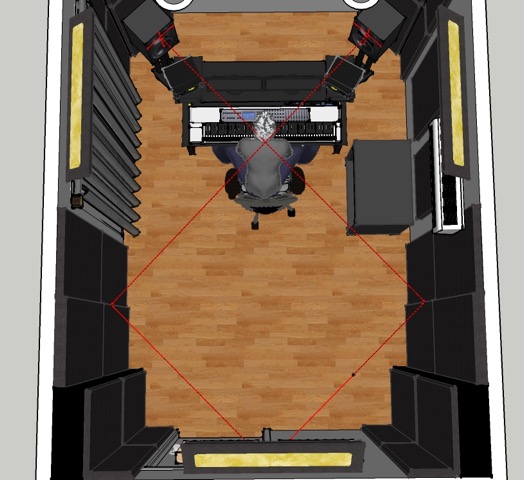
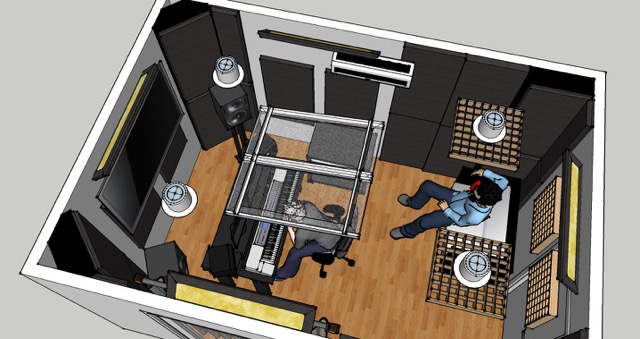 Based around Primacoustic products, we designed Trevor's room treatments in a 3D program. That way Trevor could see the layout before we moved forward. It is important to be able to see what the room is going to look like before we start the install. It gives us a chance to make small changes and see things we might have missed if there were no rendering made. It also allows us to place the speakers in the proper listening position and ray trace the sound path to see where the early reflections will hit the walls. We will also use the render to calculate all the room nodes that may be an issue. That way we can choose from various solutions that will help to make the room sound great. Lastly, we use the 3D drawing to choose the placement of products while avoiding room features like wall switches, vents, air handlers, light fixtures, windows and doors etc.
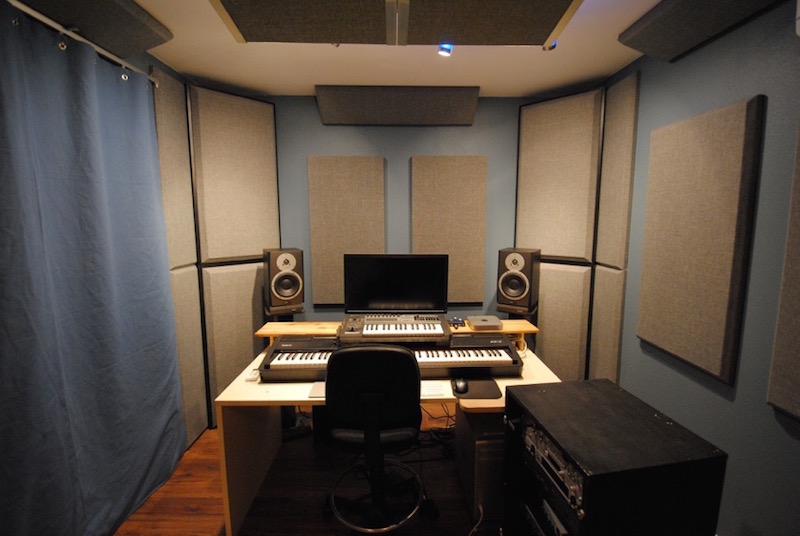
 After we got the go-ahead to start, the installation stage began. The early reflections, reverb time and flutter echoes were addressed with a variety of Primacoustic Broadway broadband absorbers of various thicknesses. We used 1", 2" and 3" panels of various sizes. By using products of different thicknesses, we avoided a common issue where people cover the walls completely using the same product, all with the same thickness. Since the thickness of a panel changes it's frequency response, you get a better spread of frequency absorption around the room if the product thickness varies. If you put the same product around the entire room, you create an issue where the frequency absorption of the panels is the same everywhere, causing a new problem while trying to fix another. To stop the early reflections from the ceiling, we installed a cloud above the listening position.
To alleviate the bass buildup in the corners, we used a variety of bass traps. In the front corners, we used floor to ceiling corner traps, with flat traps in the rear, allowing for more floor space in the back of the room. Around the room where the ceiling meets the wall, we also installed 1' x 4' by 2" thick Broadway panels with an air space behind them, turning them into small bass traps as well.
As we mentioned at the beginning of the article, you have to be very careful when working with small room acoustics. It's very easy to just cover your walls with a bunch of absorbing panels or foam, but at some point it becomes too much and the room starts to sound dead or unnatural. A great sounding room is the correct combination of absorption, diffusion, and reflection. The Primacoustic Broadway panels and bass traps covered the absorption part of the equation well, but what about the diffusion and reflection parts? Going back to the 3D render of the room, we used that to space the panels in such a way as to allow a percentage of the wall's square footage to remain exposed drywall. Careful consideration needs to be paid to the amount and location of this space, as you want to avoid leaving exposed hard surfaces where they may reflect a sound back and forth between two parallel surfaces. You also want to leave the right ratio of open space to absorbed space for a balanced sound in the room.
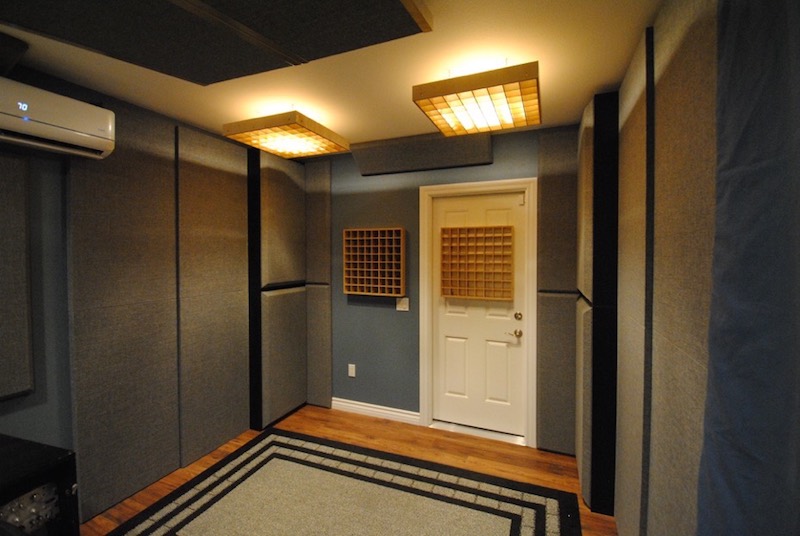
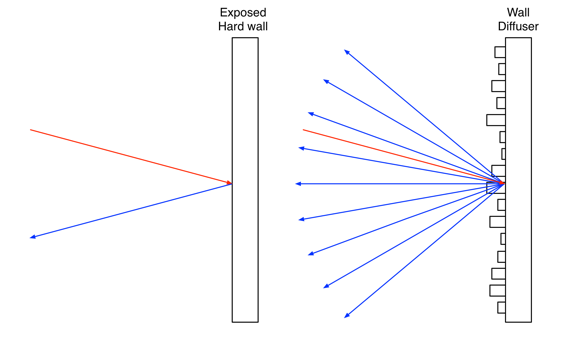 Diffusion is the last piece of the puzzle. Unlike absorption, which removes energy from the sound, therefore removing it from the room, diffusion doesn't remove the energy, it's reflected back into the room. But unlike the exposed hard surfaces that reflect the sound energy straight back into the room, diffusion will instead disperse that energy in a splayed pattern. This way the sound comes back into the room without losing energy, but splayed enough that it doesn't bounce back and forth between two parallel surfaces. In Trevor's room, we used wooden grid type diffusers on the back wall and on the ceiling in the rear of the room. The ceiling diffusers served not only to diffuse the sound, but also to diffuse the ceiling lights in the back of the room, thus providing a very nice visual effect and helping to keep the light out of clients eyes when they look up.
With all of the products in place, we tuned the room to make sure the mixes were accurate and clear. Trevor has been busy working on a few projects and the new room is just what he needed to take his work to the next level. With a more accurate acoustic environment and an interior look that he is proud of when clients come in, he is now working every day in the new space and is thrilled with the results. Click on the video below to see a great time lapse of the install as it progressed and view more photos of the completed project here.