OS X Mavericks: Switch Control helps you navigate your Mac
Enable Switch Control
Here's how you enable Switch Control:
- Choose System Preferences from the Apple menu ().
- Click Accessibility, then select Switch Control from the list of accessibility options.
- Click the General tab, then select Enable Switch Control.
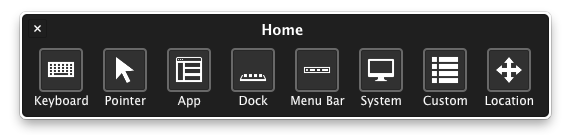
You should now see the Switch Control Home row appear:
To customize Switch Control, select the Navigation or Timing panes in Switch Control Accessibility preferences. To learn about each of these options, click the Help button within the pane.
Setting up switches
Use Switch Control preferences in the Accessibillity pane of System Preferences to set up one or more adaptive switches that perform an action when pressed. You can use a mouse, keyboard or dedicated switch hardware connected over USB or Bluetooth to act as a switch. You can also change an existing switch's actions.
- By default, the spacebar is used as a switch when Switch Control is enabled.
- To add a switch, click the Add button (+), then press your adaptive switch. Enter a name, then select an action such as Stop Scanning. To have the switch run a script or open an app, click Custom, then select the script or an app.
- To remove a switch: Select a switch in the list, then click the Remove button (-).
- To change the behavior of an existing switch, select a switch in the list, click the Action pop-up menu (looks like a gear), then change the name or action. To use a different switch for the action, click Reassign.
Scanning and selecting items
Scan items
By default, when you press the Select Item switch, Switch Control starts stepping through a panel, group, or user interface, highlighting each item or group as it scans. If you select an item, the scan pauses (unless you are using the option to keep scanning after a selection is set). To resume the scan, press the switch. If you turned auto scanning off, press the Move To Next Item switch to advance the scan. Switch Control repeats (or loops) a scan, as set in the Navigation pane.
Select an item
When an item is highlighted, press the Select Item switch. If the selected item is a group (and you didn’t set the option to resume scanning after a selection), press the switch to scan the group, then press the switch to select an item in the group. To exit a group, press the switch when the group is highlighted (or if you hear “step out,” if you set the option to have Switch Control speak while navigating).
If you need to use the pointer to click an item that isn't part of an app's interface, you can use Pointer mode to scan the screen and click an item.
- Click to begin scanning horizontally.
- When the range finder highlights the area you want to click, click your switch again.
- Click another time to precisely refine your horizontal position.
- The next click starts the vertical range finder scan.
- Click again to refine your horizontal position.
- Click your switch a final time to click the element on the scren that is currently under the blue crosshair you created on the screen.
Using panels
Set panel options
In a panel, click the Select Item switch when the Panel Options icon (looks like a gear) in the top-right corner is highlighted. Then, click the switch again when the option you want to set is highlighted. You can decrease or increase the size of the panel, and increase or decrease its transparency.
Return to the Home row
In a panel, click the Select Item switch when the Home icon in the top-right corner is highlighted. In the interface, press the switch when the Home row is highlighted.
Tips for the Home row
|
|
Keyboard |
|
|
Pointer |
|
|
App |
|
|
Dock |
|
|
Menu Bar |
|
|
System |
|
|
Custom |
|
|
Location |