MainStage 2.2.1: Optimizing latency in MainStage 2.2.1
What is latency?
Audio latency is the phenomenon of sound reaching the ear at some point after it was created. In the natural world, latency is caused by physical distance from the sound source. If you are even a few feet from a sound source, there is a delay between the time the sound is created and the time you perceive it. The further away the sound source, the more latency. With digital audio, there is also latency, in this case caused by buffering. MainStage (or any other audio software) needs some time to process audio data before it can be passed on to the Core Audio driver. To accomplish this, the audio is divided into chunks, known as buffers. The size of these buffers determines the amount of latency introduced. Smaller buffers lead to less latency, because the computer is passing audio to the Core Audio driver more frequently. However, because the computer has less time before the next buffer must be processed, it requires more processing power than larger buffer sizes would need. If the computer is unable to completely process one buffer before the next is needed, you hear glitches and dropouts in the audio signal.
Managing Latency in MainStage
MainStage 2.2.1 offers three settings that influence the amount of latency for the system. To access the settings, choose MainStage > Preferences and click the Audio button along the top of the preferences panel.
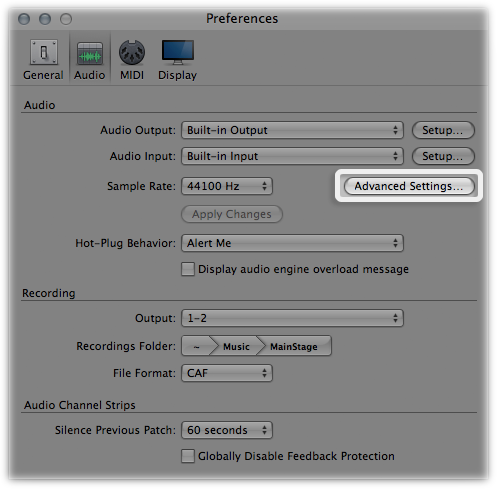
Click the Advanced Settings button on the Audio Preferences panel.
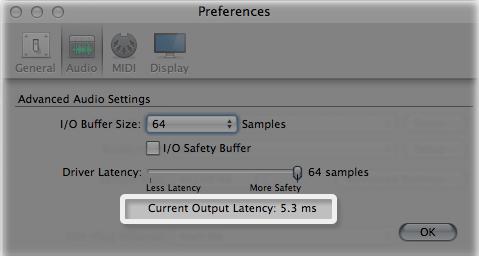
I/O Buffer Size
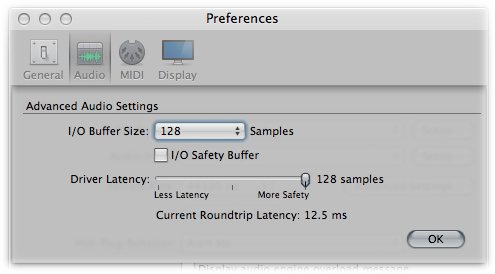
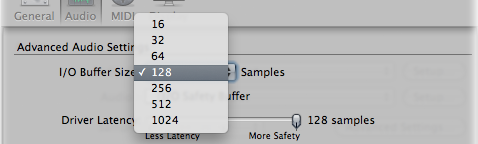
The first, and most important of the settings is the I/O Buffer Size drop-down menu. For audio channel strips, this sets both an input buffer and an output buffer. For software instrument channel strips, it sets only an output buffer, as there is no audio input for these channel strips. The buffer size may range from 16 to 1024 samples.
As you make changes to the I/O Buffer Size, you will see a large change in the Current Roundtrip Latency, as displayed in milliseconds along the bottom of the Advanced Audio Settings panel.
You can click on the Current Roundtrip Latency display to toggle it to show only the Current Output Latency. This is useful to see what the latency for software instrument channel strips will be.
Smaller settings result in a shorter latency, but may mean you can use fewer channel strips and plug-ins simultaneously before you notice unwanted artifacts as you play. Set the I/O Buffer Size based on your particular usage of channel strips and plug-ins, and the processing power offered by your computer. If you use lots of power hungry plug-ins, you may have to use a larger buffer size than if you stick to less processing intensive plug-ins, or fewer simultaneous channel strips.
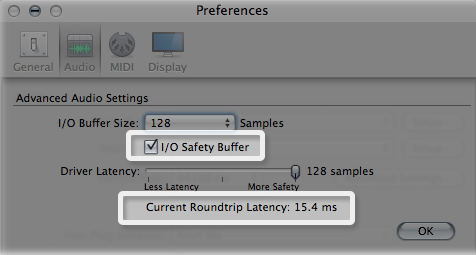
I/O Safety Buffer
The next setting is the I/O Safety Buffer. When this setting is enabled, MainStage adds an additional output buffer to protect against overloads due to unexpected CPU spikes. Its size is equal to the I/O Buffer Size setting, but only affects the output buffer. For example, if you find there is too much latency with an I/O Buffer Size of 256 samples, but you hear dropouts or other audio glitches with an I/O Buffer Size of 128 samples, try setting I/O Buffer Size to 128, and enable the I/O Safety Buffer. This will yield somewhat more latency than 128 samples without the Safety Buffer, but less than 256 samples without it.
Driver Latency Slider
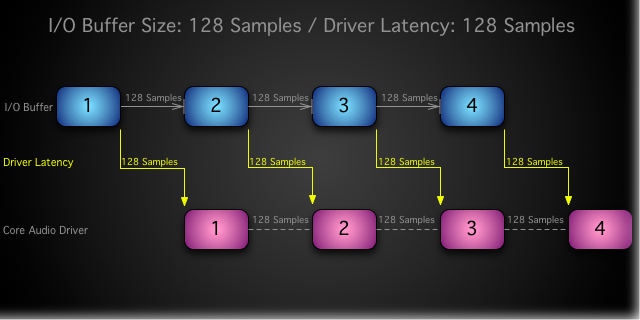
Next is the Driver Latency slider. This is new to MainStage 2.2.1. By default, the slider is set to the maximum possible value, equal to the current I/O Buffer Size, which gives exactly the same behavior as past versions of MainStage. In the illustration below, MainStage is set to a 128 Sample buffer size. Each buffer is represented by a blue block. As MainStage finishes processing a 128 sample buffer, the buffer, represented by the pink blocks, is passed to the Core Audio driver, which passes it to the audio hardware output.
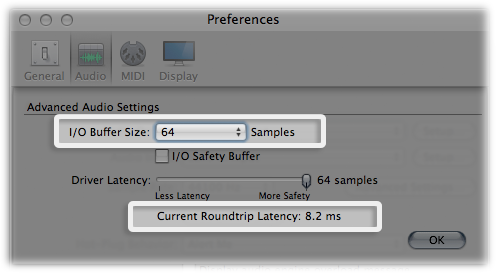
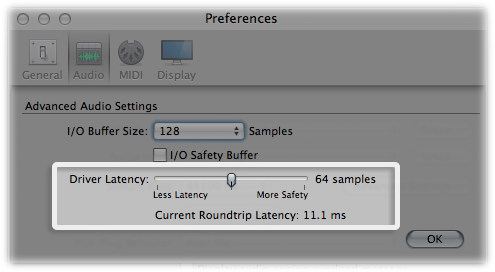
If you move the Driver Latency slider one notch to the left, to 64 samples, the latency for the system goes down by several milliseconds:
The diagram below shows what is happening:
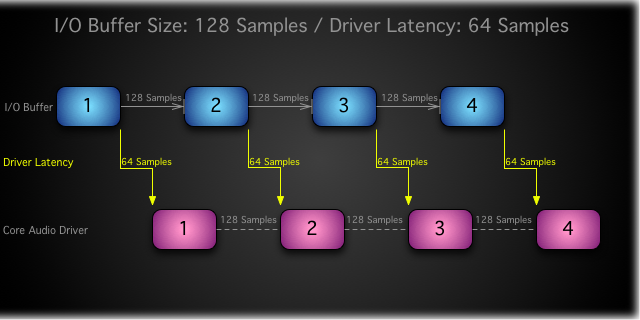
MainStage is still processing audio in 128 sample sized buffers, but rather than waiting the full 128 samples to pass each buffer to the Core Audio driver, it now only waits 64 samples before it begins to pass the buffer to the driver.
As with the I/O Buffer Size, lower Driver Latency settings may lead to dropouts or other audio glitches. The minimum setting possible for a particular system is primarily determined by the audio driver. The Driver Latency setting has no effect on the number of plug-ins or channel strips you can run.
Putting it all together
A good strategy for finding the optimal combination of settings is to start at the top of the Advanced Audio Settings panel, and work your way down. To start, leave the I/O Safety Buffer off, and keep the Driver Latency slider to its right-most, maximum setting:
- Load the most CPU intensive patch you intend to use when you perform.
- Determine the lowest I/O Buffer Size you can use without any audio dropouts or glitches. Keep in mind that this is influenced not only by the processing power of your computer, but by the type and number of plug-ins, and simultaneous number of channel strips you use.
- If the lowest I/O Buffer Size setting you can use gives too much latency for you to perform comfortably, try setting it to the next size lower and enable the I/O Safety Buffer.
- Once you have determined the best buffer settings, try lowering the Driver Latency setting, to further reduce the overall latency of your system. Since the primary factor determining the lowest possible setting is your Core Audio driver, it is a good idea to revisit this setting if you change to a different audio interface, or install an updated driver for your current interface.
Read more http://support.apple.com/kb/HT5155